1. Retro Gaming Console
One of the most popular Raspberry Pi Projects is building a retro gaming console. With the Raspberry Pi 4’s improved performance, you can create a console that emulates classic gaming systems like the Nintendo Entertainment System (NES), Super Nintendo Entertainment System (SNES), PlayStation, and more.
To build a retro gaming console, you’ll need:
– Raspberry Pi 4
– Micro SD card
– Power supply
– HDMI cable
– Game controllers
– Retro gaming software (e.g., RetroPie, RecalBox)
Steps to Build a Retro Gaming Console
- Install the retro gaming software on your Micro SD card.
- Connect your Raspberry Pi 4 to a display using an HDMI cable.
- Connect your game controllers to the Raspberry Pi 4.
- Power on the Raspberry Pi 4 and follow the on-screen instructions to set up your retro gaming console.
| Gaming System | Emulator |
|---|---|
| NES | FCEUX |
| SNES | SNES9x |
| PlayStation | PCSX Reloaded |
| Game Boy | mGBA |
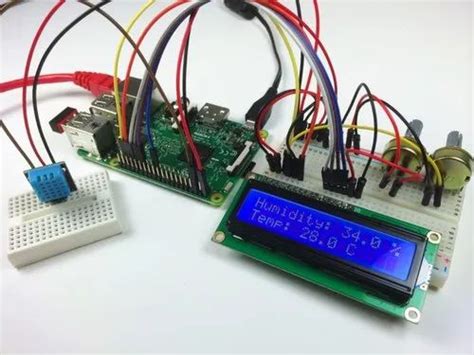
2. Home Automation Hub
The Raspberry Pi 4 can be used to create a powerful home automation hub. With the right sensors and software, you can control your lights, appliances, and security system using your smartphone or voice commands.
To build a home automation hub, you’ll need:
– Raspberry Pi 4
– Micro SD card
– Power supply
– Sensors (e.g., motion sensors, temperature sensors)
– Smart home devices (e.g., smart plugs, smart lights)
– Home automation software (e.g., Home Assistant, OpenHAB)
Steps to Build a Home Automation Hub
- Install the home automation software on your Micro SD card.
- Connect your sensors and smart home devices to the Raspberry Pi 4.
- Configure the software to control your devices based on your preferences.
- Use your smartphone or voice commands to control your smart home.
| Sensor Type | Recommended Model |
|---|---|
| Motion Sensor | PIR Motion Sensor |
| Temperature Sensor | DHT22 |
| Light Sensor | BH1750 |

3. Media Server
The Raspberry Pi 4 can also be used to create a media server that streams your favorite movies, TV shows, and music to your devices. With the right software, you can access your media from anywhere in the world.
To build a media server, you’ll need:
– Raspberry Pi 4
– Micro SD card
– Power supply
– External hard drive
– Media server software (e.g., Plex, Kodi)
Steps to Build a Media Server
- Install the media server software on your Micro SD card.
- Connect your external hard drive to the Raspberry Pi 4.
- Copy your media files to the external hard drive.
- Configure the software to access your media library.
- Use your smartphone, tablet, or smart TV to stream your media.
| Media Type | Recommended Format |
|---|---|
| Video | MP4, MKV |
| Audio | MP3, FLAC |
| Images | JPEG, PNG |

4. Network-Attached Storage (NAS)
The Raspberry Pi 4 can be used to create a network-attached storage (NAS) device that provides centralized storage for your files and backups. With the right software and external storage, you can access your files from any device on your network.
To build a NAS, you’ll need:
– Raspberry Pi 4
– Micro SD card
– Power supply
– External hard drive
– NAS software (e.g., OpenMediaVault, NextCloud)
Steps to Build a NAS
- Install the NAS software on your Micro SD card.
- Connect your external hard drive to the Raspberry Pi 4.
- Configure the software to share your files and folders.
- Access your files from any device on your network.
| Storage Capacity | Recommended Hard Drive |
|---|---|
| Up to 2 TB | WD Elements Portable |
| Up to 4 TB | Seagate Backup Plus |
| Up to 8 TB | WD My Book |

5. Web Server
The Raspberry Pi 4 can be used to create a web server that hosts your websites, web applications, and databases. With the right software and configuration, you can create a powerful and reliable web server that handles multiple requests simultaneously.
To build a web server, you’ll need:
– Raspberry Pi 4
– Micro SD card
– Power supply
– Web server software (e.g., Apache, Nginx)
– Programming language (e.g., PHP, Python)
– Database (e.g., MySQL, PostgreSQL)
Steps to Build a Web Server
- Install the web server software on your Micro SD card.
- Configure the software to host your websites and applications.
- Install the programming language and database of your choice.
- Create your website or web application.
- Access your website or application from any device with a web browser.
| Web Server Software | Recommended Version |
|---|---|
| Apache | 2.4 |
| Nginx | 1.18 |
| PHP | 7.4 |
| MySQL | 8.0 |
6. Personal Assistant
The Raspberry Pi 4 can be used to create a personal assistant that responds to your voice commands and performs tasks like setting reminders, playing music, and answering questions. With the right software and hardware, you can create a powerful and customizable personal assistant.
To build a personal assistant, you’ll need:
– Raspberry Pi 4
– Micro SD card
– Power supply
– Microphone
– Speaker
– Personal assistant software (e.g., Mycroft, Jasper)
Steps to Build a Personal Assistant
- Install the personal assistant software on your Micro SD card.
- Connect your microphone and speaker to the Raspberry Pi 4.
- Configure the software to recognize your voice and perform tasks.
- Use your voice commands to interact with your personal assistant.
| Task | Voice Command Example |
|---|---|
| Set a reminder | “Remind me to call John at 2 PM” |
| Play music | “Play some jazz music” |
| Answer questions | “What’s the weather like today?” |
| Control smart devices | “Turn on the living room lights” |
7. Security Camera System
The Raspberry Pi 4 can be used to create a security camera system that monitors your home or office. With the right camera modules and software, you can create a customizable and affordable security system that sends alerts to your smartphone when motion is detected.
To build a security camera system, you’ll need:
– Raspberry Pi 4
– Micro SD card
– Power supply
– Camera modules
– Security camera software (e.g., MotionEyeOS, Shinobi)
Steps to Build a Security Camera System
- Install the security camera software on your Micro SD card.
- Connect your camera modules to the Raspberry Pi 4.
- Configure the software to monitor your cameras and send alerts.
- Access your camera feeds from any device with a web browser.
| Camera Module | Resolution | Night Vision |
|---|---|---|
| Raspberry Pi Camera Module V2 | 8 MP | No |
| Raspberry Pi NoIR Camera Module V2 | 8 MP | Yes |
| Raspberry Pi HQ Camera | 12 MP | No |
8. Smart Mirror
The Raspberry Pi 4 can be used to create a smart mirror that displays useful information like the time, weather, news, and calendar events. With the right display and software, you can create a customizable and stylish smart mirror that enhances your daily routine.
To build a smart mirror, you’ll need:
– Raspberry Pi 4
– Micro SD card
– Power supply
– Display (e.g., monitor, TV)
– Two-way mirror film
– Smart mirror software (e.g., MagicMirror²)
Steps to Build a Smart Mirror
- Install the smart mirror software on your Micro SD card.
- Connect your display to the Raspberry Pi 4.
- Apply the two-way mirror film to the display.
- Configure the software to display your desired information.
- Mount the smart mirror in your desired location.
| Display Size | Recommended Resolution |
|---|---|
| 22 inches | 1920 x 1080 (Full HD) |
| 24 inches | 1920 x 1080 (Full HD) |
| 27 inches | 2560 x 1440 (QHD) |
| 32 inches | 3840 x 2160 (4K UHD) |
9. Digital Signage
The Raspberry Pi 4 can be used to create digital signage that displays advertisements, promotions, and information in public spaces like stores, restaurants, and offices. With the right display and software, you can create engaging and dynamic digital signage that captures your audience’s attention.
To build digital signage, you’ll need:
– Raspberry Pi 4
– Micro SD card
– Power supply
– Display (e.g., monitor, TV)
– Digital signage software (e.g., Screenly OSE, Yodeck)
Steps to Build Digital Signage
- Install the digital signage software on your Micro SD card.
- Connect your display to the Raspberry Pi 4.
- Configure the software to display your desired content.
- Schedule your content to play at specific times or intervals.
- Mount the display in your desired location.
| Content Type | Recommended Format |
|---|---|
| Images | JPEG, PNG |
| Videos | MP4, WebM |
| Websites | URL |
| Presentations | PDF, PPTX |
10. Robotics
The Raspberry Pi 4 can be used to create robots that perform various tasks like navigating obstacles, following lines, and detecting objects. With the right sensors, motors, and software, you can create sophisticated and programmable robots that solve real-world problems.
To build a robot, you’ll need:
– Raspberry Pi 4
– Micro SD card
– Power supply
– Sensors (e.g., Ultrasonic Sensors, infrared sensors)
– Motors and Motor Controllers
– Robotics software (e.g., ROS, MATLAB)
Steps to Build a Robot
- Install the robotics software on your Micro SD card.
- Connect your sensors and motors to the Raspberry Pi 4.
- Configure the software to control your robot’s behavior.
- Program your robot to perform specific tasks or navigate its environment.
- Test and refine your robot’s performance.
| Sensor Type | Recommended Model |
|---|---|
| Ultrasonic Sensor | HC-SR04 |
| Infrared Sensor | HC-SR501 |
| Motor Controller | L298N |
| DC Motor | 6V 210RPM |
Frequently Asked Questions (FAQ)
1. What is a Raspberry Pi 4?
A Raspberry Pi 4 is a single-board computer that packs a quad-core ARM Cortex-A72 processor, up to 8GB of RAM, dual-band Wi-Fi, Bluetooth 5.0, and a range of ports including USB 3.0, HDMI, and Ethernet. It’s a powerful and versatile device that can be used for a wide range of projects.
2. What can I do with a Raspberry Pi 4?
The possibilities are endless! You can use a Raspberry Pi 4 to create a retro gaming console, home automation hub, media server, NAS, web server, personal assistant, security camera system, smart mirror, digital signage, and even robots. The only limit is your imagination.
3. What operating system does the Raspberry Pi 4 use?
The Raspberry Pi 4 can run various operating systems, but the most popular one is Raspberry Pi OS (formerly known as Raspbian). It’s a Debian-based Linux distribution that’s optimized for the Raspberry Pi hardware and comes with a wide range of pre-installed software.
4. How much does a Raspberry Pi 4 cost?
The Raspberry Pi 4 comes in three variants based on RAM capacity: 2GB, 4GB, and 8GB. The prices range from $35 for the 2GB model to $75 for the 8GB model. Keep in mind that you’ll also need to purchase additional accessories like a power supply, Micro SD card, and case.
5. Where can I learn more about Raspberry Pi projects?
There are many online resources where you can learn more about Raspberry Pi projects. Some popular ones include the Raspberry Pi Foundation’s official website, the Raspberry Pi subreddit, and various Raspberry Pi forums and blogs. You can also find a wealth of tutorials, guides, and project ideas on YouTube and Instructables.
Conclusion
The Raspberry Pi 4 is a powerful and versatile single-board computer that can be used to create a wide range of exciting projects. From retro gaming consoles to home automation hubs, media servers to personal assistants, the possibilities are endless. With the right hardware, software, and a little creativity, you can build amazing projects that solve real-world problems and enhance your daily life.
We hope this article has inspired you to explore the world of Raspberry Pi projects and given you some ideas to get started. Remember, the key to success is to start small, learn from your mistakes, and have fun along the way. Happy building!


Leave a Reply