Introduction to the Raspberry Pi Camera
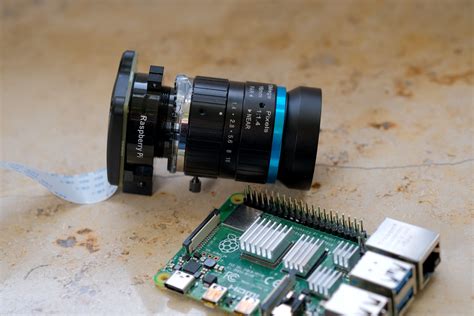
The Raspberry Pi has revolutionized the world of single-board computers, offering a powerful and versatile platform for hobbyists, educators, and professionals alike. One of the most exciting additions to the Raspberry Pi ecosystem is the IMX477 Raspberry Pi HQ Camera, the official high-quality camera module designed specifically for the Raspberry Pi. This camera module opens up a world of possibilities for photography, videography, and computer vision projects.
What is the IMX477 Raspberry Pi HQ Camera?
The IMX477 Raspberry Pi HQ Camera is a 12.3-megapixel camera module that features a Sony IMX477 sensor. This sensor is capable of capturing high-resolution images and videos, making it ideal for a wide range of applications. The camera module is designed to work seamlessly with the Raspberry Pi, providing a plug-and-play solution for capturing stunning visuals.
Key Features of the IMX477 Raspberry Pi HQ Camera
- 12.3-megapixel Sony IMX477 sensor
- Support for interchangeable lenses (C-mount and CS-mount)
- High-quality still image capture
- 4K video recording at 30 frames per second
- 1080p video recording at 60 frames per second
- Compatible with all Raspberry Pi models with a CSI camera connector
Setting Up the IMX477 Raspberry Pi HQ Camera
Hardware Requirements
To use the IMX477 Raspberry Pi HQ Camera, you will need the following components:
- Raspberry Pi board (any model with a CSI camera connector)
- IMX477 Raspberry Pi HQ Camera module
- C-mount or CS-mount lens
- Camera tripod or mount (optional)
- Power supply for the Raspberry Pi
Connecting the Camera to the Raspberry Pi
- Ensure that your Raspberry Pi is powered off.
- Locate the CSI camera connector on your Raspberry Pi board. It is a small, flat connector located near the HDMI port.
- Gently lift the plastic clip on the CSI camera connector.
- Insert the ribbon cable of the IMX477 camera module into the connector, ensuring that the blue side of the ribbon faces the Ethernet port.
- Press down the plastic clip to secure the ribbon cable in place.
Enabling the Camera in Raspberry Pi Configuration
- Power on your Raspberry Pi and wait for it to boot up.
- Open the Raspberry Pi Configuration tool by clicking on the Raspberry Pi icon in the top-left corner of the screen and selecting “Preferences” > “Raspberry Pi Configuration”.
- Navigate to the “Interfaces” tab.
- Locate the “Camera” option and click on the radio button to enable it.
- Click “OK” to save the changes.
- Reboot your Raspberry Pi for the changes to take effect.

Using the IMX477 Raspberry Pi HQ Camera
Capturing Still Images
To capture still images with the IMX477 Raspberry Pi HQ Camera, you can use the raspistill command in the terminal. Here are some examples:
-
Capture a single image:
raspistill -o image.jpg -
Capture an image with a specific resolution:
raspistill -o image.jpg -w 1920 -h 1080 -
Capture an image with a delay and preview:
raspistill -o image.jpg -t 5000 -p
Recording Videos
To record videos with the IMX477 Raspberry Pi HQ Camera, you can use the raspivid command in the terminal. Here are some examples:
-
Record a 10-second video:
raspivid -o video.h264 -t 10000 -
Record a video with a specific resolution and framerate:
raspivid -o video.h264 -w 1920 -h 1080 -fps 30 -
Record a video with a preview:
raspivid -o video.h264 -t 10000 -p
Python Programming with the Camera
The IMX477 Raspberry Pi HQ Camera can also be controlled programmatically using Python. The picamera library provides a high-level interface for accessing the camera module. Here’s a basic example of capturing an image using Python:
from picamera import PiCamera
from time import sleep

camera = PiCamera()
camera.start_preview()
sleep(5)
camera.capture('image.jpg')
camera.stop_preview()

Advanced Features and Techniques
Interchangeable Lenses
One of the standout features of the IMX477 Raspberry Pi HQ Camera is its support for interchangeable lenses. The camera module uses a standard C-mount or CS-mount, allowing you to attach a wide variety of lenses to achieve different focal lengths, apertures, and effects.
When choosing a lens for your camera, consider the following factors:
- Focal length: Determines the angle of view and magnification of the image.
- Aperture: Affects the amount of light entering the camera and the depth of field.
- Mount type: Ensure that the lens is compatible with the C-mount or CS-mount of the camera.
Some popular lens choices for the IMX477 Raspberry Pi HQ Camera include:
- 6mm wide-angle lens
- 16mm standard lens
- 50mm telephoto lens
Manual Exposure Control
The IMX477 Raspberry Pi HQ Camera allows for manual control over exposure settings, enabling you to fine-tune the image quality based on the lighting conditions and artistic intent. You can adjust parameters such as shutter speed, ISO, and white balance to achieve the desired exposure and color balance.
Here are some examples of manual exposure control using the raspistill command:
-
Set a specific shutter speed:
raspistill -o image.jpg -ss 1000000 -
Set a specific ISO value:
raspistill -o image.jpg -ISO 800 -
Set a specific white balance mode:
raspistill -o image.jpg -awb sun
Time-lapse Photography
The IMX477 Raspberry Pi HQ Camera is well-suited for time-lapse photography, allowing you to capture a series of images over an extended period and combine them into a stunning time-lapse video. Here’s an example of how to capture a time-lapse using the raspistill command:
raspistill -o image%04d.jpg -tl 2000 -t 60000
This command captures an image every 2 seconds (2000 milliseconds) for a total duration of 60 seconds (60000 milliseconds). The captured images are saved with sequential filenames (image0001.jpg, image0002.jpg, etc.).
To create a time-lapse video from the captured images, you can use video editing software or command-line tools like ffmpeg.
Low-light Photography
The IMX477 Raspberry Pi HQ Camera performs well in low-light conditions, thanks to its high-quality Sony sensor. To optimize the camera for low-light photography, you can experiment with the following settings:
- Increase the ISO value to make the sensor more sensitive to light.
- Use a longer shutter speed to allow more light to reach the sensor.
- Open up the aperture of the lens to let in more light.
Here’s an example of low-light photography settings using the raspistill command:
raspistill -o image.jpg -ss 1000000 -ISO 1600

Applications of the IMX477 Raspberry Pi HQ Camera
The IMX477 Raspberry Pi HQ Camera opens up a wide range of possibilities for various applications. Here are a few examples:
Photography Projects
- High-resolution still photography
- Portraits and macro photography
- Landscape and nature photography
- Time-lapse photography
- Astrophotography
Video Projects
- Short films and documentaries
- Live streaming and video conferencing
- Video surveillance and security systems
- Sports and action videography
- Wildlife and nature videography
Computer Vision and Robotics
- Object detection and tracking
- Facial recognition and emotion analysis
- Autonomous vehicle navigation
- Industrial inspection and quality control
- Agricultural monitoring and crop analysis
Frequently Asked Questions (FAQ)
-
Q: Can I use the IMX477 Raspberry Pi HQ Camera with any Raspberry Pi model?
A: The IMX477 Raspberry Pi HQ Camera is compatible with all Raspberry Pi models that have a CSI camera connector, including the Raspberry Pi 4, Raspberry Pi 3, and Raspberry Pi Zero. -
Q: Do I need any additional software to use the IMX477 Raspberry Pi HQ Camera?
A: The IMX477 Raspberry Pi HQ Camera is supported by the official Raspberry Pi OS (previously known as Raspbian). It works with theraspistillandraspividcommand-line tools, as well as thepicameralibrary for Python programming. -
Q: What is the maximum resolution and frame rate supported by the IMX477 Raspberry Pi HQ Camera?
A: The IMX477 Raspberry Pi HQ Camera can capture still images with a resolution of up to 12.3 megapixels (4056 x 3040 pixels). It supports 4K video recording at 30 frames per second and 1080p video recording at 60 frames per second. -
Q: Can I use the IMX477 Raspberry Pi HQ Camera for infrared (IR) photography?
A: Yes, the IMX477 Raspberry Pi HQ Camera can be used for infrared photography. However, you will need to remove the IR filter from the camera module and use an appropriate IR lens or filter. -
Q: How do I mount the IMX477 Raspberry Pi HQ Camera on my Raspberry Pi?
A: The IMX477 Raspberry Pi HQ Camera comes with a mounting bracket that can be attached to your Raspberry Pi using the provided screws. You can also use third-party camera mounts or tripods compatible with the tripod mount on the camera module.
Conclusion
The IMX477 Raspberry Pi HQ Camera is a game-changer for Raspberry Pi enthusiasts and professionals alike. With its high-resolution sensor, interchangeable lens support, and advanced features, this camera module enables a wide range of photography, videography, and computer vision applications.
Whether you’re a beginner exploring the world of digital imaging or an experienced developer working on complex projects, the IMX477 Raspberry Pi HQ Camera provides a powerful and flexible tool to bring your creative visions to life.
So, grab your Raspberry Pi, attach the IMX477 camera module, and start capturing stunning visuals today!
Comparison Table
| Feature | IMX477 Raspberry Pi HQ Camera | Raspberry Pi Camera Module V2 |
|---|---|---|
| Sensor | Sony IMX477 | Sony IMX219 |
| Resolution | 12.3 megapixels | 8 megapixels |
| Max Still Image Resolution | 4056 x 3040 pixels | 3280 x 2464 pixels |
| Max Video Resolution | 4K @ 30fps, 1080p @ 60fps | 1080p @ 30fps |
| Lens Mount | C-mount, CS-mount | Fixed lens |
| Interchangeable Lenses | Yes | No |
| IR Sensitivity | Can be modified for IR | No |
| Size | 38 x 38 x 20.5 mm | 25 x 23 x 9 mm |
| Price | Higher | Lower |
The IMX477 Raspberry Pi HQ Camera offers significant improvements over the previous Raspberry Pi Camera Module V2, including a higher resolution sensor, support for interchangeable lenses, and advanced video capabilities. However, it also comes at a higher price point compared to the V2 module.


Leave a Reply