Types of PCB Soldering
There are two main types of PCB soldering techniques: through-hole soldering and surface mount soldering.
Through-Hole Soldering
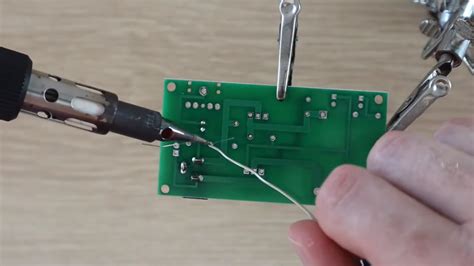
Through-hole soldering is the traditional method of soldering electronic components to a PCB. In this technique, the component leads are inserted through holes drilled in the PCB, and solder is applied to the joint on the opposite side of the board. This method is suitable for larger components and provides a strong mechanical connection.
Advantages of Through-Hole Soldering
- Strong mechanical connection
- Easy to inspect and repair
- Suitable for larger components
Disadvantages of Through-Hole Soldering
- Requires drilling holes in the PCB
- Consumes more space on the board
- Slower assembly process compared to surface mount soldering
Surface Mount Soldering
Surface mount soldering, also known as SMT (Surface Mount Technology), is a modern soldering technique where components are mounted directly onto the surface of the PCB. The components used in SMT are smaller and have either flat contacts or short pins that are soldered to pads on the PCB surface.
Advantages of Surface Mount Soldering
- Smaller component sizes
- Higher component density on the board
- Faster assembly process
- Improved high-frequency performance
Disadvantages of Surface Mount Soldering
- Requires specialized equipment for assembly
- More difficult to inspect and repair
- Components are more susceptible to damage from electrostatic discharge (ESD)
Soldering Tools and Equipment
To perform PCB soldering effectively, you need the right tools and equipment. Here are some essential items:
| Tool/Equipment | Description |
|---|---|
| Soldering Iron | A hand tool used to apply heat to the solder and components. Choose an iron with adjustable temperature control and a suitable wattage for your soldering needs. |
| Solder | A metal alloy, typically made of tin and lead (or lead-free alternatives), that melts and forms a conductive bond between components and the PCB. |
| Soldering Station | A complete soldering setup that includes a soldering iron, temperature control, and a stand for the iron. |
| Solder Wick | A braided copper wire used to remove excess solder from joints. |
| Flux | A chemical agent that helps to remove oxides and improve the flow of solder. |
| Tweezers | Used for handling small components and precise placement on the PCB. |
| Magnifying Glass | Helps in inspecting solder joints and identifying any defects. |

PCB Soldering Techniques
Hand Soldering
Hand soldering is a manual process where the soldering iron is used to apply heat to the component leads and PCB pads while solder is fed into the joint. This technique requires skill and practice to achieve consistent and reliable results.
Tips for Hand Soldering
- Keep the soldering iron tip clean and tinned with solder.
- Use the appropriate solder wire diameter for the job.
- Apply heat to the component lead and PCB pad simultaneously.
- Feed solder into the joint while maintaining heat.
- Remove the soldering iron and allow the joint to cool without disturbance.
Reflow Soldering
Reflow soldering is an automated process used for surface mount components. In this technique, solder paste (a mixture of solder particles and flux) is applied to the PCB pads using a stencil. The components are then placed onto the solder paste, and the entire assembly is heated in a reflow oven. The solder paste melts and forms a bond between the components and the PCB.
Advantages of Reflow Soldering
- Automated process suitable for high-volume production
- Consistent and reliable solder joints
- Faster than hand soldering for surface mount components
Disadvantages of Reflow Soldering
- Requires specialized equipment (reflow oven and stencils)
- Limited ability to rework or repair individual components
Wave Soldering
Wave soldering is an automated process primarily used for through-hole components. In this technique, the PCB is passed over a molten solder wave, which comes into contact with the component leads and PCB pads, forming a solder joint.
Advantages of Wave Soldering
- Automated process suitable for high-volume production
- Efficient for soldering through-hole components
- Provides a strong mechanical connection
Disadvantages of Wave Soldering
- Not suitable for surface mount components
- Can cause thermal shock to the PCB and components
- Requires specialized equipment and setup

Best Practices for PCB Soldering
To ensure high-quality solder joints and reliable PCB Assembly, follow these best practices:
- Use the appropriate solder alloy for your application (e.g., lead-free solder for RoHS compliance).
- Keep the soldering iron tip clean and well-maintained.
- Control the soldering iron temperature to suit the components and PCB material.
- Apply flux to improve solder flow and prevent oxidation.
- Use the correct amount of solder for each joint – too little can result in a weak joint, while too much can cause bridging or short circuits.
- Inspect solder joints visually for consistency, smoothness, and proper wetting.
- Clean the PCB after soldering to remove flux residue and prevent corrosion.

Frequently Asked Questions (FAQ)
1. What is the difference between lead-based and lead-free solder?
Lead-based solder contains a mixture of tin and lead, typically in a ratio of 60/40 or 63/37. Lead-free solder, on the other hand, is made from a combination of tin, silver, and copper. Lead-free solder has a higher melting point and requires slightly different soldering techniques compared to lead-based solder. The use of lead-free solder is mandated by the Restriction of Hazardous Substances (RoHS) directive in many countries to reduce the environmental impact of electronic waste.
2. How do I choose the right soldering iron for my needs?
When selecting a soldering iron, consider the following factors:
– Wattage: Choose an iron with enough power to heat the components and PCB effectively. A 20-50 watt iron is suitable for most general-purpose soldering tasks.
– Temperature Control: Look for an iron with adjustable temperature control to accommodate different soldering needs and component sensitivities.
– Tip Size and Shape: Select a tip size and shape that matches the components and PCB pads you’ll be soldering. Common tip shapes include conical, chisel, and bevel.
– Ergonomics: Choose a soldering iron with a comfortable grip and good balance to reduce fatigue during extended soldering sessions.
3. What is the purpose of flux in soldering?
Flux is a chemical agent that serves several purposes in the soldering process:
– It removes oxides and contaminants from the surfaces of the components and PCB pads, ensuring a clean and effective solder joint.
– It improves the flow and wetting of the solder, allowing it to spread evenly and adhere to the surfaces.
– It prevents oxidation of the surfaces during the soldering process, which can negatively affect the quality of the solder joint.
Flux can be applied separately or may be included in the solder wire (flux-cored solder).
4. How can I identify and fix common soldering defects?
Some common soldering defects include:
– Bridging: Excess solder causing a connection between adjacent pins or pads. Fix by using solder wick to remove the excess solder.
– Cold Joint: A dull, grainy, or incomplete solder joint caused by insufficient heat or poor wetting. Fix by reheating the joint and applying more solder if necessary.
– Insufficient Wetting: Solder not adhering properly to the surfaces, resulting in a weak joint. Fix by cleaning the surfaces, applying flux, and reheating the joint.
– Overheating: Applying too much heat, causing damage to components or lifting PCB pads. Fix by controlling the soldering iron temperature and applying heat for the appropriate duration.
Inspect solder joints visually using a magnifying glass to identify defects and take corrective action as needed.
5. What safety precautions should I take when soldering?
Soldering involves high temperatures and potential exposure to harmful fumes. To ensure your safety:
– Work in a well-ventilated area to avoid inhaling solder fumes.
– Use a fume extractor or smoke absorber to remove fumes from your work area.
– Wear safety glasses to protect your eyes from solder splashes or debris.
– Handle the soldering iron with care and always return it to its stand when not in use.
– Avoid touching the tip of the soldering iron or the molten solder.
– Wash your hands after soldering to remove any residual flux or solder particles.
By following these safety precautions, you can minimize the risks associated with soldering and maintain a safe working environment.
Conclusion
PCB soldering is an essential skill for anyone involved in Electronic Manufacturing or hobbyist projects. Understanding the different soldering techniques, tools, and best practices is crucial for creating reliable and high-quality solder joints. Whether you are using through-hole or surface mount components, hand soldering or automated processes, always strive for consistency, cleanliness, and proper technique. By mastering PCB soldering, you’ll be able to tackle a wide range of electronic projects with confidence and precision.


Leave a Reply