What is a MOSFET and Why Test It?
A MOSFET, which stands for metal-oxide-semiconductor field-effect transistor, is a type of transistor commonly used for amplifying or switching electronic signals. MOSFETs are crucial components in many electronic devices, from computers and smartphones to automotive systems and industrial equipment.
Testing a MOSFET is essential to ensure that it functions properly within the intended circuit. A faulty MOSFET can lead to device malfunction, reduced performance, or even complete failure. By regularly testing MOSFETs, you can identify issues early on and replace the component if necessary, avoiding potential problems down the line.
Types of MOSFETs
Before diving into the testing process, it’s important to understand the different types of MOSFETs available. MOSFETs can be categorized based on their structure and the type of charge carriers they use:
N-Channel MOSFETs
N-channel MOSFETs use electrons as the primary charge carriers. They are the most common type of MOSFET and are typically used for low-side switching applications. In an n-channel MOSFET, current flows from the drain to the source when a positive voltage is applied to the gate.
P-Channel MOSFETs
P-channel MOSFETs use holes as the primary charge carriers. They are less common than n-channel MOSFETs and are often used for high-side switching applications. In a p-channel MOSFET, current flows from the source to the drain when a negative voltage is applied to the gate.
Enhancement Mode MOSFETs
Enhancement mode MOSFETs, also known as normally-off MOSFETs, are the most common type. They require a voltage to be applied to the gate to allow current to flow between the drain and source. When no voltage is applied to the gate, the MOSFET is in an off state, and no current flows.
Depletion Mode MOSFETs
Depletion mode MOSFETs, also known as normally-on MOSFETs, are less common than enhancement mode MOSFETs. They allow current to flow between the drain and source when no voltage is applied to the gate. To turn off a depletion mode MOSFET, a negative voltage (for n-channel) or a positive voltage (for p-channel) must be applied to the gate.

MOSFET Pinout and Symbol
Before testing a MOSFET, it’s crucial to identify its pinout and understand its schematic symbol. A typical MOSFET has three terminals: gate (G), drain (D), and source (S).
The arrow in the symbol indicates the direction of conventional current flow when the MOSFET is in the on state. For n-channel MOSFETs, the arrow points from source to drain, while for p-channel MOSFETs, the arrow points from drain to source.

Required Equipment for Testing a MOSFET
To effectively test a MOSFET, you’ll need the following equipment:
- Digital multimeter (DMM) with diode test function
- Breadboard or circuit board for connection purposes
- Jumper wires
- Resistor (1 kΩ to 10 kΩ)
- DC power supply (optional, for testing the MOSFET under load)

Testing a MOSFET with a Multimeter
Testing a MOSFET with a multimeter is a quick and easy way to determine whether the component is functional or faulty. Follow these steps to test a MOSFET using the diode test function of your multimeter:
Step 1: Identify the MOSFET Pins
Before testing, identify the gate, drain, and source pins of the MOSFET using the component’s datasheet or by referring to the markings on the device itself.
Step 2: Set Up the Multimeter
Set your digital multimeter to the diode test function, which is usually denoted by a diode symbol. This function will apply a small voltage between the probes and measure the resistance.
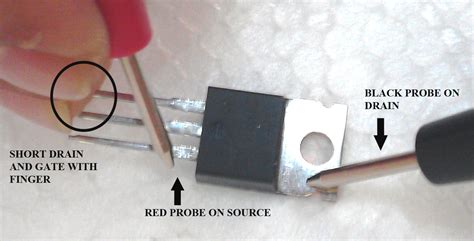
Step 3: Test the Gate-Source Junction
Connect the black (negative) probe of the multimeter to the source pin and the red (positive) probe to the gate pin. The multimeter should display an open circuit (OL) or a high resistance value (typically several MΩ). If the multimeter shows a short circuit or a low resistance value, the MOSFET is likely faulty.
Step 4: Test the Gate-Drain Junction
Keeping the black probe connected to the source pin, move the red probe to the drain pin. Again, the multimeter should display an open circuit (OL) or a high resistance value. If it shows a short circuit or a low resistance value, the MOSFET is likely damaged.
Step 5: Test the Drain-Source Junction
Connect the black probe to the drain pin and the red probe to the source pin. The multimeter should display an open circuit (OL) or a high resistance value. If it shows a short circuit or a low resistance value, the MOSFET is likely faulty.
Step 6: Reverse the Probes and Repeat Steps 3-5
To complete the testing process, reverse the positions of the red and black probes and repeat steps 3-5. This ensures that you have tested the MOSFET in both directions.
If the MOSFET passes all the above tests, it is likely functional. However, if any of the tests fail, the MOSFET is probably damaged and should be replaced.
Testing a MOSFET Under Load
While testing a MOSFET with a multimeter can provide a quick indication of its functionality, it doesn’t test the component under real-world operating conditions. To get a more comprehensive understanding of the MOSFET’s performance, you can test it under load using a simple circuit.
Step 1: Set Up the Test Circuit
Assemble the following components on a breadboard or circuit board:
- MOSFET under test
- Resistor (1 kΩ to 10 kΩ)
- DC power supply
- Jumper wires
Connect the components as shown in the diagram below:
In this circuit, the resistor acts as a load, and the DC power supply provides the necessary voltage to turn on the MOSFET.
Step 2: Apply Voltage to the Gate
Set your DC power supply to a voltage that is appropriate for the MOSFET under test, as specified in its datasheet. Typically, logic-level MOSFETs require 3.3V to 5V, while power MOSFETs may require 10V or more.
Apply the voltage to the gate of the MOSFET. If the MOSFET is functional, it should turn on, allowing current to flow through the resistor.
Step 3: Measure the Voltage Across the Resistor
Using your digital multimeter set to the DC Voltage function, measure the voltage across the resistor. If the MOSFET is fully on, the voltage across the resistor should be close to the supply voltage. If the MOSFET is faulty or not fully on, the voltage across the resistor will be significantly lower than the supply voltage.
Step 4: Measure the Drain-Source Voltage
Move the positive probe of the multimeter to the drain pin of the MOSFET while keeping the negative probe connected to the ground. Measure the voltage between the drain and source pins. If the MOSFET is fully on, the drain-source voltage should be close to zero. If the MOSFET is faulty or not fully on, the drain-source voltage will be higher.
Step 5: Test at Different Voltages and Currents
To get a more comprehensive understanding of the MOSFET’s performance, repeat the testing process at different gate voltages and load currents. This will help you determine the MOSFET’s turn-on voltage, on-resistance, and current-handling capabilities.
Interpreting MOSFET Test Results
When interpreting the results of your MOSFET tests, consider the following factors:
Turn-On Voltage
The turn-on voltage is the minimum gate-source voltage required to turn on the MOSFET and allow current to flow between the drain and source. If the MOSFET does not turn on at the specified gate voltage, it may be faulty or have a higher threshold voltage than expected.
On-Resistance
The on-resistance (RDS(on)) is the resistance between the drain and source when the MOSFET is fully on. A lower on-resistance indicates better performance, as it results in less power dissipation and voltage drop across the MOSFET. If the measured on-resistance is significantly higher than the value specified in the datasheet, the MOSFET may be faulty or degraded.
Current-Handling Capability
The current-handling capability of a MOSFET is determined by its maximum drain current rating (ID(max)). If the MOSFET fails to handle the expected current or experiences a significant voltage drop at higher currents, it may be faulty or undersized for the application.
Common MOSFET Failure Modes
Understanding common MOSFET failure modes can help you identify the cause of a faulty component and take steps to prevent future failures. Some common MOSFET failure modes include:
Gate Oxide Breakdown
The gate oxide is a thin insulating layer between the gate and the channel of the MOSFET. If the gate voltage exceeds the maximum rating, the gate oxide can break down, causing a short circuit between the gate and the channel. This failure mode is often caused by electrostatic discharge (ESD) or overvoltage events.
Drain-Source Punch-Through
Drain-source punch-through occurs when the depletion region of the drain-body junction extends to the source, creating a direct path for current to flow between the drain and source, bypassing the channel. This failure mode is more common in high-voltage MOSFETs and can be caused by excessive drain-source voltage or degradation of the device over time.
Thermal Runaway
Thermal runaway occurs when the power dissipation in the MOSFET exceeds its cooling capabilities, leading to an increase in junction temperature. As the temperature rises, the on-resistance of the MOSFET decreases, causing more current to flow and further increasing power dissipation. This positive feedback loop can quickly lead to device failure if not addressed promptly. Proper heat sinking and current limiting can help prevent thermal runaway.
Best Practices for Handling and Testing MOSFETs
To ensure accurate test results and prevent damage to the MOSFET, follow these best practices:
- Always refer to the MOSFET’s datasheet for maximum ratings, pinout information, and recommended operating conditions.
- Use electrostatic discharge (ESD) protection when handling MOSFETs, as they are sensitive to static electricity.
- Avoid applying excessive voltage or current to the MOSFET, as this can cause permanent damage.
- Use appropriate heat sinking and cooling methods when testing MOSFETs under load to prevent thermal runaway.
- Double-check your connections and polarities before applying power to the test circuit to avoid damaging the MOSFET or other components.
By following these best practices and conducting thorough tests, you can ensure that your MOSFETs are functioning properly and avoid potential issues in your electronic projects.
Frequently Asked Questions (FAQ)
1. Can I test a MOSFET without removing it from the circuit?
While it is possible to test a MOSFET in-circuit, it is generally recommended to remove the component from the circuit for accurate testing. In-circuit testing can be affected by other components connected to the MOSFET, leading to false readings or inconclusive results.
2. What should I do if my MOSFET fails the multimeter test?
If your MOSFET fails the multimeter test, it is likely faulty and should be replaced. However, before replacing the component, double-check your connections and ensure that you have identified the correct pins. If the MOSFET still fails the test after verifying your setup, it is best to replace it with a new one.
3. Can I use a MOSFET that has been exposed to electrostatic discharge (ESD)?
MOSFETs are sensitive to ESD and can be damaged by even small static charges. If a MOSFET has been exposed to ESD, it is best to test it thoroughly before using it in a circuit. If the MOSFET fails any of the tests or exhibits abnormal behavior, it should be replaced to avoid potential issues in your project.
4. How do I choose the right MOSFET for my application?
When selecting a MOSFET for your application, consider factors such as the required voltage and current ratings, switching speed, on-resistance, and package type. Refer to the MOSFET’s datasheet to ensure that it meets your circuit’s requirements and can handle the expected operating conditions. It is also a good practice to choose a MOSFET with ratings that exceed your application’s needs to provide a safety margin.
5. Can I parallel multiple MOSFETs to increase current-handling capability?
Yes, it is possible to parallel multiple MOSFETs to increase the overall current-handling capability of the circuit. However, when paralleling MOSFETs, it is essential to ensure that they have closely matched characteristics, such as threshold voltage and on-resistance, to ensure equal current sharing. Additionally, proper heat sinking and thermal management are crucial when paralleling MOSFETs to prevent thermal runaway and device failure.
Conclusion
Testing a MOSFET is a crucial skill for anyone working with electronic circuits. By understanding the different types of MOSFETs, their pinouts, and common failure modes, you can effectively test these components using a multimeter or a simple test circuit. Regular testing can help you identify faulty MOSFETs early on, preventing potential issues in your projects.
Remember to always refer to the MOSFET’s datasheet, follow best practices for handling and testing, and take appropriate safety precautions when working with electronic components. With the knowledge and techniques outlined in this article, you can confidently test MOSFETs and ensure the reliability and performance of your electronic designs.


Leave a Reply