What is Countersinking and Counterboring?
Countersinking and counterboring are two techniques used to create recesses in a printed circuit board (PCB) to accommodate the heads of screws or other fasteners. These techniques are essential for ensuring that the fasteners sit flush with the surface of the PCB, preventing any protrusion that could interfere with the operation of the circuit or cause damage to other components.
Countersinking
Countersinking involves creating a conical recess in the PCB that allows the head of a flathead screw to sit flush with the surface. The countersink is typically created using a special drill bit that has a conical shape at the tip. The angle of the countersink is usually between 82 and 90 degrees, depending on the specific requirements of the application.
Advantages of Countersinking
- Provides a flush surface for the screw head
- Reduces the overall height of the assembly
- Enhances the aesthetic appearance of the PCB
Disadvantages of Countersinking
- Limited to flathead screws
- Can weaken the PCB if the countersink is too deep
- Requires special drill bits and precise depth control
Counterboring
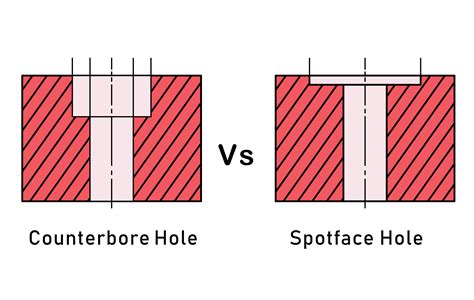
Counterboring, on the other hand, involves creating a cylindrical recess in the PCB that allows the head of a socket head cap screw or other fastener to sit below the surface. The counterbore is typically created using a drill bit with a flat bottom, followed by a larger drill bit to create the recess for the screw head.
Advantages of Counterboring
- Accommodates a wider range of fastener types
- Provides a stronger connection than countersinking
- Allows for thicker PCBs without compromising strength
Disadvantages of Counterboring
- Requires more precise machining than countersinking
- Can be more time-consuming and costly
- May require additional post-processing to ensure a smooth surface
Choosing Between Countersinking and Counterboring
When deciding between countersinking and counterboring for your PCB assembly, there are several factors to consider:
-
Fastener type: If you are using flathead screws, countersinking is the most appropriate choice. For other fastener types, such as socket head cap screws, counterboring is the better option.
-
PCB thickness: Countersinking is generally more suitable for thinner PCBs, as the conical recess can weaken the board if it is too deep. Counterboring is better suited for thicker PCBs, as it allows for a deeper recess without compromising the strength of the board.
-
Strength requirements: Counterboring provides a stronger connection than countersinking, as the cylindrical recess distributes the load more evenly. If your application requires a high degree of mechanical strength, counterboring may be the better choice.
-
Aesthetic considerations: Countersinking provides a flush surface that can enhance the aesthetic appearance of the PCB. If visual appeal is a priority, countersinking may be the preferred option.
-
Cost and time: Countersinking is generally faster and less expensive than counterboring, as it requires fewer machining steps and less precise depth control. If cost and time are major concerns, countersinking may be the more efficient choice.

Techniques for Effective Countersinking and Counterboring
To ensure that your countersinking and counterboring operations are effective and consistent, follow these best practices:
Countersinking Techniques
-
Use a high-quality countersink drill bit with the appropriate angle for your application (typically 82 or 90 degrees).
-
Set the depth stop on your drill press to ensure consistent depth control and prevent over-drilling.
-
Use a slow feed rate and moderate spindle speed to prevent chipping or tearing of the PCB material.
-
Clean the countersink thoroughly after drilling to remove any debris that could interfere with the seating of the screw.
Counterboring Techniques
-
Use a flat-bottom drill bit to create the initial hole, followed by a larger drill bit to create the recess for the screw head.
-
Ensure that the depth of the counterbore is precisely controlled to accommodate the screw head without over-drilling.
-
Use a slow feed rate and moderate spindle speed to prevent chipping or tearing of the PCB material.
-
Clean the counterbore thoroughly after drilling to remove any debris that could interfere with the seating of the screw.

Frequently Asked Questions (FAQ)
-
Q: What is the difference between countersinking and counterboring?
A: Countersinking creates a conical recess to accommodate flathead screws, while counterboring creates a cylindrical recess to accommodate other fastener types, such as socket head cap screws. -
Q: When should I use countersinking instead of counterboring?
A: Countersinking is best suited for applications using flathead screws, thinner PCBs, and when a flush surface is desired for aesthetic reasons. Counterboring is better for other fastener types, thicker PCBs, and when a stronger connection is required. -
Q: Can I use countersinking and counterboring on the same PCB?
A: Yes, it is possible to use both techniques on the same PCB, depending on the specific requirements of your application. For example, you may use countersinking for mounting holes and counterboring for component anchor points. -
Q: What are the most common angles used for countersinking?
A: The most common angles for countersinking are 82 and 90 degrees, with 82 degrees being more commonly used in PCB applications. -
Q: How can I ensure consistent depth control when countersinking or counterboring?
A: To ensure consistent depth control, use a drill press with a depth stop and set it to the appropriate depth for your application. Additionally, use a slow feed rate and moderate spindle speed to prevent over-drilling or damaging the PCB material.
| Technique | Fastener Type | PCB Thickness | Strength | Aesthetics | Cost & Time |
|---|---|---|---|---|---|
| Countersinking | Flathead screws | Thinner | Moderate | Flush | Lower |
| Counterboring | Various (e.g., SHCS) | Thicker | High | Recessed | Higher |
In conclusion, countersinking and counterboring are two essential techniques for creating recesses in PCBs to accommodate fasteners. By understanding the differences between these techniques and following best practices for their implementation, you can ensure that your PCB assemblies are strong, reliable, and visually appealing. Consider the specific requirements of your application, including fastener type, PCB thickness, strength, aesthetics, and cost and time constraints, when deciding between countersinking and counterboring for your next project.


Leave a Reply