What is PCB Soldering?
PCB soldering is the process of joining electronic components to a printed circuit board (PCB) using a molten metal alloy called solder. The solder creates a strong electrical and mechanical bond between the component leads and the PCB’s copper pads, ensuring a reliable connection.
Types of Soldering
There are two main types of soldering used in PCB assembly:
- Through-hole soldering
- Surface-mount soldering
Through-hole Soldering
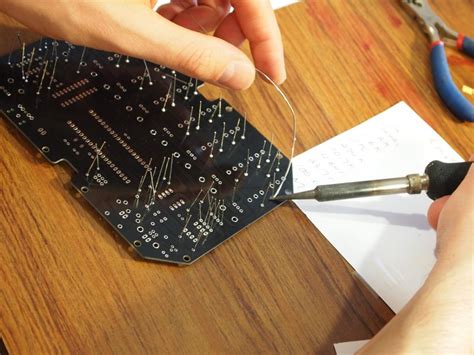
Through-hole soldering involves inserting component leads through holes drilled in the PCB and soldering them on the opposite side. This method is used for larger components and is generally easier for beginners.
Surface-mount Soldering
Surface-mount soldering involves attaching components directly to the surface of the PCB without using holes. This method is used for smaller components and requires more precise soldering techniques.
Tools and Materials Required for PCB Soldering
To get started with PCB soldering, you’ll need the following tools and materials:
- Soldering iron
- Soldering iron tip
- Solder
- Flux
- Solder wick
- Tweezers
- Wire cutters
- Multimeter
- Safety glasses
- Ventilation fan or fume extractor
Soldering Iron
A soldering iron is the most essential tool for PCB soldering. It consists of a heated metal tip that melts the solder, allowing it to flow onto the joint. When choosing a soldering iron, consider the following factors:
- Wattage: A higher wattage iron heats up faster and maintains its temperature better, but it may be more difficult to control for delicate work.
- Temperature control: Some soldering irons have adjustable temperature settings, which can be useful for working with different types of solder and components.
- Tip size and shape: The size and shape of the soldering iron tip affect the precision and heat transfer of the iron. Choose a tip that matches the size of the components you’ll be working with.
Solder
Solder is an alloy of tin and lead (or other metals for lead-free solder) that melts at a relatively low temperature. When choosing solder, consider the following factors:
- Alloy composition: The most common solder alloys are 60/40 (60% tin, 40% lead) and 63/37. Lead-free solder alloys are also available for environmental and health reasons.
- Diameter: Solder comes in various diameters, typically ranging from 0.5mm to 1.0mm. Thinner solder is better for precise work, while thicker solder is better for larger joints.
- Flux core: Most solder comes with a flux core that helps clean the joint and improve solder flow. Choose a solder with a flux core that matches your needs (e.g., rosin, no-clean, water-soluble).
Flux
Flux is a chemical compound that helps clean the surfaces of the components and PCB, promoting better solder flow and adhesion. Flux comes in various forms, including paste, liquid, and pen. When choosing flux, consider the following factors:
- Type: The most common types of flux are rosin, no-clean, and water-soluble. Rosin flux is the most common and requires cleaning after soldering. No-clean flux doesn’t require cleaning but may leave a residue. Water-soluble flux is easy to clean but requires more preparation.
- Activity level: Flux comes in different activity levels, ranging from mild to active. More active flux is better for cleaning heavily oxidized surfaces but may require more cleanup.

PCB Soldering Techniques
Now that you have your tools and materials, let’s dive into the actual soldering techniques.
Through-hole Soldering
- Insert the component leads through the holes in the PCB.
- Bend the leads slightly to hold the component in place.
- Heat the joint with the soldering iron and apply solder to the lead and pad.
- Allow the solder to cool and trim the excess lead.
Surface-mount Soldering
- Apply a small amount of solder paste to the PCB pads.
- Place the component on the pads using tweezers.
- Heat the joint with the soldering iron until the solder paste melts and flows around the component leads.
- Allow the solder to cool.
Desoldering
Sometimes, you may need to remove a component from a PCB. To desolder a component:
- Heat the joint with the soldering iron.
- Use a solder wick or desoldering pump to remove the molten solder.
- Gently pull the component lead out of the hole or off the pad.

Common PCB Soldering Problems and Solutions
Despite your best efforts, you may encounter some problems when soldering PCBs. Here are some common issues and their solutions:
| Problem | Cause | Solution |
|---|---|---|
| Cold joint | Insufficient heat or poor solder flow | Reheat the joint and apply more solder |
| Bridging | Excessive solder or poor technique | Use a solder wick to remove the excess solder |
| Overheating | Applying too much heat or holding the iron on the joint for too long | Use a lower temperature or a shorter heating time |
| Poor wetting | Dirty or oxidized surfaces | Clean the surfaces with flux or solder wick |
| Lifted pads | Excessive heat or pulling on the component | Use a lower temperature and avoid putting stress on the component |

Safety Precautions
PCB soldering involves high temperatures and potentially harmful fumes, so it’s essential to follow these safety precautions:
- Always wear safety glasses to protect your eyes from solder splashes.
- Work in a well-ventilated area or use a fume extractor to avoid inhaling solder fumes.
- Use a heat-resistant work surface to prevent damage to your workspace.
- Keep flammable materials away from your soldering area.
- Never touch the tip of the soldering iron or the molten solder.
- Always unplug your soldering iron when not in use and allow it to cool before storing.
Frequently Asked Questions (FAQ)
- What is the best temperature for PCB soldering?
-
The ideal temperature for PCB soldering depends on the type of solder and the size of the joint. In general, a temperature between 300°C and 400°C is suitable for most applications.
-
How do I choose the right solder for my project?
-
When choosing solder, consider the alloy composition, diameter, and flux core. For most projects, a 60/40 or 63/37 solder with a rosin flux core and a diameter between 0.5mm and 1.0mm is a good choice.
-
Can I use lead-free solder for PCB soldering?
-
Yes, lead-free solder is available and is becoming more common due to environmental and health concerns. However, lead-free solder typically requires higher temperatures and more precise technique than traditional leaded solder.
-
How do I clean my PCB after soldering?
-
If you’re using rosin flux, you’ll need to clean your PCB after soldering to remove the residue. You can use isopropyl alcohol and a soft brush to clean the board. If you’re using no-clean flux, cleaning is optional but may still be beneficial for appearance and long-term reliability.
-
What should I do if I accidentally damage a PCB pad while soldering?
- If you lift or damage a PCB pad, you can try to repair it using a conductive epoxy or by soldering a small wire jumper to bridge the connection. However, if the damage is extensive, you may need to replace the PCB.
Conclusion
PCB soldering is a valuable skill that takes practice and patience to master. By understanding the basics of soldering tools, materials, and techniques, and following proper safety precautions, you’ll be well on your way to creating reliable and professional-looking electronic circuits. Remember to start with simple projects and work your way up to more complex designs as you gain experience and confidence in your soldering abilities.


Leave a Reply