Introduction to the 28BYJ-48 Stepper Motor
The 28BYJ-48 is a Unipolar Stepper motor that operates on 5V DC and provides a step angle of 5.625 degrees per step. It comes with a built-in reduction gearbox that increases the torque and reduces the step angle, resulting in smoother and more precise motion. The motor has four phases, each requiring a separate control signal, which allows for accurate positioning and speed control.
Key Specifications of the 28BYJ-48 Stepper Motor
| Specification | Value |
|---|---|
| Rated Voltage | 5V DC |
| Number of Phases | 4 |
| Step Angle (Full Step) | 11.25 degrees |
| Step Angle (Half Step) | 5.625 degrees |
| Gear Reduction Ratio | 1/64 |
| Frequency | 100 Hz |
| DC Resistance | 50 Ω ±7% (per phase) |
| Idle In-traction Frequency | > 600 Hz |
| Idle Out-traction Frequency | > 1000 Hz |
| In-traction Torque | > 34.3 mN.m (120 Hz) |
| Self-positioning Torque | > 34.3 mN.m |
| Friction Torque | 600-1200 gf.cm |
| Pull-in Torque | 300 gf.cm |
| Insulated Resistance | > 10 MΩ |
| Insulated Electricity Power | 600 VAC/1 mA/1 s |
Understanding the Working Principle of Stepper Motors
Stepper motors are brushless DC motors that divide a full rotation into a number of equal steps. They provide precise positioning and speed control without the need for a closed-loop feedback system. The 28BYJ-48 is a unipolar stepper motor, which means it has four coils arranged in pairs, with a common center tap for each pair.
To control the motor, the Arduino board sends a sequence of pulses to the motor driver, which in turn energizes the coils in a specific order. By changing the sequence and the timing of the pulses, you can control the direction, speed, and number of steps the motor takes.
Full Step Sequence
In full step mode, the motor moves by one full step angle (11.25 degrees) per pulse. The sequence for full step mode is as follows:
| Step | Coil 1 | Coil 2 | Coil 3 | Coil 4 |
|---|---|---|---|---|
| 1 | ON | ON | OFF | OFF |
| 2 | OFF | ON | ON | OFF |
| 3 | OFF | OFF | ON | ON |
| 4 | ON | OFF | OFF | ON |
Half Step Sequence
In half step mode, the motor moves by half the full step angle (5.625 degrees) per pulse, resulting in smoother motion and increased resolution. The sequence for half step mode is as follows:
| Step | Coil 1 | Coil 2 | Coil 3 | Coil 4 |
|---|---|---|---|---|
| 1 | ON | OFF | OFF | OFF |
| 2 | ON | ON | OFF | OFF |
| 3 | OFF | ON | OFF | OFF |
| 4 | OFF | ON | ON | OFF |
| 5 | OFF | OFF | ON | OFF |
| 6 | OFF | OFF | ON | ON |
| 7 | OFF | OFF | OFF | ON |
| 8 | ON | OFF | OFF | ON |

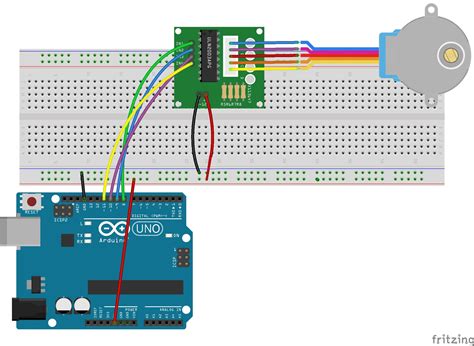
Connecting the 28BYJ-48 Stepper Motor to an Arduino Board
To control the 28BYJ-48 stepper motor with an Arduino board, you will need the following components:
- 28BYJ-48 stepper motor
- ULN2003 motor driver board
- Arduino board (e.g., Arduino Uno)
- Jumper wires
- Breadboard (optional)
Follow these steps to connect the components:
- Connect the 28BYJ-48 motor to the ULN2003 driver board using the provided connector.
- Connect the ULN2003 driver board to the Arduino board as follows:
- IN1 to Arduino pin 8
- IN2 to Arduino pin 9
- IN3 to Arduino pin 10
- IN4 to Arduino pin 11
- GND to Arduino GND
- +5V to Arduino 5V
- Power the Arduino board through the USB port or an external power supply.

Programming the Arduino to Control the 28BYJ-48 Stepper Motor
To control the 28BYJ-48 stepper motor with an Arduino, you can use the built-in Stepper library or create your own custom code. Here’s an example sketch that demonstrates how to control the motor using the Stepper library:
#include <Stepper.h>

const int stepsPerRevolution = 2048;  // Change this to match your motor
const int motorPin1 = 8;
const int motorPin2 = 9;
const int motorPin3 = 10;
const int motorPin4 = 11;

Stepper myStepper(stepsPerRevolution, motorPin1, motorPin3, motorPin2, motorPin4);

void setup() {
  myStepper.setSpeed(10);  // Set the speed to 10 RPM
}

void loop() {
  myStepper.step(stepsPerRevolution);  // Rotate one full revolution clockwise
  delay(1000);
  myStepper.step(-stepsPerRevolution); // Rotate one full revolution counterclockwise
  delay(1000);
}
In this example, we define the number of steps per revolution (2048 for the 28BYJ-48 with the built-in gearbox) and the Arduino pins connected to the ULN2003 driver board. We create an instance of the Stepper class and set the speed to 10 RPM in the setup() function. In the loop() function, we use the step() method to rotate the motor one full revolution clockwise and counterclockwise with a delay of 1 second between each rotation.

Tips and Tricks for Using the 28BYJ-48 Stepper Motor
- Power Supply: Ensure that your power supply can provide sufficient current for the motor. The 28BYJ-48 typically requires around 200-300 mA per phase.
- Microstepping: To achieve even smoother motion and higher resolution, you can implement microstepping by using a more advanced motor driver like the A4988 or DRV8825.
- Acceleration and Deceleration: When starting or stopping the motor, it’s a good practice to gradually increase or decrease the speed to avoid sudden jerks and potential damage to the motor or the mechanical system.
- Torque Considerations: Keep in mind that the torque of the 28BYJ-48 is relatively low compared to larger stepper motors. If your application requires higher torque, consider using a more powerful stepper motor or gear reduction.
- Current Limiting: To protect the motor and driver from overheating and damage, you can implement current limiting by adjusting the current limit potentiometer on the motor driver board.
Frequently Asked Questions (FAQ)
-
Q: Can I use the 28BYJ-48 stepper motor without the ULN2003 driver board?
A: No, the 28BYJ-48 requires a compatible motor driver like the ULN2003 to operate properly. The driver board is necessary to control the current flow through the motor coils. -
Q: What is the maximum speed I can achieve with the 28BYJ-48 stepper motor?
A: The maximum speed of the 28BYJ-48 depends on factors such as the supply voltage, load, and driver capabilities. Typically, it can achieve speeds up to 15-20 RPM without compromising torque. -
Q: How can I control multiple 28BYJ-48 stepper motors with a single Arduino board?
A: You can control multiple 28BYJ-48 motors by using a separate ULN2003 driver board for each motor and connecting them to different sets of Arduino pins. Make sure your Arduino board has enough digital pins and your power supply can handle the current draw of all the motors. -
Q: Can I use the 28BYJ-48 stepper motor for precise positioning applications?
A: Yes, the 28BYJ-48 is suitable for applications that require precise positioning, such as 3D printers, CNC machines, and robotic arms. However, keep in mind that the accuracy and repeatability may be limited by factors such as the motor’s step angle, gear backlash, and the mechanical system’s rigidity. -
Q: How do I change the direction of rotation for the 28BYJ-48 stepper motor?
A: To change the direction of rotation, you need to reverse the order of the step sequence in your Arduino code. For example, if you’re using the half-step sequence, change the order from {1, 2, 3, 4, 5, 6, 7, 8} to {8, 7, 6, 5, 4, 3, 2, 1} to reverse the direction.
Conclusion
The 28BYJ-48 stepper motor is a versatile and cost-effective solution for a wide range of Arduino projects that require precise motion control. By understanding its working principle, connecting it properly to an Arduino board, and programming it using the appropriate library or custom code, you can harness the power of this stepper motor to create innovative and dynamic applications. Remember to consider factors such as power supply, torque requirements, and microstepping when using the 28BYJ-48 in your projects. With the knowledge gained from this comprehensive guide, you’ll be well-equipped to incorporate the 28BYJ-48 stepper motor into your Arduino projects and bring your ideas to life.


Leave a Reply