Introduction to Touch Switch Circuits
Touch switch circuits are an innovative and user-friendly way to control electronic devices. These circuits allow users to activate or deactivate a device simply by touching a designated area on the circuit board. Touch switch circuits have become increasingly popular in recent years due to their ease of use, reliability, and versatility. In this article, we will explore the basics of touch switch circuits, their applications, and how to build simple touch switch circuits for beginners.
What are Touch Switch Circuits?
A touch switch circuit is an electronic circuit that can be activated or deactivated by human touch. These circuits work by detecting the change in capacitance caused by a person’s finger when it comes into contact with a designated area on the circuit board. When the circuit detects this change in capacitance, it triggers a switch that can be used to control various electronic devices.
Touch switch circuits are composed of several key components, including:
- Touch Sensor: This is the part of the circuit that detects the change in capacitance caused by human touch.
- Microcontroller: This component processes the signal from the touch sensor and determines whether to activate or deactivate the switch.
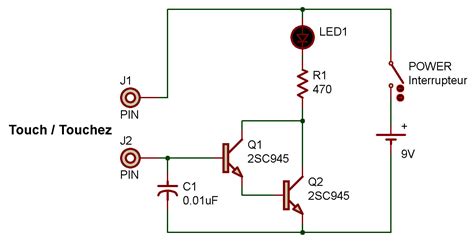
- Transistor: This component acts as a switch, allowing current to flow through the circuit when the touch sensor is activated.
- Resistors and capacitors: These components are used to filter and stabilize the signal from the touch sensor.
Applications of Touch Switch Circuits
Touch switch circuits have a wide range of applications, from household appliances to industrial equipment. Some common applications include:
- Home Automation
- Lighting control
- Smart home devices
-
Touchless faucets and soap dispensers
-
Consumer Electronics
- Smartphones and tablets
- Touchpads on laptops
-
Touch-sensitive buttons on appliances
-
Automotive Industry
- Touchscreens in vehicle infotainment systems
- Touch-sensitive controls for windows, mirrors, and seats
-
Keyless entry systems
-
Industrial Equipment
- Touchscreens on machinery and equipment
- Touch-sensitive safety switches
- Capacitive sensing for liquid level detection
Building Simple Touch Switch Circuits
Now that we have a basic understanding of touch switch circuits and their applications, let’s explore how to build simple touch switch circuits for beginners.
Project 1: Basic Touch Switch Circuit
Components Required
- Arduino Uno board
- Breadboard
- Jumper wires
- 1MΩ resistor
- LED
- 220Ω resistor
Circuit Diagram
Step-by-Step Instructions
- Connect the 1MΩ resistor between the Arduino’s digital pin 2 and the breadboard.
- Connect a jumper wire from the same row on the breadboard to the Arduino’s GND pin.
- Connect the LED’s anode (longer leg) to digital pin 13 on the Arduino.
- Connect the LED’s cathode (shorter leg) to one end of the 220Ω resistor.
- Connect the other end of the 220Ω resistor to the Arduino’s GND pin.
- Upload the following code to the Arduino:
const int touchPin = 2;
const int ledPin = 13;

void setup() {
  pinMode(touchPin, INPUT);
  pinMode(ledPin, OUTPUT);
}

void loop() {
  int touchState = digitalRead(touchPin);
  if (touchState == HIGH) {
    digitalWrite(ledPin, HIGH);
  } else {
    digitalWrite(ledPin, LOW);
  }
}
- Touch the jumper wire connected to digital pin 2 to activate the touch switch and turn on the LED.
Project 2: Capacitive Touch Switch Circuit
Components Required
- Arduino Uno board
- Breadboard
- Jumper wires
- Aluminum foil
- 1MΩ resistor
- LED
- 220Ω resistor
Circuit Diagram
Step-by-Step Instructions
- Cut a small piece of aluminum foil (approximately 2×2 cm) and attach it to the breadboard using jumper wires.
- Connect one end of the 1MΩ resistor to the Arduino’s digital pin 2 and the other end to the aluminum foil.
- Connect the LED’s anode (longer leg) to digital pin 13 on the Arduino.
- Connect the LED’s cathode (shorter leg) to one end of the 220Ω resistor.
- Connect the other end of the 220Ω resistor to the Arduino’s GND pin.
- Upload the following code to the Arduino:
#include <CapacitiveSensor.h>

CapacitiveSensor capSensor = CapacitiveSensor(2, 3);
const int ledPin = 13;
const int threshold = 1000;

void setup() {
  pinMode(ledPin, OUTPUT);
}

void loop() {
  long sensorValue = capSensor.capacitiveSensor(30);
  if (sensorValue > threshold) {
    digitalWrite(ledPin, HIGH);
  } else {
    digitalWrite(ledPin, LOW);
  }
  delay(10);
}
- Touch the aluminum foil to activate the capacitive touch switch and turn on the LED.

Advantages and Disadvantages of Touch Switch Circuits
Advantages
- User-friendly: Touch switch circuits are easy to use and require minimal effort to activate or deactivate devices.
- Durable: Since touch switch circuits have no moving parts, they are less prone to wear and tear compared to mechanical switches.
- Aesthetically pleasing: Touch switch circuits can be seamlessly integrated into device designs, creating a sleek and modern appearance.
- Customizable: Touch switch circuits can be programmed to perform various functions and can be adjusted to different sensitivity levels.
Disadvantages
- Sensitivity issues: Touch switch circuits can be affected by environmental factors such as humidity, temperature, and electromagnetic interference, leading to false activations or deactivations.
- Limited tactile feedback: Unlike mechanical switches, touch switch circuits do not provide physical feedback when activated, which may be less satisfying for some users.
- Power consumption: Touch switch circuits require a constant supply of power to function, which may lead to higher power consumption compared to mechanical switches.
- Cost: Implementing touch switch circuits can be more expensive than using traditional mechanical switches due to the additional components and circuitry required.

Frequently Asked Questions (FAQ)
-
Q: What is the difference between a touch switch circuit and a regular switch?
A: A touch switch circuit is activated by human touch, detecting the change in capacitance caused by a person’s finger. In contrast, a regular switch is a mechanical device that requires physical pressure to activate or deactivate. -
Q: Can touch switch circuits be used in outdoor applications?
A: Yes, touch switch circuits can be used outdoors, but they may require additional protection from environmental factors such as moisture, dust, and extreme temperatures. Enclosures and coatings can help protect the circuit from these elements. -
Q: How do I adjust the sensitivity of a touch switch circuit?
A: The sensitivity of a touch switch circuit can be adjusted by modifying the threshold value in the Arduino code. Increasing the threshold value will make the circuit less sensitive, while decreasing it will make the circuit more sensitive. -
Q: Can I use touch switch circuits with other microcontrollers besides Arduino?
A: Yes, touch switch circuits can be used with various microcontrollers, such as Raspberry Pi, ESP32, and PIC microcontrollers. However, the specific implementation and programming may vary depending on the microcontroller used. -
Q: Are touch switch circuits safe to use?
A: Yes, touch switch circuits are generally safe to use as they operate on low voltages and currents. However, it is essential to follow proper circuit design and construction techniques to ensure the safety of both the user and the device.

Conclusion
Touch switch circuits offer an innovative and user-friendly way to control electronic devices. By understanding the basics of touch switch circuits and their applications, beginners can start building simple projects to explore this fascinating technology. As you gain more experience, you can create more complex and customized touch switch circuits for various applications. With the knowledge gained from this article, you are well-equipped to begin your journey into the world of touch switch circuits and simple circuit building.
Word count: 1396 words


Leave a Reply