Introduction to LED Circuits
Light Emitting Diodes (LEDs) have revolutionized the world of electronics and lighting. These small, energy-efficient, and long-lasting components have found their way into countless applications, from simple indicator lights to complex displays. One of the most fascinating and visually appealing ways to use LEDs is by creating a pulsing LED circuit.
In this comprehensive article, we will dive deep into the world of pulsing LED circuits. We will explore what they are, how they work, and provide a step-by-step guide on how to build your own pulsing LED circuit. Whether you’re a beginner or an experienced electronics enthusiast, this article will equip you with the knowledge and skills needed to create your own mesmerizing LED projects.
What is a Pulsing LED Circuit?
A pulsing LED circuit is an electronic circuit that causes an LED to turn on and off at a specific frequency, creating a mesmerizing pulsing effect. This effect is achieved by controlling the current flow through the LED using various components such as resistors, capacitors, and transistors.
The pulsing effect can be customized to create different patterns, speeds, and intensities, making it a popular choice for a wide range of applications, including:
- Decorative lighting
- Attention-grabbing displays
- Visual indicators
- Mood lighting
- Art installations
How Does a Pulsing LED Circuit Work?
To understand how a pulsing LED circuit works, let’s first look at the basic components that make up the circuit:
-
LED: The Light Emitting Diode is the main component that emits light when current flows through it. LEDs are available in various colors, sizes, and power ratings.
-
Resistor: Resistors are used to limit the current flowing through the LED, preventing it from burning out. The value of the resistor depends on the LED’s specifications and the desired brightness.
-
Capacitor: Capacitors store and release electrical energy, which is essential for creating the pulsing effect. They work in conjunction with resistors to control the charging and discharging time, determining the pulsing frequency.
-
Transistor: Transistors are used as switches in pulsing LED circuits. They allow or block the current flow to the LED based on the voltage applied to their base terminal.
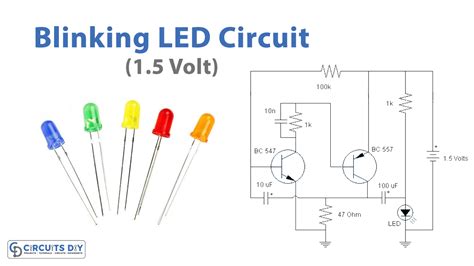
When power is applied to the circuit, the capacitor begins to charge through the resistor. Once the capacitor reaches a certain voltage, it triggers the transistor to turn on, allowing current to flow through the LED and causing it to light up. As the capacitor discharges, the transistor turns off, and the LED turns off. This process repeats continuously, creating the pulsing effect.

Building a Simple Pulsing LED Circuit
Now that we understand the basic principles behind a pulsing LED circuit, let’s build a simple version step-by-step.
Components Required
| Component | Quantity |
|---|---|
| LED | 1 |
| Resistor (1kΩ) | 1 |
| Capacitor (100μF) | 1 |
| Transistor (BC547) | 1 |
| Breadboard | 1 |
| Jumper wires | As needed |
| 9V Battery | 1 |
| Battery Connector | 1 |
Step 1: Placing the Components
- Insert the LED into the breadboard, ensuring that the longer leg (anode) is in a different row than the shorter leg (cathode).
- Place the 1kΩ resistor, connecting one end to the same row as the LED’s anode and the other end to an empty row.
- Insert the transistor into the breadboard, ensuring that each leg (collector, base, and emitter) is in a different row.
- Connect the capacitor between the same row as the resistor’s free end and the transistor’s base.
Step 2: Wiring the Circuit
- Using a jumper wire, connect the LED’s cathode to the transistor’s collector.
- Connect another jumper wire from the transistor’s emitter to the negative rail of the breadboard.
- Connect the positive terminal of the battery connector to the same row as the resistor and capacitor.
- Finally, connect the negative terminal of the battery connector to the negative rail of the breadboard.
Step 3: Powering Up
- Attach the 9V battery to the battery connector.
- Observe the LED as it starts pulsing at a steady rate.
Congratulations! You’ve just built a simple pulsing LED circuit.

Advanced Pulsing LED Circuits
While the basic pulsing LED circuit is a great starting point, there are many ways to enhance and customize the pulsing effect. Here are a few advanced techniques you can explore:
Multiple LEDs
You can create more complex and visually appealing pulsing patterns by incorporating multiple LEDs into your circuit. By using different resistor and capacitor values for each LED, you can achieve a variety of pulsing speeds and intensities.
Adjustable Pulsing Speed
By adding a potentiometer to your circuit, you can create an adjustable pulsing speed. A potentiometer is a variable resistor that allows you to change the resistance by turning a knob or slider. By connecting the potentiometer in series with the resistor that controls the capacitor’s charging time, you can easily adjust the pulsing frequency.
Microcontroller-Based Pulsing
For even more advanced control over your pulsing LED circuit, you can incorporate a microcontroller such as an Arduino or Raspberry Pi. These devices allow you to program complex pulsing patterns, create responsive designs that react to sensor input, and even control your LEDs wirelessly.

Applications of Pulsing LED Circuits
Pulsing LED circuits have a wide range of applications across various fields. Some popular uses include:
-
Automotive Industry: Pulsing LEDs are often used in car taillights, turn signals, and dashboard indicators to grab attention and convey information.
-
Advertising and Signage: Eye-catching pulsing LED displays are used in storefronts, billboards, and trade show exhibits to attract potential customers and showcase products or services.
-
Entertainment and Art: Pulsing LED installations are popular in art galleries, music festivals, and stage productions to create immersive and dynamic visual experiences.
-
Home Decor: Pulsing LED lamps, string lights, and other decorative elements can add a unique ambiance to any room, creating a relaxing or energizing atmosphere.
-
Wearable Electronics: Pulsing LED circuits are used in clothing, accessories, and costumes to create stunning visual effects and express personal style.
Troubleshooting Common Issues
When building pulsing LED circuits, you may encounter some common issues. Here are a few troubleshooting tips to help you resolve them:
-
LED Does Not Light Up: Check that the LED is connected correctly (anode to positive, cathode to negative), the battery is properly connected, and the resistor value is appropriate for your LED.
-
LED Remains Constantly On: Ensure that the transistor is connected correctly (collector to LED, base to capacitor, emitter to negative) and that the capacitor is functioning properly.
-
Pulsing Speed is Too Fast or Too Slow: Adjust the values of the resistor and capacitor that control the charging and discharging time. A higher resistor value or a larger capacitor will slow down the pulsing speed, while a lower resistor value or a smaller capacitor will increase the pulsing speed.
FAQ
-
Can I use any type of LED for a pulsing circuit?
Yes, you can use any type of LED in a pulsing circuit, as long as you choose the appropriate resistor value based on the LED’s specifications and desired brightness. -
How do I calculate the resistor value for my LED?
To calculate the resistor value, you need to know the LED’s forward voltage and current rating, as well as your power supply voltage. Use the following formula: Resistor Value = (Power Supply Voltage – LED Forward Voltage) / LED Current Rating -
Can I control the pulsing pattern using a microcontroller?
Yes, you can use a microcontroller such as an Arduino or Raspberry Pi to create complex pulsing patterns, control multiple LEDs independently, and even make your pulsing LED circuit responsive to sensors or other inputs. -
Are pulsing LED circuits energy-efficient?
Pulsing LED circuits can be more energy-efficient than constantly-on LED circuits because the LEDs are only consuming power when they are lit. The overall energy efficiency depends on factors such as the pulsing frequency, LED power consumption, and the efficiency of the Circuit Components. -
Can I power my pulsing LED circuit using a USB port instead of a battery?
Yes, you can power your pulsing LED circuit using a USB port, as long as you ensure that the voltage and current supplied by the USB port are compatible with your circuit components. Keep in mind that USB ports typically provide 5V, so you may need to adjust your resistor values accordingly.
Conclusion
Pulsing LED circuits offer a fascinating and engaging way to incorporate light into your electronic projects. By understanding the basic principles and components involved, you can create your own pulsing LED circuits and explore the endless possibilities for customization and application.
In this article, we’ve covered the fundamentals of pulsing LED circuits, provided a step-by-step guide for building a simple circuit, and explored advanced techniques and applications. With this knowledge, you’re well-equipped to start creating your own mesmerizing pulsing LED projects and contribute to the ever-growing world of LED-based electronics.
Remember to always prioritize safety, double-check your connections, and have fun experimenting with different components and designs. The world of pulsing LED circuits is full of exciting opportunities for learning, creativity, and innovation. So go ahead, grab your components, and start building your own pulsing masterpieces today!


Leave a Reply