Introduction to the Pi3 Starter Kit
The Raspberry Pi 3 (Pi3) is a powerful, single-board computer that has revolutionized the world of DIY electronics and computing. Its compact size, affordability, and versatility make it an ideal tool for beginners and experts alike. To help you get started with your Pi3 journey, we’ve put together the ultimate Pi3 Starter Kit guide, covering everything you need to know to make the most of this incredible device.
What’s Included in the Pi3 Starter Kit?
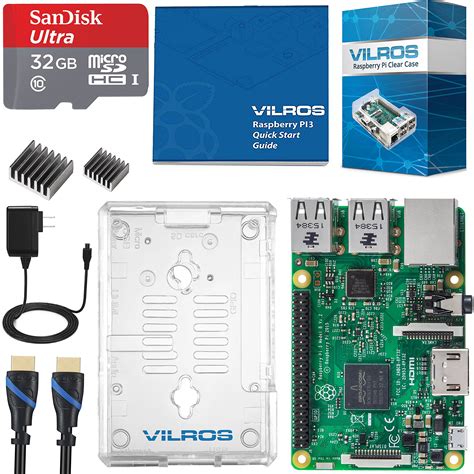
A typical Pi3 Starter Kit comes with the following components:
| Component | Description |
|---|---|
| Raspberry Pi 3 Board | The heart of the kit, a single-board computer featuring a 1.2GHz quad-core ARM Cortex-A53 CPU and 1GB RAM |
| Power Supply | A 5V 2.5A micro USB power supply to power your Pi3 |
| microSD Card | A preloaded microSD card with the NOOBS operating system installer |
| HDMI Cable | An HDMI cable to connect your Pi3 to a monitor or TV |
| USB Keyboard and Mouse | A USB keyboard and mouse for input and navigation |
| Heatsink | A heatsink to keep your Pi3 cool during operation |
| Case | A protective case to house your Pi3 and keep it safe from damage |
| Breadboard | A breadboard for prototyping and creating electronic circuits |
| GPIO Breakout Kit | A set of wires and components to connect to your Pi3’s GPIO (General Purpose Input/Output) pins |

Setting Up Your Pi3
Step 1: Insert the microSD Card
Insert the provided microSD card into the microSD card slot on the underside of your Pi3 board.
Step 2: Connect the Peripherals
Connect the USB keyboard and mouse to the USB ports on your Pi3. Then, connect the HDMI cable from your Pi3 to your monitor or TV.
Step 3: Power Up
Connect the power supply to your Pi3’s micro USB power port and plug it into a wall outlet. Your Pi3 will boot up, and you’ll see the NOOBS installer on your screen.
Step 4: Install the Operating System
Follow the on-screen instructions to install the Raspbian operating system, the official OS for Raspberry Pi devices.

Exploring the Raspbian Desktop Environment
Once you’ve installed Raspbian, you’ll be greeted by the Raspbian desktop environment. This user-friendly interface is similar to other desktop operating systems, such as Windows or macOS. Here are some key features:
- Menu Bar: Located at the top of the screen, the menu bar provides access to various applications and system settings.
- File Manager: Use the file manager to browse, organize, and manage your files and folders.
- Terminal: The terminal allows you to execute commands and run scripts using the command line interface.
- Web Browser: The built-in web browser enables you to access the internet and browse web pages.

Basic Linux Commands for Your Pi3
Knowing some basic Linux commands will help you navigate and control your Pi3 more effectively. Here are a few essential commands:
| Command | Description |
|---|---|
ls |
Lists the files and directories in the current directory |
cd |
Changes the current directory |
mkdir |
Creates a new directory |
rm |
Removes files and directories |
cp |
Copies files and directories |
mv |
Moves or renames files and directories |
sudo |
Executes a command with superuser privileges |
GPIO Pins and Programming with Python
One of the most powerful features of the Pi3 is its GPIO pins, which allow you to connect external devices and components to your Pi3 and control them using code. The Pi3 Starter Kit includes a breakout board and a set of wires to help you get started with GPIO programming.
To begin programming your Pi3’s GPIO pins, you’ll need to use a programming language like Python. Python is a popular, beginner-friendly language that is well-suited for Pi3 programming. Here’s a simple Python script that turns an LED on and off:
import RPi.GPIO as GPIO
import time

GPIO.setmode(GPIO.BCM)
GPIO.setup(18, GPIO.OUT)

while True:
    GPIO.output(18, GPIO.HIGH)
    time.sleep(1)
    GPIO.output(18, GPIO.LOW)
    time.sleep(1)
This script:
1. Imports the necessary libraries (RPi.GPIO and time).
2. Sets the GPIO pin numbering mode to BCM.
3. Configures GPIO pin 18 as an output.
4. Enters a loop that turns the LED on for 1 second and off for 1 second.
Pi3 Starter Kit Projects
Now that you’re familiar with the Pi3 Starter Kit and basic programming concepts, it’s time to explore some projects. Here are a few beginner-friendly ideas:
1. LED Blinking
Create a simple circuit with LEDs and resistors, and write a Python script to control the LEDs’ blinking patterns.
2. Button-Controlled LED
Add a button to your LED circuit and write a Python script that turns the LED on or off when the button is pressed.
3. Temperature Sensor
Connect a temperature sensor to your Pi3 and write a Python script that reads the sensor data and displays the temperature on the screen.
4. Web-Controlled LED
Create a simple web server using Python and Flask, and write a script that allows you to control an LED through a web browser.
Troubleshooting Common Issues
As you work with your Pi3 Starter Kit, you may encounter some common issues. Here are a few troubleshooting tips:
- Pi3 doesn’t boot: Check that the microSD card is inserted correctly and that the power supply is providing sufficient power.
- No display: Ensure that the HDMI cable is securely connected and that your monitor or TV is set to the correct input.
- Keyboard or mouse not working: Verify that the USB keyboard and mouse are connected to the correct USB ports and that they are compatible with the Pi3.
- GPIO not working: Double-check your wiring and ensure that you’re using the correct GPIO pin numbers in your code.
Pi3 Starter Kit Maintenance and Care
To keep your Pi3 Starter Kit in good condition, follow these maintenance and care tips:
- Handle the Pi3 board and components with care, avoiding static electricity and physical damage.
- Keep the Pi3 and its components clean and free from dust and debris.
- Ensure that the Pi3 has adequate ventilation to prevent overheating.
- Regularly update the Raspbian operating system and installed software packages.
Frequently Asked Questions (FAQ)
-
What is the difference between the Pi3 and other Raspberry Pi models?
The Pi3 is a more powerful and feature-rich version of the Raspberry Pi, with a faster processor, more RAM, and built-in Wi-Fi and Bluetooth connectivity. -
Can I use the Pi3 Starter Kit to create commercial products?
Yes, you can use the Pi3 Starter Kit to create commercial products, but be sure to comply with the Raspberry Pi Foundation’s licensing and usage guidelines. -
What programming languages can I use with the Pi3?
The Pi3 supports a wide range of programming languages, including Python, C/C++, Java, and more. -
Can I connect multiple Pi3 boards together?
Yes, you can connect multiple Pi3 boards together using Ethernet or USB cables to create more complex projects and systems. -
Where can I find additional resources and support for my Pi3 Starter Kit?
The Raspberry Pi Foundation’s official website (raspberrypi.org) offers a wealth of resources, tutorials, and forums where you can find support and connect with other Pi3 users.
Conclusion
The Pi3 Starter Kit is the perfect way to begin your journey into the world of Raspberry Pi and DIY electronics. With its powerful hardware, user-friendly software, and endless possibilities for customization and creation, the Pi3 is an invaluable tool for learning, experimentation, and innovation. By following this ultimate beginner’s guide, you’ll be well on your way to unlocking the full potential of your Pi3 Starter Kit and bringing your ideas to life.


Leave a Reply