Understanding the Basics of Induction Heating
Before we delve into the design and production of an Induction Heater circuit, it is essential to understand the fundamental concepts behind induction heating.
Electromagnetic Induction
Electromagnetic induction is the process by which an electric current is generated in a conductor when it is exposed to a changing magnetic field. This phenomenon was discovered by Michael Faraday in 1831 and forms the basis for the operation of transformers, generators, and induction heaters.
Eddy Currents
When a conductive object is placed within a changing magnetic field, electric currents called eddy currents are induced within the object. These currents flow in closed loops perpendicular to the direction of the magnetic field. The strength of the eddy currents depends on factors such as the conductivity of the material, the strength of the magnetic field, and the frequency of the alternating current.
Joule Heating
As eddy currents flow through the conductive object, they encounter electrical resistance, which leads to the generation of heat. This process is known as Joule heating or resistive heating. The amount of heat generated is proportional to the square of the current and the resistance of the material.
Skin Effect
At high frequencies, the alternating current tends to flow near the surface of the conductor, a phenomenon known as the skin effect. This effect causes the effective resistance of the conductor to increase with frequency, leading to more efficient heating at the surface of the object.
Designing an Induction Heater Circuit
Now that we have a basic understanding of the principles behind induction heating let’s move on to designing an induction heater circuit.
Components Required
To build an induction heater circuit, you will need the following components:
| Component | Description |
|---|---|
| High-frequency power supply | Provides the high-frequency alternating current for the induction coil |
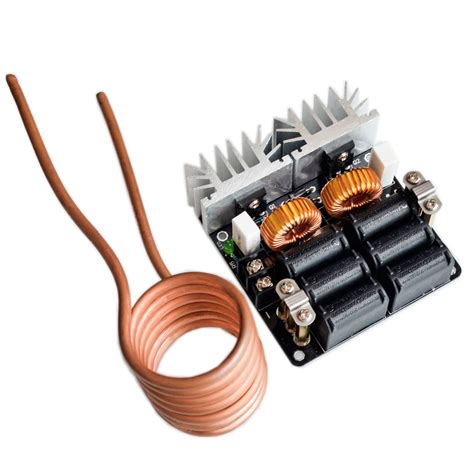
| Induction coil | Generates the alternating magnetic field that induces eddy currents in the workpiece |
| Capacitor bank | Helps to tune the resonant frequency of the circuit and improve efficiency |
| Matching transformer | Matches the impedance of the power supply to the induction coil |
| Workpiece | The conductive object to be heated |
Circuit Design
The design of an induction heater circuit involves the following steps:
-
Determine the power requirements: The power required for your induction heater will depend on the size and material of the workpiece, as well as the desired heating rate. A typical induction heater may have a power rating ranging from a few hundred watts to several kilowatts.
-
Select the operating frequency: The operating frequency of the induction heater circuit will depend on the size and material of the workpiece. Higher frequencies are generally more suitable for smaller workpieces and surface heating, while lower frequencies are better for larger workpieces and deeper heating. Common operating frequencies range from tens of kilohertz to a few megahertz.
-
Design the induction coil: The induction coil is a critical component of the induction heater circuit. It should be designed to generate a strong and uniform magnetic field around the workpiece. The shape and size of the coil will depend on the geometry of the workpiece and the desired heating pattern. Common coil designs include solenoid, pancake, and hairpin coils.
-
Select the capacitor bank: The capacitor bank is used to tune the resonant frequency of the induction heater circuit and improve its efficiency. The capacitance value should be chosen such that the circuit resonates at the desired operating frequency. The capacitor bank should also have a high voltage rating and low equivalent series resistance (ESR) to minimize losses.
-
Choose the matching transformer: The matching transformer is used to match the impedance of the power supply to the induction coil. This ensures maximum power transfer and reduces reflections in the circuit. The transformer should have a turns ratio that provides the desired voltage and current levels at the induction coil.
-
Assemble the circuit: Once you have selected all the components, you can assemble the induction heater circuit. The high-frequency power supply, capacitor bank, and matching transformer should be connected to the induction coil according to the circuit diagram. Proper grounding and shielding techniques should be employed to minimize electromagnetic interference (EMI) and ensure safe operation.

Producing an Induction Heater Circuit
With the design of the induction heater circuit complete, we can now move on to the production phase.
Sourcing Components
The first step in producing an induction heater circuit is to source the required components. While some components, such as capacitors and transformers, can be readily purchased from electronic component suppliers, others, like the induction coil and high-frequency power supply, may need to be custom-built or sourced from specialized manufacturers.
Fabricating the Induction Coil
The induction coil is arguably the most critical component of the induction heater circuit. Its design and construction will greatly influence the performance and efficiency of the heater. Here are some guidelines for fabricating the induction coil:
-
Choose the appropriate conductor: The conductor used for the induction coil should have high electrical conductivity and be able to withstand the high temperatures generated during operation. Copper tubing is a popular choice due to its excellent conductivity and ease of forming.
-
Determine the coil dimensions: The dimensions of the induction coil, including the number of turns, diameter, and pitch, will depend on the size and shape of the workpiece, as well as the desired heating pattern. Coil design software or empirical formulas can be used to optimize the coil dimensions for a specific application.
-
Form the coil: The copper tubing can be formed into the desired coil shape using a coil winding machine or by hand. Care should be taken to ensure that the coil is wound tightly and evenly to minimize inductance variations and hot spots.
-
Insulate the coil: The induction coil should be properly insulated to prevent short circuits and reduce capacitive coupling. High-temperature ceramic insulation or Kapton tape can be used to insulate the coil turns.
-
Provide cooling: In high-power applications, the induction coil may generate significant heat due to resistive losses. Adequate cooling, such as water or oil cooling, should be provided to prevent overheating and ensure stable operation.
Assembling the Circuit
Once all the components have been sourced and fabricated, the induction heater circuit can be assembled. The following steps should be followed:
-
Mount the components: The high-frequency power supply, capacitor bank, matching transformer, and induction coil should be securely mounted on a suitable chassis or enclosure. Proper spacing and insulation should be maintained between the components to prevent arcing and minimize EMI.
-
Make the electrical connections: The electrical connections between the components should be made using high-quality, low-inductance conductors, such as copper bus bars or litz wire. The connections should be properly secured and insulated to prevent loosening or short circuits.
-
Provide proper grounding: The induction heater circuit should be properly grounded to ensure safe operation and reduce EMI. The chassis, power supply, and induction coil should be connected to a low-impedance ground point.
-
Test and tune the circuit: Once the assembly is complete, the induction heater circuit should be tested and tuned for optimal performance. This may involve adjusting the capacitor bank to achieve resonance at the desired frequency and fine-tuning the matching transformer for maximum power transfer. Proper safety precautions, such as using personal protective equipment and following electrical safety guidelines, should be observed during testing and operation.

FAQ
-
What materials can be heated using an induction heater?
Induction heaters can be used to heat electrically conductive materials, such as metals, semiconductors, and graphite. Non-conductive materials, such as plastics and ceramics, cannot be directly heated by induction. -
How efficient are induction heaters compared to other heating methods?
Induction heaters are generally more efficient than resistive heating methods, such as electric furnaces or hot plates. They can achieve efficiencies of up to 90% or more, depending on the design and application. This is because the heat is generated directly within the workpiece, minimizing losses to the surroundings. -
What safety precautions should be taken when operating an induction heater?
Induction heaters can generate high voltages and strong magnetic fields, which can pose safety hazards if not properly handled. Some safety precautions include: - Using personal protective equipment, such as insulated gloves and safety glasses
- Ensuring proper grounding and shielding of the circuit components
- Keeping flammable materials and sensitive electronics away from the induction heater
-
Following electrical safety guidelines and regulations
-
Can an induction heater be used for soldering or brazing?
Yes, induction heaters can be used for soldering and brazing applications. The rapid and localized heating provided by induction can be advantageous for joining small components or working with temperature-sensitive materials. However, the design of the induction coil and the choice of soldering or brazing alloy may need to be optimized for the specific application. -
How can the heating pattern of an induction heater be controlled?
The heating pattern of an induction heater can be controlled by modifying the design of the induction coil and the frequency of the alternating current. For example, a concentrator coil can be used to focus the heating on a specific area of the workpiece, while a split coil can be used to create a more uniform heating pattern. The frequency of the current can also be adjusted to control the depth of heating and the rate of heat generation.

Conclusion
Induction heating is a versatile and efficient method for heating electrically conductive materials. By understanding the principles behind electromagnetic induction, eddy currents, and Joule heating, it is possible to design and produce a custom induction heater circuit for a wide range of applications.
The key steps in designing an induction heater include determining the power requirements, selecting the operating frequency, designing the induction coil, choosing the capacitor bank and matching transformer, and assembling the circuit with proper grounding and shielding.
When producing an induction heater, careful attention must be paid to sourcing high-quality components, fabricating the induction coil with the appropriate dimensions and insulation, and assembling the circuit with secure electrical connections and adequate cooling.
By following these guidelines and taking necessary safety precautions, a well-designed and properly assembled induction heater can provide fast, efficient, and controllable heating for various industrial and manufacturing applications.


Leave a Reply