What is Soldering?
Soldering is a process that involves joining two or more metal surfaces together using a filler metal called solder. The solder is melted and flowed into the joint, creating a strong, electrically conductive bond between the surfaces. Soldering is commonly used in electronics to create connections between wires, components, and printed circuit boards (PCBs).
Why is Soldering Important?
Soldering is important for several reasons:
-
Strong connections: Soldered joints are much stronger and more reliable than twisted or taped connections. This is especially important in applications where the connections will be subjected to vibration, temperature changes, or other stresses.
-
Electrical conductivity: Solder creates an electrically conductive path between the joined surfaces, allowing current to flow freely through the connection. This is essential for ensuring that electronic circuits function properly.
-
Durability: Properly soldered joints can last for many years, even in harsh environments. This makes soldering a preferred method for creating long-lasting electrical connections.

Tools and Materials Needed for Soldering
Before you begin soldering, you’ll need to gather the following tools and materials:
Soldering Iron
A soldering iron is the most essential tool for soldering. It consists of a heated metal tip that is used to melt the solder and apply it to the joint. Soldering irons come in various wattages, with higher wattages providing more heat for larger joints or thicker wires. For most electronics work, a 30-60 watt soldering iron is sufficient.
Soldering Stand
A soldering stand is a device that holds your soldering iron when it’s not in use. It typically includes a weighted base and a spring-loaded holder that keeps the hot iron safely away from your work surface. Some soldering stands also include a sponge or brass wool for cleaning the soldering iron tip.
Solder
Solder is a metal alloy that is used to create the soldered joint. It typically consists of tin and lead, although lead-free solder is becoming increasingly common due to environmental and health concerns. Solder comes in various diameters and compositions, with thinner solder being easier to work with for small joints and thicker solder providing more strength for larger joints.
Wire Strippers
Wire strippers are tools used to remove the insulation from the ends of wires, exposing the bare metal conductor inside. They come in various sizes to accommodate different wire gauges and insulation types. Some wire strippers also include built-in cutting blades for trimming wires to length.
Flux
Flux is a chemical compound that is used to clean and prepare the metal surfaces before soldering. It helps to remove oxidation and other contaminants from the surfaces, allowing the solder to flow more easily and create a stronger bond. Flux comes in various forms, including paste, liquid, and pens.
Safety Equipment
Soldering involves working with hot metal and potentially harmful fumes, so it’s important to use appropriate safety equipment. This includes:
- Safety glasses to protect your eyes from solder splashes and flying debris
- A well-ventilated work area or fume extractor to remove harmful fumes
- Heat-resistant gloves to protect your hands from burns
- A fire extinguisher or other fire safety equipment in case of accidents

Step-by-Step Guide to Soldering Wires
Now that you have gathered your tools and materials, let’s walk through the process of soldering wires step by step.
Step 1: Prepare the Wires
-
Using your wire strippers, remove about 1/2 inch (1.3 cm) of insulation from the end of each wire you want to solder. Be careful not to nick or damage the metal conductor inside.
-
If the wire is stranded (consisting of multiple thin wires), twist the strands together tightly to form a single conductor. This will make it easier to solder and create a stronger connection.
-
Apply a small amount of flux to the exposed metal on each wire. This will help the solder to flow more easily and create a stronger bond.
Step 2: Tin the Soldering Iron
-
Plug in your soldering iron and allow it to heat up to the appropriate temperature (usually between 600-800°F or 315-425°C).
-
Once the iron is hot, clean the tip by wiping it on a damp sponge or brass wool. This will remove any oxidation or residue that may interfere with the soldering process.
-
Apply a small amount of solder to the tip of the iron. This is called “tinning” the iron and helps to improve heat transfer and solder flow.
Step 3: Solder the Wires
-
Hold the soldering iron in one hand and the solder in the other. Touch the tip of the iron to the wire, holding it there for a few seconds to heat up the metal.
-
Touch the solder to the wire, allowing it to melt and flow around the connection. The solder should be applied to the wire, not the iron, as this will ensure a stronger bond.
-
Continue applying heat and solder until the joint is completely covered and the solder has flowed smoothly around the connection.
-
Remove the iron and allow the joint to cool for a few seconds. Do not move or disturb the wires during this time, as this can weaken the joint.
-
Repeat the process for any additional wires you need to solder.
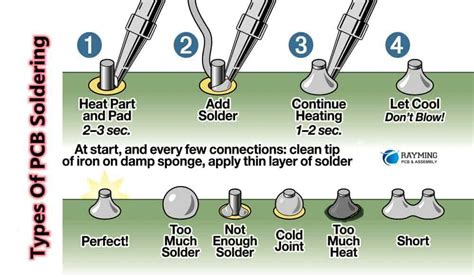
Step 4: Inspect the Joint
-
Once the joint has cooled, inspect it closely to ensure that the solder has flowed smoothly and completely around the connection.
-
The joint should be shiny and slightly concave, with no gaps or voids. If the joint appears dull, grainy, or has visible holes, it may be a “cold joint” that will not provide a strong or reliable connection.
-
If necessary, reheat the joint and apply more solder to fill any gaps or improve the connection.

Advanced Soldering Techniques
Once you have mastered the basic soldering process, there are several advanced techniques you can use to improve the strength and reliability of your soldered joints.
Pre-Tinning
Pre-tinning involves applying a small amount of solder to the wires or components before soldering them together. This helps to ensure that the solder flows evenly and completely around the joint, creating a stronger and more reliable connection.
To pre-tin a wire:
- Strip and clean the wire as described in the basic soldering process.
- Apply a small amount of flux to the exposed metal.
- Touch the soldering iron to the wire and apply a small amount of solder, allowing it to flow evenly around the conductor.
- Remove the iron and allow the solder to cool before proceeding with the joint.
Crimping
Crimping is a technique used to create a mechanical connection between wires or components before soldering. This can help to improve the strength and durability of the joint, especially in applications where the connection may be subjected to stress or vibration.
To crimp a wire:
- Strip and clean the wire as described in the basic soldering process.
- Insert the wire into a crimp connector or terminal.
- Use a crimping tool to compress the connector around the wire, creating a tight mechanical connection.
- Solder the crimped connection as described in the basic soldering process.
Heat Shrink Tubing
Heat shrink tubing is a type of insulating material that can be used to protect and strengthen soldered joints. It consists of a plastic tube that shrinks and conforms to the shape of the joint when heated.
To use heat shrink tubing:
- Slide a piece of heat shrink tubing over one of the wires before soldering the joint.
- Solder the joint as described in the basic soldering process.
- Slide the heat shrink tubing over the soldered joint and apply heat using a heat gun or lighter. The tubing will shrink and conform to the shape of the joint, providing insulation and protection.
Troubleshooting Common Soldering Problems
Even with the best techniques and materials, soldering problems can sometimes occur. Here are some common issues and how to troubleshoot them:
Cold Joints
A cold joint occurs when the solder does not flow properly or adhere to the surfaces being joined. This can result in a weak, unreliable connection that may fail over time. Cold joints are often caused by insufficient heat, improper fluxing, or contaminated surfaces.
To fix a cold joint:
- Reheat the joint with the soldering iron, applying additional flux if necessary.
- Apply fresh solder to the joint, allowing it to flow freely and completely around the connection.
- Remove the iron and allow the joint to cool before inspecting it for proper flow and adhesion.
Excessive Solder
Applying too much solder to a joint can create a bulky, uneven connection that may be difficult to work with or prone to failure. Excessive solder can also cause short circuits if it bridges adjacent connections.
To remove excess solder:
- Reheat the joint with the soldering iron, allowing the excess solder to melt.
- Use a desoldering wick or pump to remove the excess solder from the joint.
- Reapply a small amount of fresh solder if necessary to ensure a strong, even connection.
Insufficient Wetting
Insufficient wetting occurs when the solder does not flow freely or adhere properly to the surfaces being joined. This can result in a weak, unreliable connection that may fail over time. Insufficient wetting is often caused by contaminated surfaces, improper fluxing, or insufficient heat.
To improve wetting:
- Clean the surfaces being joined with isopropyl alcohol or another suitable solvent.
- Apply fresh flux to the surfaces before soldering.
- Ensure that the soldering iron is heating the joint adequately and that the solder is being applied directly to the surfaces being joined.
Frequently Asked Questions
1. What type of solder should I use for electronics work?
For most electronics work, a lead-based solder with a composition of 60% tin and 40% lead (60/40) is recommended. This type of solder has a lower melting point and better wetting properties than lead-free solder, making it easier to work with and creating stronger, more reliable joints. However, lead-free solder is becoming increasingly common due to environmental and health concerns. If you choose to use lead-free solder, look for a composition of 99.3% tin, 0.7% copper, and a small amount of silver.
2. How do I choose the right wattage for my soldering iron?
The wattage of your soldering iron will determine how much heat it can generate and how quickly it can heat up the joint. For most electronics work, a 30-60 watt soldering iron is sufficient. If you are working with larger joints or thicker wires, you may need a higher wattage iron to ensure adequate heat transfer. Conversely, if you are working with very small or delicate components, a lower wattage iron may be more appropriate to avoid damaging the components.
3. Can I solder without flux?
While it is possible to solder without flux, it is not recommended. Flux helps to clean and prepare the metal surfaces before soldering, removing oxidation and other contaminants that can interfere with solder flow and adhesion. Without flux, the solder may not flow properly or adhere to the surfaces, resulting in a weak or unreliable joint. Always use flux when soldering to ensure the best possible results.
4. How do I know when my soldering iron is hot enough?
Most soldering irons do not have a built-in temperature display, so it can be difficult to know when the iron is hot enough to use. One simple test is to touch the tip of the iron to a piece of solder. If the solder melts quickly and flows freely around the tip, the iron is hot enough to use. If the solder does not melt or melts very slowly, the iron may need more time to heat up. Alternatively, you can use a soldering iron with an adjustable temperature control and set it to the recommended temperature for the type of solder you are using.
5. How do I clean my soldering iron tip?
Cleaning your soldering iron tip is important to ensure good heat transfer and solder flow. The most common way to clean the tip is to wipe it on a damp sponge or brass wool pad after each use. This will remove any excess solder or flux residue that may have accumulated on the tip. For more stubborn residue, you can use a tip cleaner or tinner, which is a chemical compound designed to remove oxidation and restore the tip to its original condition. Always make sure the iron is hot before cleaning the tip, as a cold tip may be more difficult to clean and more prone to damage.
Conclusion
Soldering is an essential skill for anyone working with electronics, and with the right tools, techniques, and practice, anyone can learn to solder wires like a pro. By following the steps outlined in this guide and using the advanced techniques and troubleshooting tips provided, you can create strong, reliable soldered joints that will last for years to come. Remember to always prioritize safety and use appropriate equipment and ventilation when soldering, and don’t be afraid to experiment and practice until you achieve the perfect results. With time and experience, soldering will become a valuable tool in your electronics arsenal.


Leave a Reply