Introduction to DIY DACs
A Digital-to-Analog Converter (DAC) is an essential component in any audio playback system. It converts digital audio data from sources like computers, CD players, or streaming devices into an analog signal that can be amplified and played through speakers or headphones. While there are many excellent commercial DACs available, building your own DIY DAC can be a rewarding and educational experience for audio enthusiasts and electronics hobbyists alike.
In this comprehensive guide, we’ll walk you through the process of building your own high-quality DAC from scratch. We’ll cover the basics of DAC design, component selection, circuit layout, and construction techniques. By the end of this article, you’ll have the knowledge and skills needed to create a custom DAC tailored to your specific needs and preferences.
Understanding the Basics of DAC Design
What is a DAC?
A DAC is a device that converts a digital representation of an audio signal into an analog waveform. Digital audio data consists of a series of binary numbers that represent the amplitude of the audio signal at discrete points in time. The DAC takes these numbers and converts them into a continuous analog voltage that can be amplified and sent to speakers or headphones.
Key Components of a DAC
A typical DAC consists of several key components:
-
Digital interface: This is the input stage that receives the digital audio data from the source device. Common digital interfaces include USB, S/PDIF (coaxial or optical), and I2S.
-
Digital filter: The digital filter is responsible for shaping the frequency response and removing any unwanted high-frequency components from the digital audio signal before it is converted to analog.
-
DAC chip: The heart of the DAC is the converter chip itself, which performs the actual digital-to-analog conversion. Popular DAC chips include the ESS Sabre, Texas Instruments PCM1794A, and Analog Devices AD1955.
-
Analog output stage: After the conversion process, the analog signal is buffered and amplified by the analog output stage. This stage may include features like volume control, balanced outputs, or headphone amplification.
-
Power supply: A clean and stable power supply is essential for optimal DAC performance. Many DIY DAC designs incorporate linear regulators, low-noise power supplies, or battery power to minimize noise and interference.
Sampling Rate and Bit Depth
Two key specifications that define the performance of a DAC are the sampling rate and bit depth:
-
Sampling rate: This is the number of times per second that the analog signal is sampled and converted into a digital value. Common sampling rates include 44.1 kHz (CD quality), 96 kHz, and 192 kHz. Higher sampling rates can potentially capture more detail and high-frequency information.
-
Bit depth: The bit depth determines the resolution or dynamic range of the digital audio signal. Each bit represents 6 dB of dynamic range, so a 16-bit system (CD quality) has a theoretical dynamic range of 96 dB, while a 24-bit system offers 144 dB. Higher bit depths allow for more precise representation of subtle audio details and reduce quantization noise.

Choosing Components for Your DIY DAC
DAC Chip Selection
The choice of DAC chip is one of the most critical decisions in designing your DIY DAC. Some popular options include:
| DAC Chip | Manufacturer | Key Features |
|---|---|---|
| ESS Sabre ES9018 | ESS Technology | 32-bit, 8-channel, up to 384 kHz, excellent performance |
| PCM1794A | Texas Instruments | 24-bit, 192 kHz, high SNR, low distortion |
| AD1955 | Analog Devices | 24-bit, 192 kHz, excellent dynamic performance |
| WM8741 | Wolfson Microelectronics | 24-bit, 192 kHz, high SNR, low power consumption |
When selecting a DAC chip, consider factors such as the desired sampling rate, bit depth, number of channels, and overall performance characteristics. Read datasheets and reviews to compare the specs and sound quality of different chips.
Digital Interface
The choice of digital interface will depend on your sources and desired connectivity options. USB is a popular choice for computer-based systems, while S/PDIF (coaxial or optical) is common for home audio equipment. I2S is often used for direct connection between digital components like CD transports and DACs.
Consider the compatibility of your sources, the ease of implementation, and any special features (like galvanic isolation or reclocking) when selecting a digital interface for your DAC.
Analog Output Stage
The analog output stage is responsible for buffering and amplifying the converted analog signal from the DAC chip. Key considerations include:
-
Op-amp selection: Choose high-quality, low-noise op-amps like the OPA1612, AD797, or LME49720 for the best performance.
-
Balanced vs. unbalanced outputs: Balanced outputs (using XLR connectors) offer better noise immunity and are preferred for long cable runs, while unbalanced outputs (RCA) are simpler to implement.
-
Headphone amplification: If you plan to use your DAC with headphones, consider including a dedicated headphone amplifier stage with sufficient power and low output impedance.
Power Supply Design
A clean, stable power supply is essential for optimal DAC performance. Consider the following:
-
Linear vs. switching regulators: Linear regulators offer lower noise and better regulation, while switching regulators are more efficient and generate less heat.
-
Multiple regulation stages: Use separate regulators for the digital and analog sections of the DAC to minimize crosstalk and interference.
-
Low-noise design techniques: Use techniques like star grounding, shielding, and careful component layout to minimize noise and interference.

Designing and Building Your DIY DAC
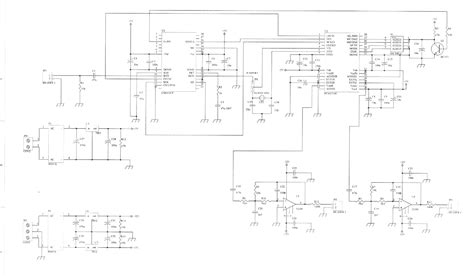
Schematic Design
Start by creating a schematic diagram of your DAC circuit. Use a CAD tool like KiCad or Eagle to draw the schematic, including all components and connections. Follow best practices for grounding, signal routing, and power supply design.
PCB Layout
Once your schematic is complete, design the printed circuit board (PCB) layout. Consider factors like component placement, signal trace routing, ground planes, and shielding. Use dedicated PCB design software or an integrated CAD tool to create your PCB layout.
Component Selection and Sourcing
Choose high-quality components for your DAC build. This includes resistors, capacitors, op-amps, and connectors. Consider factors like tolerance, stability, and noise performance when selecting components. Source your components from reputable suppliers to ensure quality and reliability.
PCB Fabrication and Assembly
Have your PCB fabricated by a reputable PCB manufacturer. Many online services offer affordable, high-quality PCB fabrication with quick turnaround times. Once you receive your PCBs, carefully assemble the components using proper soldering techniques. Use a temperature-controlled soldering iron, high-quality solder, and appropriate tools for the best results.
Enclosure and Finishing Touches
Choose an appropriate enclosure for your DAC. This could be a custom-designed case or a pre-made enclosure modified to fit your needs. Consider factors like shielding, ventilation, and aesthetics when selecting an enclosure. Add any necessary labels, connectors, or controls to complete your DAC build.

Testing and Calibration
Initial Power-Up and Functionality Test
Before applying power to your completed DAC, double-check all connections and component orientations. Apply power and verify that the power supply voltages are correct and stable. Test the basic functionality of your DAC by connecting a digital source and verifying that you get an analog output signal.
Performance Measurements
Use an audio analyzer or oscilloscope to measure the performance of your DAC. Key measurements include:
-
Frequency response: Verify that the DAC’s frequency response is flat across the audible range (20 Hz to 20 kHz).
-
Signal-to-noise ratio (SNR): Measure the SNR to ensure that your DAC has a high dynamic range and low noise floor.
-
Total harmonic distortion (THD): Check that the THD is within acceptable limits, typically less than 0.1% for a high-quality DAC.
-
Crosstalk: Measure the crosstalk between channels to ensure good stereo separation.
Listening Tests and Subjective Evaluation
In addition to objective measurements, perform subjective listening tests to evaluate the sound quality of your DIY DAC. Use a variety of high-quality audio sources and tracks, and compare the performance of your DAC to other reference devices. Trust your ears and make any necessary adjustments to optimize the sound quality based on your personal preferences.
FAQ
Q1. What skills do I need to build a DIY DAC?
A1. Building a DIY DAC requires a basic understanding of electronics, soldering skills, and the ability to read and follow schematic diagrams. Familiarity with audio concepts and measurements is also helpful.
Q2. How much does it cost to build a DIY DAC?
A2. The cost of building a DIY DAC can vary widely depending on the components used and the complexity of the design. A basic DAC using a single DAC chip and simple power supply can be built for around $100, while a high-end DAC with multiple regulation stages and premium components can easily exceed $1000.
Q3. Can I use my DIY DAC with any digital source?
A3. Your DIY DAC will be compatible with digital sources that use the same digital interface (e.g., USB, S/PDIF, or I2S) that you have designed it to work with. Make sure to choose a digital interface that is compatible with your intended sources.
Q4. How do I troubleshoot my DIY DAC if it’s not working properly?
A4. If your DIY DAC is not functioning as expected, start by visually inspecting the board for any missing components, solder bridges, or damaged parts. Double-check your connections and power supply voltages. Use a multimeter or oscilloscope to trace signals through the circuit and identify any issues. Consult online forums or communities dedicated to DIY audio for additional support and guidance.
Q5. Can a DIY DAC sound as good as a commercial DAC?
A5. With careful design, component selection, and construction, a DIY DAC can potentially outperform commercial DACs in terms of sound quality and performance. However, achieving top-tier performance requires a significant investment in time, effort, and resources. Commercial DACs benefit from extensive research and development, rigorous testing, and economies of scale, which can be difficult to match in a DIY project. Ultimately, the sound quality of a DIY DAC will depend on the skills and dedication of the builder.
Conclusion
Building your own DIY DAC can be a challenging but rewarding experience for audio enthusiasts and electronics hobbyists. By understanding the basics of DAC design, selecting high-quality components, and following best practices for construction and testing, you can create a custom DAC that meets your specific needs and preferences.
Remember to take your time, pay attention to details, and don’t hesitate to seek advice from experienced builders or online communities. With patience and perseverance, you can build a DIY DAC that delivers exceptional sound quality and provides a sense of pride and accomplishment.
Happy building, and enjoy the fruits of your labor as you experience your favorite music through your very own custom DAC!


Leave a Reply