What is the DHT22 Sensor?
The DHT22, also known as the AM2302, is a digital temperature and humidity sensor that provides highly accurate readings. It features a capacitive humidity sensor and a thermistor for measuring the surrounding air. The sensor communicates with a microcontroller using a single-wire protocol, making it easy to interface with various development boards, such as Arduino and Raspberry Pi.
Key Features of the DHT22 Sensor
- Temperature range: -40°C to 80°C (-40°F to 176°F)
- Temperature accuracy: ±0.5°C (±0.9°F)
- Humidity range: 0% to 100% RH
- Humidity accuracy: ±2% RH (at 25°C)
- Operating voltage: 3.3V to 5V
- Low power consumption
- Single-wire communication protocol
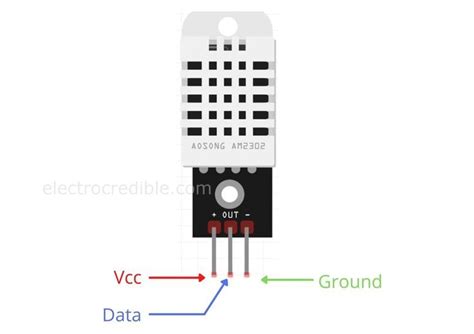
DHT22 Pinout
The DHT22 sensor has four pins, but only three of them are used for operation. Let’s take a closer look at each pin and its function.
| Pin Number | Pin Name | Description |
|---|---|---|
| 1 | VCC | Power supply (3.3V to 5V) |
| 2 | DATA | Data output pin (single-wire communication) |
| 3 | NC | Not connected |
| 4 | GND | Ground |
VCC Pin
The VCC pin is used to power the DHT22 sensor. It accepts a wide range of input voltages, from 3.3V to 5V. When connecting the sensor to a microcontroller, ensure that the voltage levels are compatible to avoid damage to the sensor or the microcontroller.
DATA Pin
The DATA pin is responsible for the single-wire communication between the DHT22 sensor and the microcontroller. This pin is both an input and an output, allowing the microcontroller to send commands and receive data from the sensor. A pull-up resistor (typically 4.7kΩ to 10kΩ) is required on the DATA pin to ensure stable communication.
NC Pin
The NC pin, or “Not Connected” pin, is not used in the DHT22 sensor’s operation. You can leave this pin unconnected when wiring the sensor to your microcontroller.
GND Pin
The GND pin is the ground connection for the DHT22 sensor. It should be connected to the ground of your microcontroller to ensure a common reference point for the voltage levels.

How the DHT22 Works
The DHT22 sensor uses a capacitive humidity sensor and a thermistor to measure the relative humidity and temperature of the surrounding air. The capacitive humidity sensor consists of two electrodes with a moisture-holding substrate between them. As the humidity changes, the substrate’s electrical properties change, altering the capacitance between the electrodes. This change in capacitance is measured and converted into a digital humidity reading.
The thermistor, on the other hand, is a temperature-sensitive resistor. As the temperature changes, the resistance of the thermistor changes accordingly. This change in resistance is measured and converted into a digital temperature reading.
The DHT22 sensor incorporates an 8-bit microcontroller that processes the analog signals from the humidity sensor and thermistor, converting them into digital values. The microcontroller then communicates these digital values to the main microcontroller (e.g., Arduino or Raspberry Pi) using the single-wire protocol.
Single-Wire Communication Protocol
The single-wire communication protocol used by the DHT22 sensor is similar to the I2C protocol, but it uses only one wire for data transmission. The protocol consists of the following steps:
- The microcontroller sends a start signal by pulling the DATA line low for at least 18ms.
- The microcontroller pulls the DATA line high and waits for 20-40μs for the DHT22 sensor to respond.
- The DHT22 sensor responds by pulling the DATA line low for 80μs and then high for 80μs.
- The DHT22 sensor sends 40 bits of data, consisting of the humidity and temperature readings, each bit lasting for 50μs. A logic ‘0’ is represented by a 26-28μs low pulse, while a logic ‘1’ is represented by a 70μs low pulse.
- The microcontroller reads the 40 bits of data and calculates the humidity and temperature values based on the received data.

Interfacing DHT22 with Arduino
To demonstrate the usage of the DHT22 sensor, let’s go through an example of interfacing it with an Arduino board.
Required Components
- DHT22 sensor
- Arduino board (e.g., Arduino Uno)
- 4.7kΩ to 10kΩ pull-up resistor
- Breadboard
- Jumper wires
Wiring Diagram
| DHT22 Pin | Arduino Pin |
|---|---|
| VCC | 5V |
| DATA | Digital Pin 2 (with pull-up resistor) |
| NC | Not connected |
| GND | GND |
Arduino Code
#include <DHT.h>

#define DHTPIN 2
#define DHTTYPE DHT22

DHT dht(DHTPIN, DHTTYPE);

void setup() {
  Serial.begin(9600);
  dht.begin();
}

void loop() {
  float humidity = dht.readHumidity();
  float temperature = dht.readTemperature();

  if (isnan(humidity) || isnan(temperature)) {
    Serial.println("Failed to read from DHT sensor!");
    return;
  }

  Serial.print("Humidity: ");
  Serial.print(humidity);
  Serial.print("%\t");
  Serial.print("Temperature: ");
  Serial.print(temperature);
  Serial.println("°C");

  delay(2000);
}
In this example, we use the DHT library to simplify the communication with the DHT22 sensor. The library handles the single-wire protocol and provides easy-to-use functions for reading the humidity and temperature values.
First, we define the pin to which the DHT22’s DATA pin is connected and specify the sensor type. In the setup() function, we initialize the serial communication and the DHT sensor.
In the loop() function, we read the humidity and temperature values using the readHumidity() and readTemperature() functions, respectively. We then check if the readings are valid (not NaN) and print them to the serial monitor. The loop repeats every 2 seconds (2000ms).

Applications of DHT22 Sensor
The DHT22 sensor’s accurate temperature and humidity measurements make it suitable for a wide range of applications, including:
-
Home Automation: The DHT22 can be used in smart home systems to monitor and control the indoor climate. By integrating the sensor with a microcontroller and relay modules, you can automate heating, ventilation, and air conditioning (HVAC) systems based on the measured temperature and humidity levels.
-
Weather Stations: The DHT22 is often used in DIY weather stations to measure outdoor temperature and humidity. By combining the sensor with other components, such as a barometric pressure sensor and an anemometer, you can create a comprehensive weather monitoring system.
-
Greenhouse Monitoring: In agriculture, the DHT22 can be employed to monitor the temperature and humidity levels in greenhouses. By maintaining optimal environmental conditions, farmers can ensure the healthy growth of plants and maximize crop yields.
-
Industrial Monitoring: The DHT22 can be used in industrial settings to monitor the temperature and humidity levels in manufacturing processes, storage facilities, and server rooms. By keeping the environmental conditions within acceptable ranges, businesses can protect sensitive equipment and ensure product quality.
-
Health and Comfort: The DHT22 can be integrated into wearable devices or used in indoor environments to monitor the temperature and humidity levels for personal health and comfort. Maintaining proper humidity levels can help prevent respiratory issues and improve overall well-being.
Frequently Asked Questions (FAQ)
-
Can I use the DHT22 sensor with a 3.3V microcontroller?
Yes, the DHT22 sensor is compatible with both 3.3V and 5V microcontrollers. However, when using a 3.3V microcontroller, you should connect the DATA pin to a 3.3V compatible pin on the microcontroller and use a lower value pull-up resistor (e.g., 4.7kΩ). -
How often can I read data from the DHT22 sensor?
It is recommended to read data from the DHT22 sensor every 2 seconds or longer. The sensor requires a minimum of 2 seconds between readings to ensure accurate measurements and to prevent excessive power consumption. -
What is the purpose of the pull-up resistor on the DATA pin?
The pull-up resistor on the DATA pin is used to ensure stable communication between the DHT22 sensor and the microcontroller. It pulls the DATA line high when it is not being actively driven low by either the sensor or the microcontroller, preventing floating states and signal distortion. -
Can I use multiple DHT22 sensors with a single microcontroller?
Yes, you can connect multiple DHT22 sensors to a single microcontroller. However, each sensor should be connected to a different digital pin on the microcontroller, and you should create separate instances of the DHT object in your code for each sensor. -
How do I calculate the heat index using the DHT22 sensor readings?
The heat index is a measure of how hot it feels when relative humidity is factored in with the actual air temperature. To calculate the heat index using the DHT22 sensor readings, you can use the following formula:
HI = c1 + c2 * T + c3 * RH + c4 * T * RH + c5 * T^2 + c6 * RH^2 + c7 * T^2 * RH + c8 * T * RH^2 + c9 * T^2 * RH^2
Where:
– HI is the heat index (in °C)
– T is the air temperature (in °C)
– RH is the relative humidity (in %)
– c1 = -8.78469475556
– c2 = 1.61139411
– c3 = 2.33854883889
– c4 = -0.14611605
– c5 = -0.012308094
– c6 = -0.0164248277778
– c7 = 0.002211732
– c8 = 0.00072546
– c9 = -0.000003582
Conclusion
The DHT22 sensor is a reliable and accurate solution for measuring temperature and humidity in various applications. By understanding the DHT22 pinout and its working principle, you can easily integrate this sensor into your projects and build innovative solutions for climate monitoring and control.
Throughout this article, we’ve covered the essential aspects of the DHT22 sensor, including its pinout, single-wire communication protocol, and how to interface it with an Arduino board. We’ve also explored several practical applications where the DHT22 sensor can be utilized, such as home automation, weather stations, greenhouse monitoring, industrial monitoring, and health and comfort.
As you embark on your journey of using the DHT22 sensor in your projects, remember to consider factors such as the operating voltage, pull-up resistor value, and the minimum time interval between readings. By following best practices and leveraging the sensor’s capabilities, you can create robust and efficient systems that accurately monitor and respond to environmental conditions.


Leave a Reply