Introduction
Having a reliable power source is essential for many electronic devices and systems. However, power outages and interruptions can occur unexpectedly, causing loss of data, damage to equipment, and inconvenience. To mitigate these risks, a Battery Backup Circuit can be implemented to provide uninterrupted power supply (UPS) during power failures.
In this comprehensive guide, we will delve into the process of creating a battery backup circuit. We will cover the basic principles, components required, design considerations, and step-by-step instructions for building a reliable and efficient battery backup system.
Understanding the Basics of a Battery Backup Circuit
What is a Battery Backup Circuit?
A battery backup circuit, also known as an uninterrupted power supply (UPS) circuit, is an electronic system that provides continuous power to connected devices in the event of a main power failure. It consists of a battery, charging circuit, switching mechanism, and other components that work together to ensure a seamless transition from main power to battery power when needed.
How Does a Battery Backup Circuit Work?
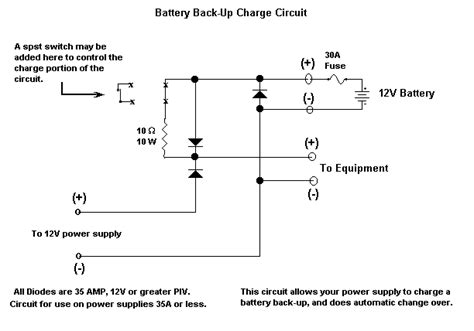
The basic principle of a battery backup circuit is straightforward. During normal operation, the main power supply charges the backup battery through a charging circuit. When a power outage occurs, the circuit automatically switches to the battery, allowing it to power the connected devices. Once the main power is restored, the circuit reverts to charging the battery while simultaneously powering the devices from the main supply.

Components Required for a Battery Backup Circuit
To build a battery backup circuit, you will need the following components:
-
Battery: The core of the backup system, providing power during outages. Common types include lead-acid, lithium-ion, and nickel-metal hydride batteries.
-
Charging Circuit: Responsible for charging the battery when main power is available. It regulates the charging current and voltage to ensure optimal battery performance and longevity.
-
Switching Mechanism: Automatically switches between the main power supply and the battery based on the availability of main power. It can be implemented using relays, transistors, or dedicated power management ICs.
-
Voltage Regulator: Maintains a stable output voltage from the battery to the connected devices, ensuring proper operation within the specified voltage range.
-
Fuse: Protects the circuit and connected devices from overcurrent conditions, preventing damage in case of short circuits or other faults.
-
Diode: Prevents reverse current flow from the battery to the main power supply, protecting the battery and the charging circuit.
-
Capacitors: Smooth out voltage fluctuations and provide short-term energy storage for stable operation.
-
Resistors: Limit current flow and provide necessary voltage drops in the circuit.
-
Indicators: Visual indicators such as LEDs to display the status of the battery backup system (e.g., charging, discharging, low battery).

Designing a Battery Backup Circuit
Before building a battery backup circuit, it’s crucial to consider the following factors to ensure optimal performance and reliability:
Load Requirements
Determine the power requirements of the devices that will be connected to the battery backup circuit. Calculate the total current draw and the required voltage to ensure the battery and other components are appropriately sized.
Battery Capacity
Choose a battery with sufficient capacity to power the connected devices for the desired duration during a power outage. Consider factors such as the expected outage duration, battery self-discharge rate, and the depth of discharge (DoD) recommended for the specific battery type.
Charging Circuit Specifications
Design the charging circuit based on the battery type and its charging requirements. Ensure the charging voltage and current are within the recommended range to prevent overcharging or undercharging, which can damage the battery and reduce its lifespan.
Switching Mechanism
Select a suitable switching mechanism that can handle the required current and voltage levels. Consider factors such as switching speed, reliability, and power consumption. Relays, transistors, or dedicated power management ICs can be used depending on the specific requirements.
Protection Features
Incorporate appropriate protection features to safeguard the battery backup circuit and connected devices. These may include:
-
Overcharge Protection: Prevents the battery from being charged beyond its maximum voltage limit, avoiding damage and potential safety hazards.
-
Overdischarge Protection: Stops the battery from being discharged below its minimum voltage threshold, preventing deep discharge and preserving battery health.
-
Short Circuit Protection: Detects and isolates short circuit conditions to prevent damage to the Circuit Components and connected devices.
-
Thermal Protection: Monitors the temperature of the battery and other critical components, shutting down the system if the temperature exceeds safe limits.
Monitoring and Indication
Include monitoring and indication features to provide real-time information about the status of the battery backup system. This can include:
-
Battery Voltage Monitoring: Continuously measure the battery voltage and display it using a voltmeter or an LCD.
-
Charging Status Indication: Use LEDs or other indicators to show when the battery is charging, fully charged, or in discharge mode.
-
Low Battery Warning: Implement a low battery warning system that alerts the user when the battery reaches a critical level, prompting them to take necessary actions.

Step-by-Step Guide to Building a Battery Backup Circuit
Step 1: Gather the Required Components
Collect all the necessary components based on your design requirements. Ensure that the components are compatible with each other and meet the specified ratings.
Step 2: Design the Circuit Schematic
Create a detaiLED Circuit schematic that includes all the components and their connections. Use appropriate software tools or draw the schematic by hand, clearly labeling each component and its values.
Step 3: Assemble the Charging Circuit
Build the charging circuit based on your schematic. Connect the main power supply to the input of the charging circuit and the battery to its output. Include necessary protection features such as overcharge protection and current limiting.
Step 4: Implement the Switching Mechanism
Set up the switching mechanism to automatically switch between the main power supply and the battery. Use relays, transistors, or dedicated power management ICs based on your design requirements. Ensure proper isolation between the main power and the battery.
Step 5: Integrate the Voltage Regulator
Include a voltage regulator in the circuit to maintain a stable output voltage from the battery to the connected devices. Choose a regulator with the appropriate voltage rating and current capacity.
Step 6: Add Protection Features
Incorporate the necessary protection features such as fuses, diodes, and voltage monitoring circuits to safeguard the battery backup system and connected devices.
Step 7: Include Monitoring and Indication
Implement monitoring and indication features to provide visual feedback on the status of the battery backup system. Use LEDs, LCD displays, or other indicators to display battery voltage, charging status, and low battery warnings.
Step 8: Test and Verify
Thoroughly test the assembled battery backup circuit to ensure proper functionality. Simulate power outages and verify that the system switches to battery power seamlessly. Monitor the battery voltage, charging, and discharging behavior to validate the circuit’s performance.
Step 9: Optimize and Refine
Based on the testing results, make necessary optimizations and refinements to improve the efficiency, reliability, and overall performance of the battery backup circuit.
Battery Backup Circuit Example
Let’s consider a simple battery backup circuit example for powering a small electronic device. The device requires a 5V DC supply and draws a maximum current of 500mA. We will use a lithium-ion battery with a nominal voltage of 3.7V and a capacity of 2000mAh.
Circuit Diagram
Here’s a simplified circuit diagram for the battery backup system:
         +------+     +-------+     +---------+
         |      |     |       |     |         |
+--------+ Main +-----+ Relay +-----+ Voltage |
|        | Power|     |       |     |Regulator|
|        |      |     +-------+     +---------+
|        +------+                        |
|                                         |
|        +------+     +--------+         |
|        |      |     |        |         |
+--------+Battery+-----+Charging+---------+
         |      |     |Circuit |
         +------+     +--------+
Component Selection
- Battery: Lithium-ion battery with a nominal voltage of 3.7V and a capacity of 2000mAh.
- Charging Circuit: TP4056 lithium-ion battery charging module with overcharge and overcurrent protection.
- Relay: 5V SPDT relay for switching between main power and battery.
- Voltage Regulator: LM7805 voltage regulator to provide a stable 5V output.
- Diode: 1N4007 diode for reverse polarity protection.
- Fuse: 1A fuse for overcurrent protection.
- Capacitors: 10μF and 100nF ceramic capacitors for input and output filtering.
Calculations
- Battery Runtime: With a 2000mAh battery and a 500mA load, the estimated runtime is approximately 4 hours (2000mAh ÷ 500mA).
- Charging Current: The TP4056 module typically charges the battery at 1A, so the charging time would be around 2 hours (2000mAh ÷ 1A).
Implementation Steps
- Connect the main power supply to the normally closed (NC) contact of the relay and the common (COM) contact to the input of the voltage regulator.
- Connect the battery to the charging module and the output of the charging module to the normally open (NO) contact of the relay.
- Place the diode in series with the battery to prevent reverse current flow.
- Connect the fuse in series with the main power supply for overcurrent protection.
- Add the capacitors at the input and output of the voltage regulator for filtering.
- Connect the load device to the output of the voltage regulator.
Testing and Verification
- Apply main power and verify that the relay switches to the NC position, connecting the main power to the voltage regulator.
- Measure the output voltage of the regulator to ensure a stable 5V supply to the load.
- Disconnect the main power and check if the relay switches to the NO position, connecting the battery to the voltage regulator.
- Monitor the battery voltage and the load’s operation to ensure proper functionality during battery power mode.
- Reconnect the main power and confirm that the relay switches back to the NC position and the battery starts charging.
Frequently Asked Questions (FAQ)
1. What is the difference between a battery backup circuit and a UPS?
A battery backup circuit and an uninterruptible power supply (UPS) serve the same purpose of providing backup power during power outages. However, a UPS typically includes additional features such as surge protection, voltage regulation, and power conditioning. Battery backup circuits are more basic and focus primarily on switching to battery power when the main power fails.
2. Can I use any type of battery for a battery backup circuit?
The choice of battery depends on the specific requirements of your application. Factors such as voltage, capacity, size, weight, and cost should be considered. Common Battery Types used in battery backup circuits include lead-acid, lithium-ion, and nickel-metal hydride batteries. It’s important to select a battery that is compatible with your charging circuit and meets the power demands of your connected devices.
3. How do I determine the battery capacity needed for my backup system?
To determine the required battery capacity, you need to consider the power consumption of your connected devices and the desired backup duration. Calculate the total current draw of all the devices and multiply it by the expected outage duration. For example, if your devices consume a total of 500mA and you want a backup time of 4 hours, you would need a battery capacity of at least 2000mAh (500mA × 4 hours).
4. How often should I replace the battery in my backup circuit?
The lifespan of a battery depends on various factors such as the battery type, usage patterns, and environmental conditions. Most rechargeable batteries have a limited number of charge-discharge cycles before their capacity starts to degrade. It’s recommended to periodically check the battery’s performance and replace it when its capacity drops significantly or when it fails to hold a charge. Consult the battery manufacturer’s guidelines for specific recommendations on battery replacement intervals.
5. Can I use a battery backup circuit to power high-current devices?
Battery backup circuits can be designed to handle different power levels, but it’s important to ensure that the components, including the battery, charging circuit, and switching mechanism, are rated for the required current. For high-current applications, you may need to use larger batteries, heavy-duty relays or transistors, and robust protection features. It’s advisable to carefully design and test the circuit to ensure it can safely handle the expected load current.
Conclusion
Building a battery backup circuit is a valuable skill that can help you ensure uninterrupted power supply for your electronic devices and systems. By understanding the basic principles, selecting the right components, and following a systematic design approach, you can create a reliable and efficient battery backup solution.
Remember to consider factors such as load requirements, battery capacity, charging specifications, protection features, and monitoring options when designing your circuit. Follow the step-by-step guide provided in this article and refer to the example circuit for guidance.
With a well-designed battery backup circuit, you can minimize the impact of power outages, protect your devices from damage, and ensure continuous operation of critical systems. Whether you’re building a backup system for a small electronic project or a larger-scale application, the principles outlined in this guide will serve as a solid foundation for your battery backup circuit design.


Leave a Reply