What are Arduino Shields?
Arduino shields are expansion boards that can be connected to an Arduino board to add specific features or functionalities. They are designed to be plugged directly on top of the Arduino board, using the same pin layout and form factor. This allows for easy integration and compatibility between the shield and the Arduino board.
Shields can provide a wide range of features, such as:
- Additional sensors and inputs (e.g., GPS, accelerometer, temperature sensor)
- Communication interfaces (e.g., Ethernet, Wi-Fi, Bluetooth)
- Display and output devices (e.g., LCD, LED matrix, motor drivers)
- Power management and battery charging
- Prototyping and breadboarding areas
By using shields, you can quickly and easily add new capabilities to your Arduino projects without having to design and build custom circuits from scratch.
Types of Arduino Shields
There are numerous types of Arduino shields available, each designed for specific purposes. Here are some of the most common categories of Arduino shields:
1. Communication Shields
Communication shields enable your Arduino to communicate with other devices or networks using various protocols and interfaces. Some popular communication shields include:
- Ethernet Shield: Allows your Arduino to connect to a wired Ethernet network and communicate using the TCP/IP protocol.
- Wi-Fi Shield: Enables wireless communication using Wi-Fi networks, allowing your Arduino to connect to the internet or communicate with other Wi-Fi devices.
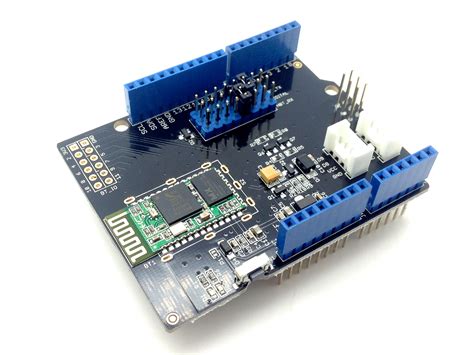
- Bluetooth Shield: Facilitates wireless communication between your Arduino and Bluetooth-enabled devices, such as smartphones or tablets.
- GSM/GPRS Shield: Allows your Arduino to connect to cellular networks and send/receive SMS messages or data using GSM/GPRS technology.
2. Sensor Shields
Sensor shields expand the sensing capabilities of your Arduino by providing additional sensors or inputs. Some common sensor shields include:
- GPS Shield: Adds GPS functionality to your Arduino, allowing it to determine its location, altitude, speed, and other GPS-related data.
- IMU (Inertial Measurement Unit) Shield: Combines accelerometer, gyroscope, and sometimes magnetometer sensors to provide motion and orientation data.
- Environmental Sensor Shield: Includes sensors for measuring various environmental parameters, such as temperature, humidity, barometric pressure, or air quality.
- Touch Sensor Shield: Provides capacitive touch sensing capabilities, allowing your Arduino to detect touch inputs.
3. Display Shields
Display shields add visual output capabilities to your Arduino projects. Some popular display shields include:
- LCD Shield: Provides a simple and easy way to add a character LCD display to your Arduino for displaying text and data.
- OLED Shield: Offers a high-contrast, low-power OLED display for graphical output.
- TFT Shield: Adds a color TFT (Thin-Film-Transistor) LCD display for more advanced graphical applications.
- LED Matrix Shield: Allows you to control a matrix of LEDs for creating visual effects, animations, or simple displays.
4. Motor Control Shields
Motor control shields enable your Arduino to control various types of motors, such as DC motors, stepper motors, or servo motors. These shields typically include motor driver circuits and provide easy-to-use interfaces for controlling motor speed, direction, and position.
Some popular motor control shields include:
- Motor Driver Shield: Provides a simple way to control DC motors with your Arduino, allowing you to control the speed and direction of the motors.
- Stepper Motor Shield: Enables precise control of stepper motors, which are commonly used in CNC machines, 3D printers, and robotics applications.
- Servo Motor Shield: Allows your Arduino to control multiple servo motors simultaneously, making it ideal for robotics and automation projects.
5. Prototyping Shields
Prototyping shields provide a convenient way to add custom circuitry and components to your Arduino projects. They typically offer a breadboard-like prototyping area where you can add your own sensors, modules, or circuits.
Some prototyping shields also include additional features, such as:
- Power regulation and distribution
- Pin headers for easy access to Arduino pins
- Mounting holes for attaching the shield securely to the Arduino board
6. Power Management Shields
Power management shields help regulate and manage power supply for your Arduino projects. They can provide features such as:
- Battery charging and management
- Power supply switching and regulation
- Solar panel integration
- High-current output for driving motors or other power-hungry devices
These shields are particularly useful for projects that require portable or autonomous power sources.

Choosing the Right Arduino Shield
With so many Arduino shields available, it can be overwhelming to choose the right one for your project. Here are some factors to consider when selecting an Arduino shield:
-
Compatibility: Ensure that the shield is compatible with your specific Arduino board model. Some shields may have different form factors or pin layouts that are not compatible with all Arduino boards.
-
Functionality: Determine the specific features and functionalities you need for your project. Choose a shield that provides those features or a combination of shields that collectively meet your requirements.
-
Quality and Reliability: Look for shields from reputable manufacturers or suppliers to ensure good quality and reliability. Read reviews and feedback from other users to gauge the performance and durability of the shield.
-
Documentation and Support: Consider the availability of documentation, tutorials, and community support for the shield. Good documentation and active community support can make it easier to integrate and use the shield in your projects.
-
Cost: Evaluate the cost of the shield in relation to your project budget. While some shields may offer more features, they may also come at a higher price point. Consider the value and necessity of the features offered by the shield.

Integrating Arduino Shields into Your Projects
Once you have chosen the appropriate Arduino shield(s) for your project, the next step is to integrate them into your Arduino setup. Here are the general steps to follow:
-
Mount the shield: Carefully align the shield’s pins with the corresponding headers on the Arduino board. Gently press the shield onto the Arduino board, ensuring that all pins are properly inserted.
-
Connect peripherals: If the shield requires additional peripherals, such as sensors, motors, or external devices, connect them to the appropriate connectors or pins on the shield.
-
Install libraries: Some shields may require specific libraries to be installed in the Arduino IDE to enable their functionalities. Check the shield’s documentation for any required libraries and install them accordingly.
-
Update the code: Modify your Arduino sketch to include the necessary code for initializing and utilizing the features provided by the shield. Refer to the shield’s documentation or example sketches for guidance on how to interact with the shield through code.
-
Test and debug: Upload the modified sketch to your Arduino board and test the functionality of the shield. If you encounter any issues, refer to the shield’s documentation, troubleshooting guides, or seek help from the Arduino community forums.
-
Integrate into the project: Once the shield is functioning as expected, integrate it into your overall project setup. This may involve connecting additional components, enclosures, or power sources, depending on your project requirements.

Example Project: Weather Station with Arduino Shields
To illustrate the use of Arduino shields, let’s consider an example project: building a weather station using an Arduino board and various shields.
Components Required
- Arduino board (e.g., Arduino Uno)
- Environmental Sensor Shield (with temperature, humidity, and Barometric Pressure Sensors)
- Wi-Fi Shield (for wireless data transmission)
- LCD Shield (for displaying weather data)
- Power Management Shield (for battery-powered operation)
- Enclosure and mounting hardware
Steps
- Assemble the hardware:
- Mount the Environmental Sensor Shield, Wi-Fi Shield, LCD Shield, and Power Management Shield onto the Arduino board.
-
Connect any necessary peripherals, such as external sensors or antennas.
-
Install required libraries:
-
Install the libraries for the Environmental Sensor Shield, Wi-Fi Shield, and LCD Shield in the Arduino IDE.
-
Write the Arduino sketch:
- Initialize the shields and configure their settings (e.g., Wi-Fi credentials, sensor parameters).
- Read data from the Environmental Sensor Shield (temperature, humidity, pressure).
- Display the weather data on the LCD Shield.
- Transmit the data wirelessly using the Wi-Fi Shield to a remote server or database.
-
Implement power management functions using the Power Management Shield (e.g., battery monitoring, sleep modes).
-
Test and debug:
- Upload the sketch to the Arduino board and verify that the weather data is being accurately measured, displayed, and transmitted.
-
Debug any issues related to sensor readings, wireless connectivity, or power management.
-
Integrate into the enclosure:
- Mount the Arduino board with shields into a suitable weatherproof enclosure.
-
Ensure proper ventilation and protection from the elements.
-
Deploy and collect data:
- Install the weather station in the desired location.
- Collect and analyze the weather data transmitted by the station over time.
This example demonstrates how Arduino shields can be used to quickly and easily build a sophisticated weather station with multiple functionalities, such as environmental sensing, wireless communication, display, and power management.
Frequently Asked Questions (FAQ)
-
Can I use multiple shields simultaneously on an Arduino board?
Yes, you can stack multiple shields on top of an Arduino board as long as they are compatible and do not have conflicting pin usage. However, keep in mind that stacking too many shields may cause physical instability and power consumption issues. -
Are all Arduino shields compatible with all Arduino boards?
Not all shields are compatible with all Arduino boards. Some shields are designed for specific Arduino models or form factors. Always check the shield’s specifications and compatibility information before purchasing or using it with your Arduino board. -
Do I need to modify my Arduino code when using a shield?
In most cases, yes. Shields often require specific libraries and code modifications to initialize and utilize their features. The shield’s documentation or example sketches provide guidance on how to integrate the shield into your Arduino code. -
Can I create my own custom Arduino shields?
Yes, you can design and create your own custom Arduino shields. This requires knowledge of PCB design, electronics, and fabrication processes. There are online resources, tutorials, and communities that can help you get started with designing and building custom shields. -
Are there any limitations to using Arduino shields?
While Arduino shields offer great flexibility and functionality, there are some limitations to consider: - Shields can add physical bulk and weight to your Arduino setup.
- Stacking multiple shields may introduce power consumption and heat dissipation challenges.
- Some shields may have limited compatibility with certain Arduino models or other shields.
- Shields may add cost to your project, especially if you require multiple specialized shields.
Conclusion
Arduino shields are a powerful and convenient way to expand the capabilities of your Arduino projects. By providing additional features, sensors, communication interfaces, and functionalities, shields enable you to quickly prototype and build complex projects without starting from scratch.
When choosing Arduino shields, consider factors such as compatibility, functionality, quality, documentation, and cost. By carefully selecting the right shields for your project and integrating them properly, you can unlock a wide range of possibilities and bring your Arduino projects to life.
As you explore the world of Arduino shields, don’t hesitate to experiment, learn from the community, and push the boundaries of what you can create with Arduino. With the vast ecosystem of shields available, the only limit is your imagination.


Leave a Reply