Introduction to ESP32
The ESP32 is a low-cost, low-power system on a chip (SoC) series with Wi-Fi & dual-mode Bluetooth capabilities. It is designed and developed by Espressif Systems, a Shanghai-based Chinese company. The ESP32 series employs a Tensilica Xtensa LX6 microprocessor in both dual-core and single-core variations and includes built-in antenna switches, RF balun, power amplifier, low-noise receive amplifier, filters, and power management modules.
Key Features of ESP32
| Feature | Description |
|---|---|
| Processor | Xtensa dual-core 32-bit LX6 microprocessor, operating at 160 or 240 MHz |
| Memory | 520 KiB SRAM, 448 KiB ROM |
| Wireless Connectivity | Wi-Fi: 802.11 b/g/n, Bluetooth: v4.2 BR/EDR and BLE |
| Peripheral Interfaces | SPI, I2C, I2S, UART, GPIO, SDIO, LED PWM, Motor PWM, IR, pulse counter, GPIO |
| Security | IEEE 802.11 standard security features, including WFA, WPA/WPA2, and WAPI |
| Power Management | Internal low-dropout regulator, individual power domain for RTC, 5uA deep sleep current |
The ESP32’s low cost, versatile features, and energy efficiency make it an ideal choice for a wide range of IoT applications and projects.
Getting Started with ESP32 Projects
Before diving into specific projects, it’s essential to set up the development environment and understand the basics of programming the ESP32.
Setting Up the Development Environment
-
Install the Arduino IDE: Download and install the latest version of the Arduino IDE from the official website (https://www.arduino.cc/en/software).
-
Add ESP32 Board Support: In the Arduino IDE, go to File > Preferences. In the “Additional Boards Manager URLs” field, enter “https://dl.espressif.com/dl/package_esp32_index.json” and click “OK.”
-
Install ESP32 Board: Go to Tools > Board > Boards Manager. Search for “esp32” and install the “ESP32 by Espressif Systems” package.
-
Select the ESP32 Board: Go to Tools > Board and select your specific ESP32 board from the list.
Basic Programming Concepts
-
Setup() Function: This function is called once when the ESP32 starts up or resets. It is used to initialize variables, pin modes, and other settings.
-
Loop() Function: This function is called repeatedly after the setup() function. It contains the main logic of your program.
-
GPIO Pins: The ESP32 has numerous GPIO (General Purpose Input/Output) pins that can be used for digital input, digital output, analog input, and more.
-
Serial Communication: The ESP32 can communicate with a computer or other devices using serial communication. Use the Serial.begin() function to initialize serial communication and Serial.print() or Serial.println() to send data.

Low Power ESP32 Projects
One of the key advantages of the ESP32 is its low power consumption, making it suitable for battery-powered and energy-efficient applications.
1. Battery-Powered Environmental Sensor
In this project, we’ll create a battery-powered environmental sensor using an ESP32, a BME280 temperature, humidity, and pressure sensor, and a lithium-ion battery.
Hardware Requirements
- ESP32 development board
- BME280 sensor module
- Lithium-ion battery (e.g., 18650)
- Battery holder
- Breadboard and jumper wires
Wiring Diagram
| ESP32 Pin | BME280 Pin |
|---|---|
| 3.3V | VCC |
| GND | GND |
| GPIO21 | SDA |
| GPIO22 | SCL |
Code
#include <Wire.h>
#include <Adafruit_BME280.h>

Adafruit_BME280 bme;

void setup() {
  Serial.begin(115200);
  Wire.begin(21, 22);

  if (!bme.begin(0x76)) {
    Serial.println("Could not find a valid BME280 sensor, check wiring!");
    while (1);
  }
}

void loop() {
  float temperature = bme.readTemperature();
  float humidity = bme.readHumidity();
  float pressure = bme.readPressure() / 100.0F;

  Serial.printf("Temperature: %.2f°C | Humidity: %.2f%% | Pressure: %.2fhPa\n", temperature, humidity, pressure);

  // Enter deep sleep for 10 minutes (600 seconds)
  esp_sleep_enable_timer_wakeup(600 * 1000000);
  esp_deep_sleep_start();
}
In this code, we initialize the BME280 sensor and read the temperature, humidity, and pressure values every 10 minutes. Between readings, the ESP32 enters deep sleep mode to conserve power.
2. Solar-Powered Weather Station
This project extends the battery-powered environmental sensor by adding solar charging capabilities and displaying the data on a web dashboard.
Additional Hardware Requirements
- Solar panel (5V)
- TP4056 lithium battery charging module
- SSD1306 OLED display (128×64)
Wiring Diagram
| ESP32 Pin | Component Pin |
|---|---|
| 3.3V | OLED VCC, TP4056 OUT+ |
| GND | OLED GND, TP4056 OUT- |
| GPIO21 | OLED SDA |
| GPIO22 | OLED SCL |
Connect the solar panel to the TP4056 module’s IN+ and IN- pins, and connect the battery to the TP4056 module’s BAT+ and BAT- pins.
Code Modifications
-
Include the SSD1306 library and initialize the OLED display in the setup() function.
-
Display the sensor readings on the OLED screen before entering deep sleep.
-
Create a web server that displays the sensor data on a dashboard. You can use the ESP32’s built-in Wi-Fi capabilities to send the data to a web server or cloud platform like ThingSpeak or Blynk.

Low-Cost ESP32 Projects
The ESP32’s affordability makes it an excellent choice for budget-friendly projects and prototypes.
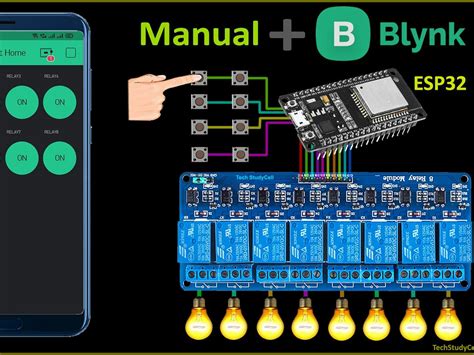
1. DIY Smart Home Hub
Create a low-cost smart home hub using an ESP32 and off-the-shelf components to control and monitor various devices.
Hardware Requirements
- ESP32 development board
- Relay module (e.g., 4-channel)
- DHT22 temperature and humidity sensor
- Breadboard and jumper wires
Software Requirements
- Blynk app (iOS or Android)
- Blynk library for Arduino
Code
-
Install the Blynk library in the Arduino IDE.
-
Set up a new Blynk project in the app and obtain the authentication token.
-
Write the code to connect the ESP32 to Wi-Fi and the Blynk server.
-
Define the GPIO pins for the relay module and DHT22 sensor.
-
Create functions to control the relays and read the sensor data.
-
Use the Blynk app to create a dashboard with buttons for controlling the relays and displaying the sensor data.
2. RFID Access Control System
Implement a low-cost RFID access control system using an ESP32, an RFID reader, and a servo motor for door control.
Hardware Requirements
- ESP32 development board
- MFRC522 RFID reader
- RFID tags
- Servo motor (e.g., SG90)
- Breadboard and jumper wires
Wiring Diagram
| ESP32 Pin | Component Pin |
|---|---|
| 3.3V | MFRC522 3.3V, Servo VCC |
| GND | MFRC522 GND, Servo GND |
| GPIO18 | Servo signal |
| GPIO5 | MFRC522 SCK |
| GPIO23 | MFRC522 MOSI |
| GPIO19 | MFRC522 MISO |
| GPIO22 | MFRC522 RST |
| GPIO21 | MFRC522 SDA |
Code
-
Install the MFRC522 and Servo libraries in the Arduino IDE.
-
Define the GPIO pins for the RFID reader and servo motor.
-
Create a list of authorized RFID tags.
-
In the loop() function, check for the presence of an RFID tag.
-
If a tag is detected, compare it to the list of authorized tags.
-
If the tag is authorized, rotate the servo motor to open the door.
-
After a specified time (e.g., 5 seconds), rotate the servo motor back to its original position to close the door.

Frequently Asked Questions (FAQ)
1. What is the difference between the ESP32 and the ESP8266?
The ESP32 is a more advanced and feature-rich successor to the ESP8266. It has a dual-core processor, more memory, faster Wi-Fi, Bluetooth support, and additional peripheral interfaces. The ESP32 is more suitable for complex projects and applications that require higher performance and more connectivity options.
2. Can I use the ESP32 with batteries?
Yes, the ESP32 is designed for low-power applications and can be powered by batteries. You can use lithium-ion batteries, such as 18650 cells, or even solar panels in combination with battery charging modules like the TP4056.
3. What programming languages can I use with the ESP32?
The most common programming language for the ESP32 is C++, using the Arduino IDE. However, you can also use other languages and frameworks, such as MicroPython, Lua (with the NodeMCU firmware), and the Espressif IoT Development Framework (ESP-IDF) with C/C++.
4. How can I extend the battery life of my ESP32 projects?
To maximize battery life in your ESP32 projects, you can:
- Use deep sleep mode to put the ESP32 into a low-power state when not in use
- Reduce the frequency of sensor readings or data transmissions
- Minimize the use of power-hungry peripherals like Wi-Fi and Bluetooth when not needed
- Use efficient power management techniques, such as disabling unused peripherals and optimizing code for low power consumption
5. Where can I find more resources and project ideas for the ESP32?
There are numerous online resources, communities, and platforms dedicated to the ESP32 and IoT projects. Some popular resources include:
- Espressif Systems official website and forums (https://www.espressif.com/)
- Arduino ESP32 documentation and examples (https://github.com/espressif/arduino-esp32)
- Instructables (https://www.instructables.com/circuits/arduino/projects/)
- Hackster.io (https://www.hackster.io/esp32)
- GitHub repositories and project collections (https://github.com/topics/esp32)
By exploring these resources and engaging with the ESP32 community, you can find inspiration, learn from others’ experiences, and discover new project ideas to suit your needs and interests.


Leave a Reply