What is an Arduino Robot Kit?
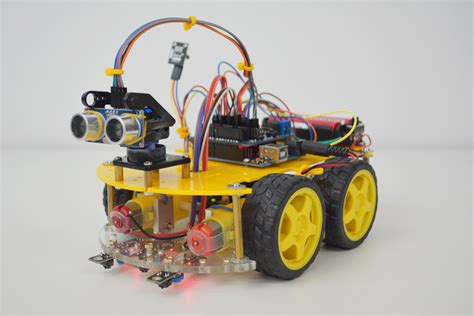
An Arduino robot kit is a collection of components and instructions that enable you to build and program a functional robot using the Arduino microcontroller board. These kits typically include various sensors, actuators, wheels, and structural components, along with the necessary wiring and a guide to help you assemble and program your robot.
Arduino Robot Kits come in different sizes, complexity levels, and price ranges, catering to both beginners and advanced users. Some kits focus on specific applications, such as line-following robots or obstacle-avoiding robots, while others provide a more general-purpose platform for experimentation and customization.
Benefits of Arduino Robot Kits
Arduino robot kits offer several benefits for those interested in robotics and programming:
- Learning opportunities: Building and programming an Arduino robot provides hands-on experience with electronics, mechanics, and coding, making it an excellent educational tool for students and hobbyists.
- Customization: Arduino is an open-source platform, which means you can easily modify and expand your robot’s capabilities by adding new sensors, actuators, or custom code.
- Community support: The Arduino community is vast and active, providing a wealth of resources, tutorials, and forums where you can seek guidance and share your projects.
- Affordability: Compared to industrial-grade robots, Arduino robot kits are relatively inexpensive, making robotics accessible to a wider audience.

Types of Arduino Robot Kits
There are several types of Arduino robot kits available, each with its own features and target audience:
1. Beginner-friendly Kits
These kits are designed for those new to robotics and programming. They often include a pre-assembled chassis, a simple Arduino board (such as the Arduino Uno), and a limited number of sensors and actuators. Beginner-friendly kits usually come with detailed instructions and example code to help you get started quickly.
Examples:
– Arduino Robot Kit for Beginners
– Elegoo UNO Project Smart Robot Car Kit
2. Educational Kits
Educational Arduino robot kits are aimed at students and educators, providing a platform for learning robotics, programming, and STEM concepts. These kits often include additional resources, such as lesson plans, worksheets, and tutorials, to facilitate classroom use.
Examples:
– Arduino Mecanum Wheel Robot Kit for Education
– Parallax Arduino Robot Shield Kit
3. Advanced Kits
Advanced Arduino robot kits cater to users with prior experience in robotics and programming. These kits often feature more powerful Arduino boards (such as the Arduino Mega), a wider range of sensors and actuators, and more complex mechanical designs. Advanced kits may require additional assembly and offer more flexibility for customization.
Examples:
– SainSmart 6WD Arduino Robotics Kit
– DFRobot 4WD Arduino Mobile Robot Platform
4. Application-specific Kits
Some Arduino robot kits are designed for specific applications or tasks, such as line-following, obstacle avoidance, or remote control. These kits include specialized sensors and actuators tailored to the intended application, along with sample code and tutorials to help you implement the desired functionality.
Examples:
– Arduino Line Follower Robot Kit
– Arduino Bluetooth Controlled Robot Car Kit

Factors to Consider When Choosing an Arduino Robot Kit
When shopping for an Arduino robot kit, consider the following factors to ensure you select the best kit for your needs and skill level:
- Skill level: Choose a kit that matches your experience with robotics and programming. Beginner-friendly kits are ideal for those just starting, while advanced kits offer more challenges and opportunities for experienced users.
- Budget: Arduino robot kits vary in price, ranging from under $50 for basic kits to several hundred dollars for advanced ones. Determine your budget and look for kits that offer the best value for your money.
- Intended use: Consider the purpose of your robot. If you have a specific application in mind, look for kits that cater to that purpose. For general experimentation and learning, choose a versatile kit with a variety of sensors and actuators.
- Expandability: If you plan to add new features or customize your robot in the future, choose a kit that allows for easy expansion and modification.
- Documentation and support: Look for kits with comprehensive documentation, tutorials, and community support to ensure you have the resources you need to build, program, and troubleshoot your robot.

Popular Arduino Robot Kit Components
Arduino robot kits typically include a variety of components that work together to create a functional robot. Here are some of the most common components you’ll find in these kits:
1. Arduino Board
The heart of any Arduino robot is the Arduino microcontroller board. The most common boards used in robot kits are:
| Board | Features |
|---|---|
| Arduino Uno | Entry-level board with sufficient I/O pins for basic robots |
| Arduino Mega | Advanced board with more I/O pins and memory for complex projects |
| Arduino Nano | Compact board suitable for small robots or limited space |
2. Sensors
Sensors allow your robot to gather information about its environment. Some popular sensors used in Arduino robot kits include:
| Sensor | Function |
|---|---|
| Ultrasonic sensor | Measures distance by emitting and detecting ultrasonic waves |
| Infrared sensor | Detects objects and obstacles using infrared light |
| Line sensor | Detects contrasting colors, typically used for line-following robots |
| Gyroscope and accelerometer | Measures the robot’s orientation and acceleration |
3. Actuators
Actuators enable your robot to move and interact with its surroundings. Common actuators in Arduino robot kits include:
| Actuator | Function |
|---|---|
| DC motors | Provide rotational motion for wheels or other moving parts |
| Servo motors | Allow precise control of angular position, often used for steering or object manipulation |
| Stepper motors | Offer precise control of rotational position and speed |
4. Structural Components
Arduino robot kits include various structural components to build the robot’s chassis and mount the electronics. These components may include:
- Acrylic or aluminum plates
- Wheels and treads
- Gears and pulleys
- Screws, nuts, and standoffs
5. Power Supply
Most Arduino robot kits use rechargeable battery packs or disposable batteries to power the robot. Some common power supply options include:
- 7.4V Li-Po battery packs
- AA or AAA battery holders
- 9V battery connectors
Getting Started with Your Arduino Robot Kit
Once you’ve chosen and purchased your Arduino robot kit, follow these steps to get started:
- Unbox and inventory: Carefully unpack your kit and verify that all components are present using the provided inventory list.
- Review the documentation: Read through the kit’s assembly guide, schematic diagrams, and programming tutorials to familiarize yourself with the components and the build process.
- Assemble the chassis: Begin by assembling the robot’s chassis according to the instructions. Pay attention to the placement of motors, wheels, and structural components.
- Mount the electronics: Attach the Arduino board, sensors, and actuators to the chassis as specified in the guide. Ensure that all connections are secure and properly insulated.
- Install the Arduino IDE: Download and install the Arduino Integrated Development Environment (IDE) on your computer. This software is used to write, compile, and upload code to your Arduino board.
- Connect and test: Connect your Arduino robot to your computer using a USB cable. Use the Arduino IDE to upload a basic test sketch (such as a blink sketch) to ensure that the board is functioning correctly.
- Program your robot: Follow the programming tutorials provided with your kit to write and upload code that controls your robot’s sensors and actuators. Start with simple sketches and gradually increase the complexity as you become more comfortable with the programming language and the robot’s capabilities.
- Experiment and customize: Once you have a working robot, feel free to experiment with different configurations, add new sensors or actuators, and create your own custom programs. The Arduino community is a great resource for inspiration and guidance as you explore the possibilities of your robot kit.
Tips for Success with Arduino Robot Kits
Building and programming an Arduino robot can be a rewarding experience, but it can also present challenges. Here are some tips to help you succeed:
- Start simple: If you’re new to robotics or programming, begin with basic sketches and gradually increase the complexity of your projects. This approach helps you build a strong foundation and avoid frustration.
- Double-check connections: Before powering on your robot, always double-check that all connections are secure and properly insulated. Loose or incorrect connections can cause damage to your components or result in unpredictable behavior.
- Comment your code: When writing sketches, use comments to describe what each section of the code does. This practice makes it easier to understand and modify your code later, especially if you take a break from the project.
- Seek help when needed: If you encounter difficulties or have questions, don’t hesitate to reach out to the Arduino community. Forums, tutorials, and online resources can provide valuable guidance and support.
- Learn from failures: Building a robot involves trial and error. If something doesn’t work as expected, take the opportunity to learn from the experience and make adjustments. Troubleshooting is an essential skill in robotics and programming.
Frequently Asked Questions (FAQ)
-
Do I need prior experience with electronics or programming to use an Arduino robot kit?
While some prior knowledge can be helpful, many Arduino robot kits are designed for beginners and include detailed instructions and tutorials to guide you through the process. With dedication and patience, even those with no prior experience can successfully build and program an Arduino robot. -
Can I use an Arduino robot kit for a school project or competition?
Yes, Arduino robot kits are an excellent choice for school projects and robotics competitions. Many kits are specifically designed for educational purposes and can be used to teach STEM concepts and foster problem-solving skills. -
How long does it take to build an Arduino robot from a kit?
The time required to build an Arduino robot varies depending on the complexity of the kit and your experience level. Simple kits may take a few hours to assemble, while more advanced kits can take several days or weeks. Always refer to the kit’s documentation for estimated build times. -
Can I add custom parts or modify my Arduino robot after building it from a kit?
Absolutely! One of the great advantages of Arduino robot kits is their flexibility and expandability. You can easily add new sensors, actuators, or custom components to your robot to extend its capabilities or adapt it to new applications. -
What should I do if I encounter issues or errors while building or programming my Arduino robot?
If you encounter issues, first consult the kit’s documentation and troubleshooting guide. If the problem persists, seek help from the Arduino community through forums, social media, or online resources. Many experienced users are happy to offer guidance and support to those facing challenges with their projects.
Conclusion
Arduino robot kits offer an accessible and engaging way to explore the world of robotics and programming. By providing a hands-on learning experience, these kits enable users of all skill levels to build and customize their own robots, fostering creativity, problem-solving, and technical skills.
When shopping for an Arduino robot kit, consider your skill level, budget, intended use, and the kit’s expandability and documentation. With the right kit and a willingness to learn, you can embark on an exciting journey into the realm of robotics.
As you build and program your Arduino robot, remember to start simple, double-check connections, comment your code, seek help when needed, and learn from failures. By following these tips and engaging with the supportive Arduino community, you’ll be well on your way to creating impressive robotic projects.
So, whether you’re a student, hobbyist, or aspiring roboticist, an Arduino robot kit is an excellent investment in your education and passion for technology. Get ready to unleash your creativity and bring your robotic dreams to life!


Leave a Reply