Introduction to Raspberry Pi and Microphones
The Raspberry Pi is a versatile single-board computer that has revolutionized the world of DIY projects and embedded systems. With its compact size, low power consumption, and powerful processing capabilities, the Raspberry Pi has become a popular choice for developers, hobbyists, and educators alike. One of the many exciting possibilities with the Raspberry Pi is the integration of a microphone, which opens up a wide range of applications in audio processing, voice recognition, and more.
In this article, we will explore the world of Raspberry Pi Microphones and guide you through the process of integrating a microphone with your Raspberry Pi. We will cover the basics of microphones, the different types of microphones compatible with the Raspberry Pi, and provide step-by-step instructions on how to set up and configure a microphone for your projects. Whether you are a beginner or an experienced Raspberry Pi user, this article will equip you with the knowledge and skills to incorporate microphone functionality into your projects.
What is a Microphone?
A microphone is an transducer that converts sound waves into electrical signals. It is an essential component in various audio applications, including voice recording, speech recognition, and audio analysis. Microphones come in different types, each with its own characteristics and suitable for specific use cases. The most common types of microphones are:
-
Dynamic Microphones: These microphones use a moving coil attached to a diaphragm to convert sound waves into electrical signals. They are rugged, reliable, and often used in live performances and stage applications.
-
Condenser Microphones: Condenser microphones utilize a thin diaphragm and a backplate to create a capacitor. When sound waves hit the diaphragm, it vibrates, causing changes in the capacitance, which is then converted into an electrical signal. Condenser microphones are known for their high sensitivity and wide frequency response, making them ideal for studio recordings and detailed audio capture.
-
Electret Microphones: Electret microphones are a type of condenser microphone that uses a permanently charged diaphragm. They are cost-effective, compact, and widely used in consumer electronics, such as smartphones and laptops.
-
MEMS Microphones: MEMS (Micro-Electro-Mechanical Systems) microphones are miniature microphones fabricated using semiconductor manufacturing techniques. They are small, low-power, and commonly found in mobile devices, wearables, and IoT applications.
When choosing a microphone for your Raspberry Pi project, consider factors such as the desired audio quality, the intended application, and the compatibility with the Raspberry Pi’s hardware and software ecosystem.
Connecting a Microphone to the Raspberry Pi
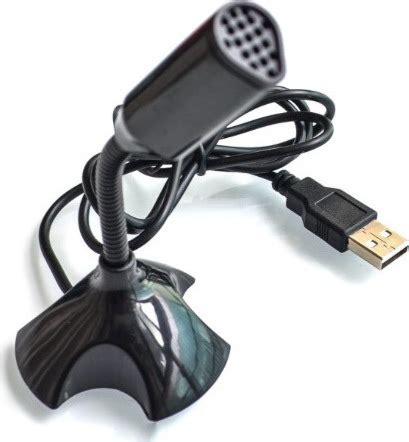
USB Microphones
One of the easiest ways to connect a microphone to your Raspberry Pi is by using a USB microphone. USB microphones are plug-and-play devices that can be directly connected to the Raspberry Pi’s USB port without requiring additional hardware or complex configurations. Here’s how you can set up a USB microphone with your Raspberry Pi:
-
Connect the USB microphone to one of the available USB ports on your Raspberry Pi.
-
Open a terminal window on your Raspberry Pi.
-
Install the necessary audio packages by running the following command:
sudo apt-get install alsa-utils
- Once the installation is complete, you can test the microphone by running the following command:
arecord --duration=5 --format=wav test.wav
This command will record audio from the USB microphone for 5 seconds and save it as a WAV file named test.wav.
- To play back the recorded audio, use the following command:
aplay test.wav
If you hear the recorded audio, congratulations! Your USB microphone is now successfully set up and ready to use with your Raspberry Pi.
Some popular USB microphones compatible with the Raspberry Pi include:
- Blue Yeti USB Microphone
- Samson Go Mic Portable USB Condenser Microphone
- Audio-Technica ATR2100x-USB Cardioid Dynamic Microphone
Audio Input Jack
Another option for connecting a microphone to your Raspberry Pi is by using the audio input jack. The Raspberry Pi 3 and earlier models feature a 3.5mm audio jack that supports both audio output and input. Here’s how you can connect a microphone using the audio input jack:
-
Connect your microphone to the audio input jack on your Raspberry Pi. If your microphone has a separate 3.5mm connector, you may need to use a splitter cable to separate the microphone and headphone channels.
-
Open a terminal window on your Raspberry Pi.
-
Install the necessary audio packages by running the following command:
sudo apt-get install alsa-utils
- Configure the audio input source by running the following command:
sudo raspi-config
Navigate to “Advanced Options” > “Audio” and select “Force 3.5mm (‘headphone’) jack” as the audio input source.
- Test the microphone by recording audio using the
arecordcommand, similar to the USB microphone setup:
arecord --duration=5 --format=wav test.wav
- Play back the recorded audio using the
aplaycommand:
aplay test.wav
If you hear the recorded audio, your microphone is successfully connected and configured via the audio input jack.
Note: The Raspberry Pi 4 does not have a dedicated audio input jack. If you are using a Raspberry Pi 4, you will need to use a USB microphone or an external USB sound card with microphone input.
I2S Microphones
I2S (Inter-IC Sound) is a digital audio interface commonly used in embedded systems. Some microphones, especially MEMS microphones, support I2S output, which can be connected directly to the Raspberry Pi’s GPIO pins. Here’s how you can connect an I2S microphone to your Raspberry Pi:
- Identify the I2S pins on your Raspberry Pi. The I2S pins are typically labeled as follows:
- BCLK: Bit Clock
- LRCLK: Left-Right Clock (also known as Frame Sync)
-
DIN: Data In
-
Connect the I2S microphone to the corresponding pins on the Raspberry Pi. Refer to the microphone’s datasheet for the specific pin assignments.
-
Enable I2S on your Raspberry Pi by adding the following line to the
/boot/config.txtfile:
dtparam=i2s=on
-
Reboot your Raspberry Pi for the changes to take effect.
-
Install the necessary dependencies by running the following command:
sudo apt-get install libasound2-dev
- Configure the I2S device in the ALSA configuration file. Create a new file named
i2s.confin the/etc/modprobe.d/directory and add the following lines:
options snd-rpi-simple-card simple-card-name="I2S Mic"

   options snd-rpi-simple-card simple-card-dai-name="i2s-hifi"
- Load the I2S driver by running the following command:
sudo modprobe snd-rpi-simple-card
- Test the I2S microphone by recording audio using the
arecordcommand:
arecord -D plughw:1,0 --duration=5 --format=wav test.wav
- Play back the recorded audio using the
aplaycommand:
aplay test.wav
If you hear the recorded audio, your I2S microphone is successfully connected and configured.
Some popular I2S microphones compatible with the Raspberry Pi include:
- Adafruit I2S MEMS Microphone Breakout
- InvenSense ICS-43434 I2S Digital Microphone
- SPH0645 I2S MEMS Microphone

Audio Processing Libraries and Tools
Once you have connected a microphone to your Raspberry Pi, you can leverage various audio processing libraries and tools to analyze, manipulate, and extract information from the captured audio. Here are some popular libraries and tools for audio processing on the Raspberry Pi:
PyAudio
PyAudio is a Python library that provides bindings for the PortAudio library, enabling easy access to audio input and output devices. With PyAudio, you can capture audio from a microphone, process it in real-time, and even generate audio output. Here’s a simple example of recording audio using PyAudio:
import pyaudio
import wave

CHUNK = 1024
FORMAT = pyaudio.paInt16
CHANNELS = 1
RATE = 44100
RECORD_SECONDS = 5
WAVE_OUTPUT_FILENAME = "output.wav"

p = pyaudio.PyAudio()

stream = p.open(format=FORMAT,
                channels=CHANNELS,
                rate=RATE,
                input=True,
                frames_per_buffer=CHUNK)

print("Recording...")

frames = []

for i in range(0, int(RATE / CHUNK * RECORD_SECONDS)):
    data = stream.read(CHUNK)
    frames.append(data)

print("Recording finished.")

stream.stop_stream()
stream.close()
p.terminate()

wf = wave.open(WAVE_OUTPUT_FILENAME, 'wb')
wf.setnchannels(CHANNELS)
wf.setsampwidth(p.get_sample_size(FORMAT))
wf.setframerate(RATE)
wf.writeframes(b''.join(frames))
wf.close()
This example demonstrates how to record audio from the default microphone for a specified duration and save it as a WAV file using PyAudio.
librosa
librosa is a Python library for music and audio analysis. It provides a wide range of functionalities, including audio loading, feature extraction, pitch detection, and tempo estimation. Here’s an example of loading an audio file and extracting the Mel-frequency cepstral coefficients (MFCCs) using librosa:
import librosa

# Load the audio file
y, sr = librosa.load("audio.wav")

# Extract MFCCs
mfccs = librosa.feature.mfcc(y=y, sr=sr, n_mfcc=13)

# Print the shape of the MFCC feature matrix
print(mfccs.shape)
librosa is particularly useful for audio analysis tasks, such as speech recognition, music information retrieval, and audio classification.
SpeechRecognition
SpeechRecognition is a Python library that provides a simple interface for performing speech recognition with various engines and APIs, including Google Speech Recognition, Sphinx, and Wit.ai. Here’s an example of performing speech recognition using the Google Speech Recognition API:
import speech_recognition as sr

r = sr.Recognizer()

with sr.Microphone() as source:
    print("Say something!")
    audio = r.listen(source)

try:
    text = r.recognize_google(audio)
    print("You said: " + text)
except sr.UnknownValueError:
    print("Google Speech Recognition could not understand audio")
except sr.RequestError as e:
    print("Could not request results from Google Speech Recognition service; {0}".format(e))
This example demonstrates how to capture audio from the microphone, send it to the Google Speech Recognition API, and retrieve the recognized text.

Voice-Controlled Projects with Raspberry Pi
With a microphone connected to your Raspberry Pi, you can create exciting voice-controlled projects that respond to spoken commands or trigger actions based on specific voice patterns. Here are a few project ideas to get you started:
-
Voice-Controlled Home Automation: Build a voice-controlled home automation system using the Raspberry Pi and a microphone. Use speech recognition to interpret voice commands and control various devices, such as lights, thermostats, or smart plugs, using protocols like MQTT or REST APIs.
-
Voice-Activated Robot: Create a voice-activated robot using the Raspberry Pi, a microphone, and a robot chassis. Implement speech recognition to interpret voice commands and control the robot’s movements, such as forward, backward, left, and right.
-
Personal Voice Assistant: Develop a personal voice assistant similar to Alexa or Siri using the Raspberry Pi and a microphone. Use speech recognition to understand voice queries, perform web searches, play music, set reminders, or integrate with other APIs to provide a personalized voice-controlled experience.
-
Voice-Based Security System: Build a voice-based security system using the Raspberry Pi, a microphone, and additional sensors like motion detectors or cameras. Use voice recognition to authenticate users and grant access based on specific voice patterns or spoken passwords.
-
Voice-Controlled Media Center: Create a voice-controlled media center using the Raspberry Pi, a microphone, and a media player software like Kodi. Implement speech recognition to control playback, search for media, or navigate through the user interface using voice commands.
These are just a few examples of the possibilities with voice-controlled projects using the Raspberry Pi and a microphone. The combination of the Raspberry Pi’s processing power, audio processing libraries, and speech recognition capabilities opens up a wide range of creative and interactive applications.

FAQs
-
What is the best microphone for the Raspberry Pi?
The best microphone for the Raspberry Pi depends on your specific requirements, budget, and project needs. USB microphones like the Blue Yeti or Audio-Technica AT2020USB+ offer excellent audio quality and ease of use. For embedded projects, I2S microphones like the Adafruit I2S MEMS Microphone or the InvenSense ICS-43434 are popular choices due to their compact size and digital output. -
Can I use multiple microphones with the Raspberry Pi?
Yes, you can use multiple microphones with the Raspberry Pi. If you are using USB microphones, you can connect multiple microphones to the available USB ports. For I2S microphones, you can daisy-chain multiple microphones together using the I2S bus. However, keep in mind that using multiple microphones simultaneously may require additional configuration and processing power. -
How can I improve the audio quality of my Raspberry Pi microphone setup?
To improve the audio quality of your Raspberry Pi microphone setup, consider the following tips: - Use a high-quality microphone that suits your application and budget.
- Ensure proper microphone placement to minimize background noise and echo.
- Use a pop filter or windscreen to reduce plosives and wind noise.
- Adjust the microphone gain and sensitivity settings to optimize the audio input level.
-
Apply audio processing techniques like noise reduction, equalization, or compression to enhance the recorded audio.
-
What is the latency of microphone input on the Raspberry Pi?
The latency of microphone input on the Raspberry Pi depends on various factors, including the microphone type, audio interface, and software configuration. USB microphones typically have a latency of around 5-20 milliseconds, while I2S microphones can achieve lower latencies due to their direct connection to the GPIO pins. The actual latency may vary based on the specific setup and audio processing pipeline. -
Can I use the Raspberry Pi for real-time audio processing?
Yes, the Raspberry Pi is capable of real-time audio processing, depending on the complexity of the processing tasks and the available computing resources. Libraries like PyAudio and PortAudio enable low-latency audio input and output, allowing for real-time audio processing. However, for demanding audio processing tasks or low-latency applications, you may need to optimize your code and consider using a more powerful Raspberry Pi model or additional hardware accelerators.
Conclusion
Integrating a microphone with your Raspberry Pi opens up a world of possibilities for audio-related projects and applications. Whether you are building a voice-controlled home automation system, developing a personal voice assistant, or experimenting with audio analysis and speech recognition, the Raspberry Pi provides a flexible and affordable platform to bring your ideas to life.
In this article, we explored the different types of microphones compatible with the Raspberry Pi, including USB microphones, analog microphones connected via the audio input jack, and I2S microphones. We provided step-by-step instructions on how to connect and configure each type of microphone, along with code examples demonstrating audio recording and processing using popular libraries like PyAudio and librosa.
Furthermore, we discussed various audio processing libraries and tools available for the Raspberry Pi, such as PyAudio for audio input/output, librosa for music and audio analysis, and SpeechRecognition for speech recognition tasks. These libraries empower you to analyze, manipulate, and extract meaningful information from the captured audio data.
We also presented several project ideas that combine the Raspberry Pi, microphones, and audio processing techniques to create voice-controlled applications, such as home automation systems, voice-activated robots, personal voice assistants, and voice-based security systems. These projects showcase the potential of leveraging the Raspberry Pi’s capabilities in conjunction with microphones to build interactive and intelligent systems.
As you embark on your journey of integrating microphones with the Raspberry Pi, remember to


Leave a Reply