What is a Cold Solder Joint?
A cold solder joint is a defective solder connection that occurs when the solder fails to melt and flow properly during the soldering process. This results in a dry, cracked, or incomplete bond between the solder and the surfaces being joined. Cold solder joints are a common issue in electronic assemblies and can lead to poor electrical conductivity, mechanical weakness, and eventual failure of the soldered connection.
Characteristics of a Cold Solder Joint
Cold solder joints exhibit several distinct characteristics that set them apart from properly soldered connections:
-
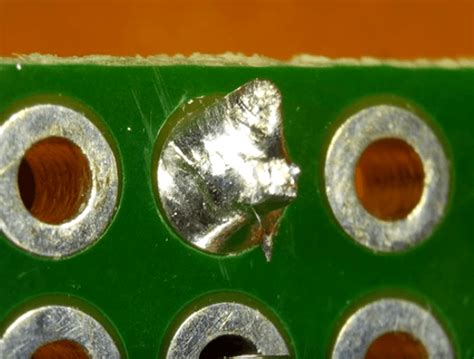
Dull or grainy appearance: A cold solder joint often appears dull, rough, or grainy, lacking the smooth and shiny surface of a well-soldered joint.
-
Cracked or incomplete solder fillets: The solder fillets (the concave meniscus of solder that forms between the component lead and the pad) may be cracked, incomplete, or absent in a cold solder joint.
-
High electrical resistance: Due to the poor bond between the solder and the surfaces, a cold solder joint exhibits higher electrical resistance compared to a properly soldered connection.
-
Mechanical weakness: Cold solder joints are mechanically weak and prone to cracking or breaking under stress or vibration.
Causes of Cold Solder Joints
Several factors can contribute to the formation of cold solder joints during the soldering process:
Insufficient Heat
One of the primary causes of cold solder joints is insufficient heat during the soldering process. If the soldering iron temperature is too low or the heat is not applied long enough, the solder may not melt completely or flow properly, resulting in a poor bond.
Dirty or Oxidized Surfaces
Contaminants such as dirt, grease, or oxidation on the surfaces being soldered can prevent the solder from adhering properly. These contaminants act as barriers, inhibiting the formation of a strong metallic bond between the solder and the surfaces.
Improper Fluxing
Flux is a chemical agent used to remove oxides and promote solder wetting during the soldering process. If insufficient flux is used or the flux is of poor quality, it may not adequately clean the surfaces, leading to poor solder adhesion and cold solder joints.
Incorrect Solder Composition
Using solder with an incorrect composition or alloy can also contribute to cold solder joints. Some solder alloys have higher melting points or require specific soldering temperatures and techniques. Using the wrong type of solder can result in incomplete melting and poor bonding.
Mechanical Disturbance
Moving or disturbing the components being soldered before the solder has fully solidified can cause the solder to crack or form a cold joint. It is important to keep the components stable until the solder has cooled and solidified completely.

Preventing Cold Solder Joints
To minimize the occurrence of cold solder joints, consider the following best practices:
-
Use the correct soldering temperature: Ensure that the soldering iron is set to the appropriate temperature for the type of solder being used. Consult the solder manufacturer’s recommendations for optimal soldering temperatures.
-
Clean and prepare the surfaces: Before soldering, clean the surfaces to be joined with isopropyl alcohol or a suitable solvent to remove any dirt, grease, or oxidation. Apply flux to the surfaces to promote solder wetting and improve adhesion.
-
Use quality solder and flux: Choose high-quality solder and flux that are appropriate for the application. Avoid using old or contaminated solder, as it may have degraded properties that can lead to cold solder joints.
-
Apply proper soldering technique: When soldering, apply heat to both the component lead and the pad simultaneously. Allow sufficient time for the solder to melt and flow properly, creating a smooth and shiny solder fillet. Avoid disturbing the components until the solder has cooled and solidified.
-
Inspect the solder joints: After soldering, visually inspect the solder joints for any signs of cold solder joints, such as dull appearance, cracks, or incomplete fillets. Use magnification aids if necessary to ensure the quality of the solder joints.

Repairing Cold Solder Joints
If a cold solder joint is detected, it is essential to repair it promptly to ensure the reliability and functionality of the electronic assembly. The repair process involves the following steps:
-
Remove the old solder: Use a desoldering tool, such as a desoldering pump or desoldering braid, to remove the old solder from the cold joint. Apply heat to the joint while using the desoldering tool to absorb the molten solder.
-
Clean the surfaces: After removing the old solder, clean the component lead and the pad with isopropyl alcohol or a suitable solvent to remove any residual solder or contaminants.
-
Apply flux and new solder: Apply fresh flux to the cleaned surfaces and reheat the joint with the soldering iron. Apply new solder to the joint, ensuring that it melts and flows properly, creating a smooth and shiny solder fillet.
-
Inspect the repaired joint: Allow the repaired joint to cool and solidify, then visually inspect it to ensure that the solder has bonded properly and there are no signs of a cold solder joint.

Consequences of Cold Solder Joints
Cold solder joints can have severe consequences on the performance and reliability of electronic assemblies:
Intermittent Electrical Connections
Cold solder joints can cause intermittent electrical connections, leading to erratic or unpredictable behavior in the electronic circuit. This can manifest as signal distortion, noise, or complete loss of functionality.
Increased Resistance and Power Dissipation
The high electrical resistance of cold solder joints can lead to increased power dissipation and heat generation at the joint. This can cause localized overheating, which can further degrade the solder joint and surrounding components.
Mechanical Failure
The mechanical weakness of cold solder joints makes them susceptible to cracking or breaking under stress or vibration. This can lead to complete failure of the soldered connection and potential damage to the associated components.
Reduced Reliability and Lifespan
Cold solder joints compromise the overall reliability and lifespan of electronic assemblies. They can cause premature failure of components and circuits, leading to costly repairs or replacements.
Inspection Methods for Cold Solder Joints
Several inspection methods can be employed to detect and assess cold solder joints:
Visual Inspection
Visual inspection is the most basic and widely used method for detecting cold solder joints. Inspectors use magnification aids, such as magnifying lenses or microscopes, to examine the solder joints for signs of defects, such as dull appearance, cracks, or incomplete fillets.
X-Ray Inspection
X-ray inspection is a non-destructive method that allows for the examination of solder joints hidden beneath components or within multi-layered assemblies. X-ray images can reveal voids, cracks, or other internal defects in the solder joints.
Automated Optical Inspection (AOI)
AOI systems use high-resolution cameras and advanced image processing algorithms to automatically inspect solder joints for defects. These systems can quickly scan large numbers of solder joints and identify potential cold solder joints based on predefined criteria.
Electrical Testing
Electrical testing methods, such as continuity testing or resistance measurement, can be used to assess the electrical integrity of solder joints. Cold solder joints typically exhibit higher resistance values compared to properly soldered joints.
Industry Standards and Guidelines
Several industry standards and guidelines provide recommendations for soldering practices and acceptance criteria for solder joints:
IPC-A-610
IPC-A-610, “Acceptability of Electronic Assemblies,” is a widely recognized standard that defines the acceptance criteria for solder joints in electronic assemblies. It provides visual examples and descriptions of acceptable and defective solder joints, including cold solder joints.
J-STD-001
J-STD-001, “Requirements for Soldered Electrical and Electronic Assemblies,” is a standard that specifies the requirements for materials, methods, and verification criteria for producing high-quality soldered interconnections. It includes guidelines for soldering processes, inspection, and repair of defective solder joints.
Manufacturer-Specific Guidelines
Many electronic component manufacturers provide their own guidelines and recommendations for soldering their components. These guidelines may include specific soldering temperatures, times, and techniques to ensure optimal solder joint quality and reliability.
Frequently Asked Questions (FAQ)
-
What is the main cause of cold solder joints?
The main cause of cold solder joints is insufficient heat during the soldering process. This can be due to a soldering iron temperature that is too low or not applying heat long enough for the solder to melt and flow properly. -
Can cold solder joints be repaired?
Yes, cold solder joints can be repaired by removing the old solder, cleaning the surfaces, and resoldering the joint with fresh solder and flux. However, it is important to address the underlying cause of the cold solder joint to prevent recurrence. -
How can I prevent cold solder joints?
To prevent cold solder joints, ensure that the soldering iron is set to the correct temperature, clean and prepare the surfaces before soldering, use quality solder and flux, apply proper soldering technique, and inspect the solder joints after soldering. -
What are the consequences of cold solder joints?
Cold solder joints can cause intermittent electrical connections, increased resistance and power dissipation, mechanical failure, and reduced reliability and lifespan of electronic assemblies. -
What industry standards provide guidelines for soldering practices?
IPC-A-610 and J-STD-001 are two widely recognized industry standards that provide guidelines and acceptance criteria for soldering practices and solder joint quality in electronic assemblies.
| Parameter | Acceptable Range |
|---|---|
| Soldering Iron Temperature | 315°C to 425°C |
| Soldering Time | 2 to 5 seconds |
| Solder Fillet Shape | Concave meniscus |
| Solder Fillet Coverage | 100% of lead and pad |
| Solder Joint Appearance | Smooth and shiny |
Table 1: Acceptable parameters for soldering process to avoid cold solder joints.
In conclusion, cold solder joints are a common defect in electronic assemblies that can lead to poor electrical and mechanical performance, as well as reduced reliability. By understanding the causes, prevention methods, and repair techniques for cold solder joints, manufacturers and technicians can ensure the production of high-quality soldered connections. Adhering to industry standards and best practices, such as IPC-A-610 and J-STD-001, can help minimize the occurrence of cold solder joints and improve the overall reliability of electronic products.


Leave a Reply