Introduction to DC Motors and Soft Starting
DC motors are widely used in various applications due to their simplicity, reliability, and easy control. However, starting a DC motor directly at full voltage can lead to high inrush currents and mechanical stress, which can damage the motor and reduce its lifespan. This is where soft starting comes into play. A DC Motor Soft Start is a technique that gradually increases the voltage applied to the motor during startup, reducing the initial current surge and providing a smooth acceleration.
In this article, we will explore the concept of DC motor soft starting, its benefits, and how you can create your own soft start circuit. We will also discuss various methods and components used in soft starting and provide practical examples and code snippets to help you implement your own soft start solution.
Benefits of DC Motor Soft Starting
- Reduced inrush current
- Prolonged motor life
- Smooth acceleration
- Reduced mechanical stress
- Improved system reliability
Understanding the Soft Start Process
Inrush Current and Its Effects
When a DC motor is started directly at full voltage, it experiences a high inrush current. This current surge occurs because the motor’s back EMF (Electromotive Force) is initially zero, allowing a large current to flow through the motor windings. The inrush current can be several times higher than the motor’s rated current, leading to the following issues:
- Overheating of motor windings
- Increased wear and tear on mechanical components
- Voltage drops in the power supply
- Tripping of circuit breakers or fuses
Gradual Voltage Ramping
The soft start process addresses these issues by gradually increasing the voltage applied to the motor over a specified time period. This gradual voltage ramping allows the motor to develop its back EMF and reduces the initial current surge. The soft start time can be adjusted based on the motor’s characteristics and the application requirements.
Soft Start Time Calculation
The soft start time depends on various factors, such as the motor’s inertia, load, and desired acceleration. A general rule of thumb is to set the soft start time to be at least 10 times the motor’s electrical time constant (τ). The electrical time constant is given by:
τ = L / R
Where:
– L is the motor’s inductance (in henries)
– R is the motor’s resistance (in ohms)
For example, if a motor has an inductance of 10 mH and a resistance of 2 ohms, the electrical time constant would be:
τ = 10 mH / 2 ohms = 5 ms
In this case, a soft start time of at least 50 ms would be recommended.

Soft Start Methods and Components
There are various methods and components used to implement DC motor soft starting. Let’s explore some of the most common ones:
1. Series Resistance
One of the simplest methods of soft starting is to connect a series resistance in line with the motor during startup. The resistance limits the initial current flow and gradually decreases as the motor accelerates. The series resistance can be a fixed value or a variable resistance, such as a potentiometer, to allow adjustable soft start times.
Example Circuit
2. PWM (Pulse Width Modulation)
PWM is a popular method for controlling the speed and torque of DC motors. It can also be used for soft starting by gradually increasing the PWM duty cycle from 0% to 100% over the desired soft start time. This method provides a smooth and controlled acceleration, and it can be easily implemented using a microcontroller or a dedicated PWM controller.
Example Code (Arduino)
const int motorPin = 9;
const int softStartTime = 1000; // Soft start time in milliseconds

void setup() {
  pinMode(motorPin, OUTPUT);
}

void loop() {
  softStart();
  delay(5000); // Run at full speed for 5 seconds
  digitalWrite(motorPin, LOW); // Stop the motor
  delay(2000); // Wait for 2 seconds before next soft start
}

void softStart() {
  for (int i = 0; i <= 255; i++) {
    analogWrite(motorPin, i);
    delay(softStartTime / 255);
  }
}
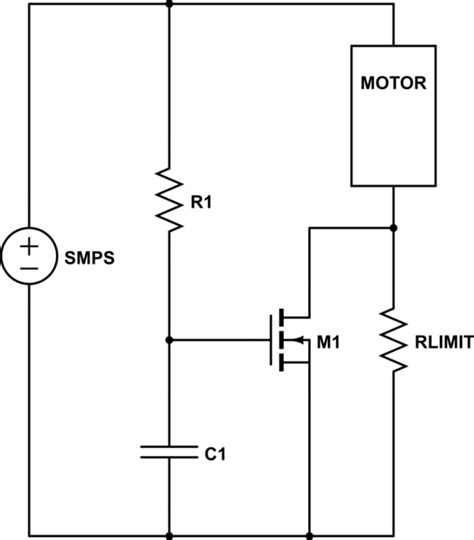
3. MOSFET-Based Soft Start
MOSFETs (Metal-Oxide-Semiconductor Field-Effect Transistors) can be used to create a voltage-controlled soft start circuit. By gradually increasing the gate voltage of the MOSFET, the motor voltage can be ramped up smoothly. This method offers precise control over the soft start process and can handle high currents.
Example Circuit
Comparison of Soft Start Methods
| Method | Advantages | Disadvantages |
|---|---|---|
| Series Resistance | Simple implementation, low cost | Fixed soft start time, power dissipation in the resistor |
| PWM | Smooth acceleration, easy to implement with microcontrollers | Requires additional components (microcontroller, driver) |
| MOSFET-Based | Precise control, handles high currents | More complex circuit, requires MOSFET and control circuitry |

Implementing Your Own Soft Start Circuit
Now that we have explored different soft start methods and components, let’s dive into creating your own soft start circuit. We will focus on the PWM-based approach using an Arduino microcontroller.
Step 1: Gather the Required Components
- Arduino board (e.g., Arduino Uno)
- DC motor
- Motor driver (e.g., L298N)
- Breadboard
- Jumper wires
- Power supply
Step 2: Connect the Components
- Connect the motor driver to the Arduino board:
- IN1 and IN2 of the motor driver to Arduino digital pins (e.g., pins 9 and 10)
- ENA of the motor driver to Arduino PWM pin (e.g., pin 11)
- GND of the motor driver to Arduino GND
- Connect the DC motor to the motor driver output terminals (OUT1 and OUT2).
- Connect the power supply to the motor driver’s power input (12V and GND).
Step 3: Write the Arduino Code
const int in1Pin = 9;
const int in2Pin = 10;
const int enAPin = 11;
const int softStartTime = 1000; // Soft start time in milliseconds

void setup() {
  pinMode(in1Pin, OUTPUT);
  pinMode(in2Pin, OUTPUT);
  pinMode(enAPin, OUTPUT);
}

void loop() {
  // Set motor direction (forward)
  digitalWrite(in1Pin, HIGH);
  digitalWrite(in2Pin, LOW);

  softStart();
  delay(5000); // Run at full speed for 5 seconds

  // Stop the motor
  digitalWrite(in1Pin, LOW);
  digitalWrite(in2Pin, LOW);
  delay(2000); // Wait for 2 seconds before next soft start
}

void softStart() {
  for (int i = 0; i <= 255; i++) {
    analogWrite(enAPin, i);
    delay(softStartTime / 255);
  }
}
Step 4: Upload the Code and Test
- Connect the Arduino board to your computer using a USB cable.
- Open the Arduino IDE and paste the code into a new sketch.
- Select the appropriate board and port in the Arduino IDE.
- Upload the code to the Arduino board.
- Observe the DC motor’s soft start behavior and adjust the soft start time if needed.

Frequently Asked Questions (FAQ)
1. What is the purpose of soft starting a DC motor?
Soft starting a DC motor helps reduce the initial current surge during startup, which can cause damage to the motor and other components. It also provides a smooth acceleration and reduces mechanical stress on the system.
2. Can I use soft starting with any DC motor?
Yes, soft starting can be applied to most DC motors, regardless of their size or power rating. However, the specific implementation and components may vary depending on the motor’s specifications and application requirements.
3. How do I determine the appropriate soft start time for my motor?
The soft start time depends on factors such as the motor’s inertia, load, and desired acceleration. A general rule of thumb is to set the soft start time to be at least 10 times the motor’s electrical time constant (τ), which is calculated as the motor’s inductance divided by its resistance.
4. Can I use soft starting with brushless DC motors (BLDC)?
Yes, soft starting can be applied to BLDC motors as well. However, the implementation is more complex compared to brushed DC motors due to the need for precise commutation control. BLDC motor controllers often include built-in soft start functionalities.
5. Are there any disadvantages to using soft starting?
One potential disadvantage of soft starting is the increased startup time compared to direct starting. Additionally, some soft start methods may require additional components or circuitry, which can increase the overall system complexity and cost. However, the benefits of soft starting often outweigh these disadvantages in most applications.
Conclusion
DC motor soft starting is a valuable technique for reducing inrush currents, prolonging motor life, and providing smooth acceleration. By understanding the principles behind soft starting and exploring different methods and components, you can create your own soft start circuit tailored to your specific application.
In this article, we covered the benefits of soft starting, the soft start process, and various implementation methods, including series resistance, PWM, and MOSFET-based approaches. We also provided practical examples and code snippets to help you get started with your own soft start implementation.
Remember to consider factors such as the motor’s characteristics, load requirements, and desired acceleration when designing your soft start circuit. With the knowledge gained from this article, you can confidently implement DC motor soft starting in your projects and enjoy the benefits of smooth and controlled motor acceleration.


Leave a Reply