Introduction to the LM386 Amplifier
The LM386 is a popular low-voltage audio power amplifier integrated circuit (IC) designed for use in low-power consumer applications. This versatile amplifier is widely used in various projects, ranging from portable audio devices to small-scale audio systems. In this comprehensive guide, we will delve into the details of the LM386 amplifier, exploring its features, applications, and how to effectively utilize it in your projects.
Key Features of the LM386 Amplifier
The LM386 amplifier boasts several key features that make it an attractive choice for audio applications:
- Low Voltage Operation: The LM386 can operate with a supply voltage ranging from 4V to 12V, making it suitable for battery-powered devices.
- Low Quiescent Current: With a typical quiescent current of only 4mA, the LM386 is energy-efficient and ideal for portable applications.
- Gain Adjustment: The amplifier’s gain can be easily adjusted using external components, allowing flexibility in design.
- Low Distortion: The LM386 provides good audio quality with low distortion, ensuring clear and accurate sound reproduction.
- Compact Size: The IC comes in a small 8-pin package, making it easy to integrate into space-constrained projects.
Understanding the LM386 Pinout
To effectively use the LM386 amplifier, it’s essential to understand its pinout and the function of each pin. The LM386 is available in two package variants: DIP-8 and SOIC-8. Let’s take a closer look at the pinout:
| Pin Number | Pin Name | Description |
|---|---|---|
| 1 | GAIN | Gain control pin (connected to pin 8 for 20x gain) |
| 2 | -INPUT | Inverting input |
| 3 | +INPUT | Non-inverting input |
| 4 | GND | Ground |
| 5 | VS | Positive supply voltage |
| 6 | BYPASS | Bypass pin for external capacitor (improves bass response) |
| 7 | VOUT | Amplifier output |
| 8 | GAIN | Gain control pin (connected to pin 1 for 20x gain) |
Gain Control
The LM386 offers two gain settings: 20x (26dB) and 200x (46dB). The gain is determined by the connection between pins 1 and 8:
- For a gain of 20x, pins 1 and 8 should be left open (not connected).
- For a gain of 200x, pins 1 and 8 should be connected through a 10μF capacitor.
It’s important to note that the higher gain setting may introduce more noise and distortion, so it’s recommended to use the lower gain setting unless the extra gain is necessary.

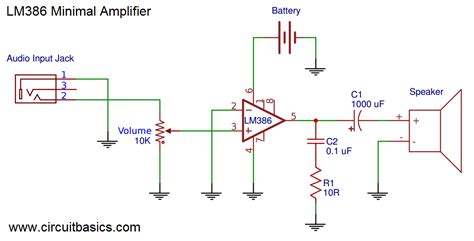
Basic LM386 Amplifier Circuit
Building a basic LM386 amplifier circuit is relatively straightforward. Here’s a step-by-step guide to creating a simple audio amplifier:
Components Required
- LM386 amplifier IC
- 10kΩ potentiometer (for volume control)
- 10μF capacitor (for gain control, if using 200x gain)
- 0.1μF capacitor (for input coupling)
- 220μF capacitor (for output coupling)
- 100nF capacitor (for power supply decoupling)
- 8Ω speaker
- Audio input source (e.g., microphone, mp3 player)
- Power supply (4V to 12V)
Circuit Diagram
Here’s a basic circuit diagram for an LM386 amplifier:
              +-----+
    Input >---| 0.1 |---+----+
              +-----+   |    |
                        |    |
                        |   +-+
                       +-+  | | 10k
                       |    | |
                       |   +-+
                       |    |
                      +-+   |
                      | |   |
                      | |   |
                      | |   |
                  +---|-|---+
                  |   | |   |
    10uF  +-------+   | |   |
    ___   |       |   | |   |
     |    |       |   | |   |
     +----+       |   | |   |
     |            |   +-+   |
     |            |    |    |
     |           +-+   |    |
     |           | |   |    |
     |           | |   |    |
     |           | |   |    |
     |          ++-++--+    |
     |          |8 7|6 +----+
     |  +-------+   +--+   +++
     |  | +-----+ LM386 +--| |  100nF
     |  | |1   5+-------+  | |
     |  | +--+--+   +--+   +-+
     |  |    |2     |4 +----+
     |  |    +------+    GND
     |  |       3  |
     |  |       +--+
     |  |       |
     |  |      +++
     +--+      | |  220uF
               | |
               +-+
                |
                |
                |
               +++
               | |
               | | 8 ohm
               | | Speaker
               +-+
                |
               GND
Step-by-Step Instructions
- Connect the positive terminal of the power supply to pin 5 (VS) of the LM386 and the negative terminal to pin 4 (GND).
- Place a 100nF capacitor between pin 5 (VS) and ground for power supply decoupling.
- Connect the audio input source to pin 3 (+INPUT) of the LM386 through a 0.1μF capacitor for input coupling.
- If using the 200x gain setting, connect a 10μF capacitor between pins 1 and 8. If using the 20x gain setting, leave pins 1 and 8 unconnected.
- Connect a 10kΩ potentiometer between pin 3 (+INPUT) and ground for volume control.
- Connect a 220μF capacitor between pin 5 (VS) and pin 7 (VOUT) for output coupling.
- Connect the positive terminal of the 8Ω speaker to pin 7 (VOUT) and the negative terminal to ground.
Once the circuit is assembled, power on the supply, and the LM386 amplifier should be ready to amplify the audio input signal.

Advanced LM386 Amplifier Configurations
While the basic LM386 amplifier circuit is suitable for most applications, there are several advanced configurations that can enhance the amplifier’s performance and functionality.
Bass Boost
To improve the bass response of the LM386 amplifier, you can add a capacitor between pin 6 (BYPASS) and ground. The value of the capacitor determines the amount of bass boost:
- 10μF capacitor: Moderate bass boost
- 100μF capacitor: Significant bass boost
Keep in mind that larger capacitor values will also increase the overall gain of the amplifier.
Tone Control
To add tone control to your LM386 amplifier, you can incorporate a simple passive tone control circuit using a potentiometer and capacitors. Here’s an example circuit:
              +-----+
    Input >---| 0.1 |---+----+
              +-----+   |    |
                        |    |
                        |   +-+
                       +-+  | | 10k (Volume)
                       |    | |
                       |   +-+
                       |    |
                      +-+   |
                      | |   |
                      | |   |
                      | |   |
                  +---|-|---+
                  |   | |   |
    10uF  +-------+   | |   |
    ___   |       |   | |   |
     |    |       |   | |   |
     +----+       |   | |   |
     |            |   +-+   |
     |            |    |    |
     |           +-+   |    |
     |           | |   |    |
     |           | |   |    |
     |           | |   |    |
     |          ++-++--+    |
     |          |8 7|6 +----+
     |  +-------+   +--+   +++
     |  | +-----+ LM386 +--| |  100nF
     |  | |1   5+-------+  | |
     |  | +--+--+   +--+   +-+
     |  |    |2     |4 +----+
     |  |    +------+    GND
     |  |       3  |
     |  |       +--+
     |  |       |
     |  |      +-+
     |  |      | | 10nF
     |  |      | |         +-+
     +--+      +-+         | | 50k (Treble)
               | |         | |
               | |        +-+
               | |         |
               | |        +++
               | |        | |
               | |        | | 4.7uF
               | |        | |
               +-+        +-+
                |          |
                |         +++
                |         | |
               +++        | | 50k (Bass)
               | |        | |
               | | 220uF  +-+
               | |         |
               +-+        GND
                |
               GND
In this configuration, the 50kΩ potentiometers control the treble and bass frequencies, while the 10nF and 4.7μF capacitors set the frequency range for each control.
Multiple Speakers
To drive multiple speakers with the LM386 amplifier, you can connect them in parallel or series, depending on their impedance and the desired output power. When connecting speakers in parallel, ensure that the total impedance is not lower than the minimum recommended load for the amplifier (typically 4Ω for the LM386).
For example, if you have two 8Ω speakers, connecting them in parallel will result in a 4Ω load, which is suitable for the LM386. If you connect them in series, the total impedance will be 16Ω, which may reduce the output power but can still work with the amplifier.

LM386 Amplifier Applications
The LM386 amplifier’s versatility makes it suitable for a wide range of applications, including:
-
Portable Audio Devices: The LM386’s low power consumption and compact size make it ideal for use in portable speakers, headphone amplifiers, and small-scale audio systems.
-
Guitar Amplifiers: The LM386 can be used to build simple guitar amplifiers for practice or small performances.
-
Intercom Systems: With its ability to amplify audio signals, the LM386 can be employed in DIY intercom systems for homes or small offices.
-
Audio Mixers: The LM386 can be utilized in compact audio mixers for blending multiple audio sources.
-
Sensor Projects: In projects involving sound-based sensors (e.g., microphones), the LM386 can amplify the sensor’s output for further processing or triggering actions.
Troubleshooting Common LM386 Issues
When working with the LM386 amplifier, you may encounter some common issues. Here are a few troubleshooting tips:
- No Sound Output:
- Check the power supply connections and ensure that the voltage is within the specified range (4V to 12V).
- Verify that the audio input source is properly connected and functioning.
-
Ensure that the speaker is connected correctly and not damaged.
-
Distorted Sound:
- Reduce the gain by using the 20x setting instead of the 200x setting.
- Check for loose connections or damaged components in the circuit.
-
Ensure that the input signal is not clipping or distorted.
-
Excessive Noise:
- Use shielded cables for the audio input to minimize interference.
- Place the 100nF decoupling capacitor close to the LM386 power supply pin.
-
Consider adding a resistor (e.g., 1kΩ) in series with the input signal to reduce noise.
-
Low Volume:
- Increase the gain by using the 200x setting instead of the 20x setting.
- Check the volume control potentiometer and ensure it’s functioning properly.
- Verify that the input signal level is sufficient.
By carefully examining the circuit and following these troubleshooting tips, you should be able to resolve most common issues with the LM386 amplifier.
LM386 Amplifier Alternatives
While the LM386 is a popular choice for low-power audio amplification, there are several alternatives available that may better suit specific applications or requirements. Some notable alternatives include:
-
PAM8403: This is a class-D audio amplifier IC that offers higher efficiency and output power compared to the LM386. It can deliver up to 3W of power per channel with a 5V supply.
-
TDA7297: The TDA7297 is a dual-channel audio amplifier IC capable of delivering up to 15W of power per channel with a 12V supply. It features built-in thermal and short-circuit protection.
-
TPA3116D2: This is a class-D audio amplifier board based on the TPA3116D2 IC. It can provide up to 50W of power per channel with a 12V to 24V supply, making it suitable for higher-power applications.
-
LM4871: The LM4871 is a low-voltage, single-supply audio power amplifier IC that can deliver up to 0.25W of continuous output power with a 3V supply. It’s a good choice for ultra-low-power applications.
When considering alternatives, factors such as power requirements, available board space, and specific project needs should be taken into account to select the most appropriate amplifier for your application.
FAQ
-
Q: What is the maximum output power of the LM386 amplifier?
A: The maximum output power of the LM386 depends on the supply voltage and load impedance. With a 9V supply and an 8Ω load, the LM386 can deliver approximately 0.5W of output power. -
Q: Can the LM386 be used with a single-ended power supply?
A: Yes, the LM386 is designed to operate with a single-ended power supply ranging from 4V to 12V. -
Q: How can I adjust the volume of the LM386 amplifier?
A: To adjust the volume, you can use a potentiometer connected to the input signal. By varying the resistance of the potentiometer, you can control the input signal level and, consequently, the output volume. -
Q: Is it possible to bridge two LM386 amplifiers for higher output power?
A: While it is theoretically possible to bridge two LM386 amplifiers, it is not recommended, as the IC is not designed for bridged operation. It’s better to consider alternative amplifiers with higher output power ratings if needed. -
Q: Can the LM386 be used for stereo audio amplification?
A: Yes, you can use two LM386 ICs to build a stereo audio amplifier, with each IC amplifying one channel (left and right).
Conclusion
The LM386 low-voltage audio power amplifier is a versatile and widely-used IC that offers a simple and cost-effective solution for various audio applications. With its low quiescent current, adjustable gain, and good audio quality, the LM386 is well-suited for portable devices, small-scale audio systems, and DIY projects.
By understanding the LM386’s pinout, basic circuit configuration, and advanced techniques like bass boost and tone control, you can effectively incorporate this amplifier into your designs and optimize its performance to meet your specific requirements.
While the LM386 is a reliable choice for many applications, it’s essential to consider factors such as power requirements and project constraints when selecting an amplifier. Alternative ICs like the PAM8403, TDA7297, TPA3116D2, and LM4871 may be more suitable for certain projects.
By following the guidelines and troubleshooting tips provided in this comprehensive guide, you should be well-equipped to work with the LM386 amplifier and create successful audio projects. Remember to always prioritize safety, double-check connections, and test your circuits thoroughly to ensure optimal performance and reliability.


Leave a Reply