What is Capacitor Leakage and Why Test for It?
Capacitors are two-terminal electronic components that store electric charge. In an ideal capacitor, no current flows between the terminals when a DC voltage is applied. However, real-world capacitors are not ideal. They allow a small amount of current, called leakage current, to flow.
Some leakage current is normal and expected. But if a capacitor’s leakage exceeds its specifications, that indicates it is defective. Excessive leakage will prevent the capacitor from performing its intended function in the circuit.
There are a few reasons why capacitors can develop excessive leakage:
- Manufacturing defects
- Degradation over time
- Exposure to heat, overvoltage, or other stresses
- Physical damage
Leaky capacitors can cause problems like:
- Inaccurate timing in circuits like oscillators and filters
- Failure to block DC in coupling circuits
- Overheating and catastrophic failure
- Battery drain in devices
To avoid these issues, it’s important to test capacitors, especially in critical or high-reliability applications. Leakage testing can be done:
- As an incoming quality control check for new parts
- During troubleshooting to diagnose circuit problems
- As part of preventative maintenance to detect degraded caps
Types of Capacitor Leakage Testers
There are a few different instruments that can be used to measure capacitor leakage:
Insulation Resistance Tester
Also known as a megohmmeter or “megger”, an insulation resistance tester measures resistance up to tens of thousands of megaohms. It applies a high DC voltage, typically 50-1000V, and measures the resulting current flow.
To test capacitor leakage with an insulation resistance tester:
- Safely discharge the capacitor
- Connect the tester leads to the capacitor terminals
- Apply voltage for the specified test time (usually 1-10 min)
- Read the insulation resistance in megaohms
- Compare to the minimum acceptable value for the capacitor
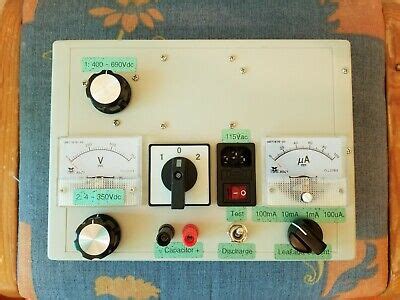
Dedicated Capacitor Leakage Tester
For more convenient testing, you can use a dedicated capacitor leakage tester. These specialized instruments are optimized for cap leakage measurement. They have features like:
- Capacitor-safe test voltages
- Automatic charge/discharge of capacitor
- Direct readout of leakage current in microamps or nanoamps
- Pass/fail comparison to selectable leakage limits
- Ability to test multiple caps in a batch
Using a dedicated cap leakage tester is straightforward:
- Select an appropriate test voltage (below the cap’s rated voltage)
- Connect the tester to the capacitor
- Initiate the test
- Read the leakage current and pass/fail result
Multimeters with Capacitor Test Function
Some digital multimeters (DMMs) include a basic capacitor test function that can measure leakage. These typically only work for caps up to a few hundred microfarads. The test voltages are also relatively low, around 3-20V.
To test leakage with a DMM:
- Set the meter to capacitance mode
- Connect the probes to the capacitor
- Note the capacitance reading
- Wait at least 30 seconds
- Check if the reading is stable or drifts upwards (indicating leakage)
This simple test can detect gross leakage failures. But for a definitive leakage measurement, use an insulation tester or dedicated cap leakage meter.

How Capacitor Leakage Testers Work
To understand how capacitor leakage testers work, let’s first review what happens inside a capacitor.
A capacitor consists of two conductive plates separated by an insulating dielectric material. When a voltage is applied, electric charge builds up on the plates. Positive charge collects on one plate and negative charge on the other.
Ideally, the dielectric blocks all current flow between the plates. But in reality, a small leakage current flows through the dielectric. This is due to the dielectric not being a perfect insulator.
The leakage current depends on a few factors:
- Dielectric material properties
- Capacitor design and construction
- Applied voltage
- Temperature
A capacitor leakage tester works by applying a known DC voltage across the capacitor and measuring the resulting leakage current. The tester includes a precision current measurement circuit to detect very small leakage currents, typically in the microamp to nanoamp range.
Leakage testers use various techniques to apply the test voltage:
- Some use the AC line with a step-up transformer and rectifier
- Battery-powered testers generate the test voltage with a boost converter
- Lab-grade instruments have linear regulated power supplies
To measure the leakage current, the tester essentially functions as a sensitive ammeter. It may use:
- A shunt resistor to convert the leakage current to a voltage drop
- An operational amplifier to convert the current to a voltage
- An integrating ADC to directly totalize the charge transferred over time
Some testers also include a circuit to automatically charge and discharge the capacitor at the start and end of the test. This is for safety and to ensure the cap starts the test in a known state.
The measured leakage current is then compared to the acceptable value for the capacitor under test. This may be:
- A fixed limit selected on the tester (e.g. 1µA, 10µA, 100µA)
- A calculated value based on the capacitor’s specifications
- A user-defined limit programmed into the tester
If the leakage current is below the limit, the capacitor passes. If it exceeds the limit, the cap is defective and should be replaced.

How to Use a Capacitor Leakage Tester
Using a capacitor leakage tester is generally straightforward, but there are a few important points to keep in mind. Always follow the manufacturer’s instructions for your particular tester. But in general, the basic procedure is:
-
Safety first: Disconnect power and discharge the capacitor before connecting the tester. High-voltage caps can store a dangerous charge.
-
Set up the tester:
- Select a test voltage below the capacitor’s rated voltage. Higher voltage stresses the dielectric more and reveals borderline failures. But never exceed the cap’s max voltage rating.
- Choose a leakage current limit based on the capacitor specs or the circuit requirements.
- For multicap batch testing, set the number of capacitors.
-
Connect the tester leads to the capacitor terminals. Observe polarity if applicable.
-
Start the test. The tester will charge the cap to the test voltage, wait for a specified “soak” time, then measure the leakage current.
-
Read the test result. The tester will display the leakage value and indicate a pass or fail.
-
Disconnect the tester and discharge the capacitor before reconnecting it to the circuit.
Some tips for effective capacitor leakage testing:
- Test at room temperature (25°C) unless investigating temperature effects
- Ensure the capacitor is fully discharged before testing, especially for high-value electrolytics
- For critical applications, consider testing at multiple voltages to simulate real-world stresses
- Keep records of leakage measurements to track degradation over time
- Use a Kelvin (4-wire) connection for high-accuracy low-current measurements
With practice, capacitor leakage testing will become a quick and easy way to diagnose faulty capacitors and keep your circuits running reliably.

Frequently Asked Questions About Capacitor Leakage Testing
What is a “good” capacitor leakage value?
The acceptable amount of leakage current depends on the capacitor type, value, and application. Refer to the manufacturer’s datasheet for the maximum leakage specification.
In general, smaller capacitors should have less than 1µA of leakage at their rated voltage. Larger caps may allow up to 10µA or more.
Ultimately, the leakage limit comes down to the needs of the circuit. For example, a sample-and-hold circuit needs lower leakage than a simple power supply filter.
How long does a capacitor leakage test take?
The test time depends on the capacitor value and the characteristics of the tester. Small caps may only need a few seconds of “soak” time at the test voltage. High-value electrolytics could require several minutes for the leakage current to stabilize.
Testers usually have a default test time that can be adjusted based on the application. A good practice is to test for about 5 time constants (5RC) to allow the cap to fully charge.
Can you test capacitor leakage in-circuit?
Ideally, capacitors should be isolated from the circuit for leakage testing. In-circuit resistance paths can conduct some of the test current, affecting the results.
However, in some cases, in-circuit testing is possible if the parallel resistance is much higher than the expected leakage resistance. Comparison to a known-good board can also be useful.
If in doubt, unsolder one end of the capacitor to ensure a valid leakage test.
What causes capacitors to develop leakage?
Capacitor leakage can increase due to various factors:
– Manufacturing defects that damage the dielectric layer
– Electromechanical stress from high voltage or current spikes
– Exposure to high temperatures which accelerates dielectric breakdown
– Aging and degradation of the dielectric material over the capacitor’s life
– Physical damage from shock, vibration, or PCB flexing
While some increase in leakage is inevitable as capacitors age, proper component selection, circuit design, and environmental controls can minimize premature failures.
What happens if you use a leaky capacitor?
A capacitor with excessive leakage can cause performance and reliability issues:
– Inaccurate timing in oscillators, filters, and integrators
– Failure to block DC voltages in coupling and decoupling applications
– Overheating and further damage due to power dissipation
– Battery drain in portable devices
– Catastrophic short-circuit failure under high voltage stress
Leakage failures can be tricky to diagnose since the capacitor may still have the correct capacitance value. Leakage testing is an important part of any capacitor maintenance program.
Conclusion
We’ve covered the basics of capacitor leakage testing and how to effectively use a capacitor leakage tester. This powerful tool is invaluable for finding defective capacitors that can cause hard-to-diagnose circuit issues.
By understanding the different test methods, procedures, and failure modes, you’ll be well-equipped to keep your capacitors healthy and your circuits running strong. So don’t neglect this critical component of your electronic troubleshooting arsenal!


Leave a Reply